
170mm Fork on Ibis Ripmo
We’ve been getting a ton of interest in what a 170mm Fork on Ibis Ripmo, both V1 and V2, is all about. Well, there are a handful of things you’re looking at. Let’s skip the flowery verbiage and jump right in.
170mm Fork on Ibis Ripmo
The current supply (and it changes daily!) of Ripmo V1 have a lot of people wondering about running 170mm forks to blur the lines between V1 and V2. This creates a slacker headtube angle as well as a longer wheelbase. Both are changes we see in evolving geometry. Lets’ look at the Ripmo wheelbase and headtube changes.
First let’s break down the method we use to get our results. (or feel free to skip to the results if you figure we’ve got it!)
Triangles are amazing. With 3 data points you can extrapolate the remaining sides or angles. Pretty rad right?
So let’s create a simple triangle with geometry provided on the Ripmo.
Calculating Headtube and Wheelbase Change
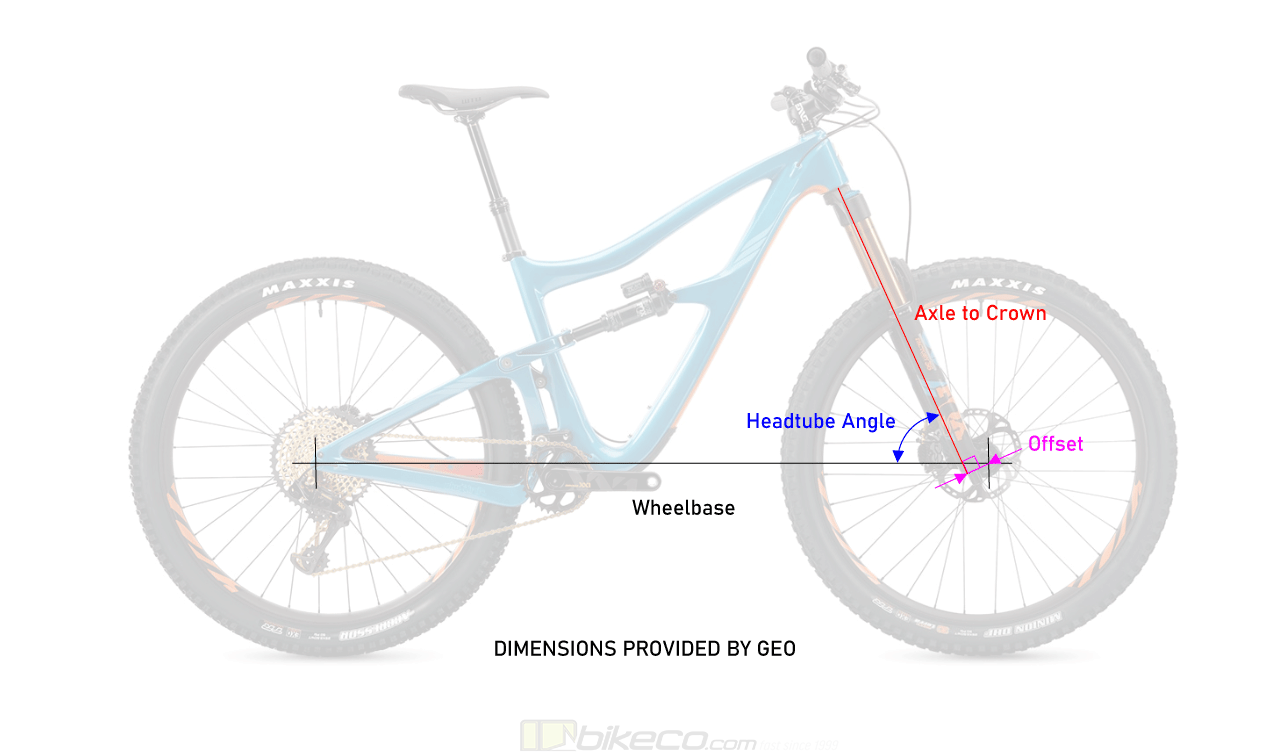
Each size (S, M, L & XL) has a specific wheelbase. Axle to crown, fork offset and headtube angle are static across the size run.

Using the provided wheelbase, headtube angle and axle to crown there are formulas to calculate the remainder of this triangle.
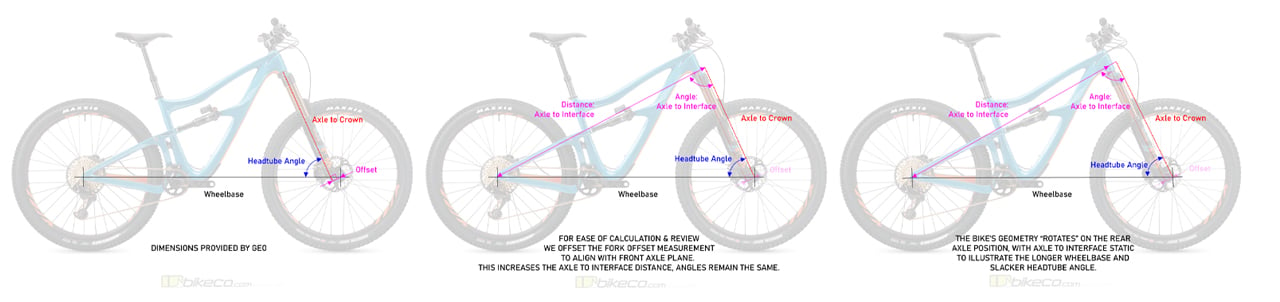
For each size the purple dimensions will be static. These dimensions, along with the increase to the axle to crown, allow us to calculate the revised wheelbase and headtube angle.

To simplify the equation we will offset the fork offset measurement.
This allows a single triangle to calculate the revised wheelbase. It increases the axle to headtube / steer tube interface dimension (projecting it outside the physical frame – but allowed in math) which then becomes the new static dimension for comparison.

Example: Size Large Ripmo V1
To calculate the axle to interface dimension and angle we use 567.1 mm for the 160 mm axle to crown, 65.9 degree headtube as well as 1220 mm wheelbase.
Now, I could spend a bunch of time explaining the formulas you find here (link opens in new window). But, I like our readers and will link you to a triangle calculator that definitely speeds the process here (link opens in new window).
Our Axle to Interface Distance calculates at 1,115.79 mm. The corresponding axle to interface angle is 86.5 degrees. Now, these dimensions are important. They stay the same no matter what we do to the fork height. The frame doesn’t shrink, stretch or bend. It stays the same size (length between axle and interface) and shape (angle that the fork engages the frame’s headtube).
However it does rotate, but not quite yet for this example.
Almost there…
We extend the fork axle to crown for a 170 mm fork. The axle to crown now measures 577.1mm.

Here you see the modified triangle. Obviously the front axle is too low (although your calculations on wheelbase and headtube are correct at this point if you’ve entered them).
So, we rotate the triangle from the center point on the rear hub and reset the front axle at an equal height to the rear axle.

Exaggerated example, but you get the idea.
So for our Large Ripmo V1 with a 170 mm fork we come up with 1,224.12 mm wheelbase and revised headtube angle of 65.47 degrees. Disclaimer: I’m sure there is some variance here based on how far behind the decimal, etc, etc, but that’s the math based on the supplied data…
Another thing to take into account – since we’re adding fork and rotating on the rear axle the wheelbase and headtube variations will change slightly different for all sizes.
Let’s look at the numbers then get deeper into what it all means.
Ibis Ripmo 160mm Fork (V1)
All headtube angles 65.9 degrees
Wheelbase: S – 1177, M – 1195, L – 1220, XL – 1249
Ibis Ripmo 170mm Fork (V1)
Small – Wheelbase 1,181.11 mm (0.35% longer), Headtube 65.46 degrees
Medium – Wheelbase 1,199.12 mm (0.34% longer), Headtube 65.46 degrees
Large – Wheelbase 1,224.12 mm (0.34% longer), Headtube 65.47 degrees
X-Large – Wheelbase 1,253.12 mm (0.33% longer), Headtube 65.48 degrees
So you could “safely” say a 170mm fork on an Ripmo V1 slackens the bike 0.4 degrees. Well, since the V2 is a degree slacker with an air spring you’ve suddenly almost halved the headtube angle difference.
Let’s look at the Ripmo V2 under the same light.
Ibis Ripmo V2 160mm Fork
All headtube angles 64.9 degrees
Wheelbase: S – 1187, M – 1219, L – 1238, XL – 1267
Ibis Ripmo V2 170mm Fork
Small – Wheelbase 1,191.28 mm (0.36%), Headtube 64.47 degrees
Medium – Wheelbase 1,223.28 mm (0.35%), Headtube 64.48 degrees
Large – Wheelbase 1,242.28 mm (0.35%), Headtube 64.48 degrees
X-Large – Wheelbase 1,271.27 mm (0.34%), Headtube 64.49 degrees
Let’s say a .5 degree headtube change to run the taller fork on the Ripmo V2. Like the Ripmo V1 at right around 1/3 of a percent I would say the wheelbase increase is minimal.
So what else changes when we increase the axle to crown, or fork travel? Well, a lot actually…
Bottom bracket height increases slightly and rotates slightly backwards decreasing chainstay (very slightly).
Trail measurement increases. (a previous article on the Yeti SB130 Lunch Ride 150 vs 160 fork option helps explain) The Trail and Wheel Flop are actually some of the most changed dimensions with this change. Ibis lists the Ripmo V1 with 160mm fork to have a Trail measurement of 118mm. The Ripmo V2 with a 1 degree slacker headtube angle measures 125mm according to Ibis. That’s about 5.5% different…
Your stack gets taller (using the same spacer setup).
The reach gets shorter. And the bigger size bikes shorten more than the smaller ones. A longer item “leans” further than a shorter one at the same angle. If you lean a broom over the end of the broom is much further from the bristles on the ground than the middle. Or, the Leaning Tower of Pisa is much less impressive / noticeable if it’s you know, 1 story.
Let’s look at another set of triangles to expand on this just a little bit.
Grip Center to BB & Axle Centers
Here we put a cockpit on the geo (working only in 2d, so overlaid on the center of the bike). I’m not getting masters or doctoral credit for this, so I left out handlebar backsweep…
We add an estimated large headtube 110mm, a few mm for headset, some for spacers, half the height of the stem and the rise of the bars. I’m calling it 188mm. For this example I’m going to have the stem length and backsweep equal 44mm, effectively canceling the offset calculation for now.

Now we’ve modified the triangle and can look at a couple other factors that I find intriguing.

OK, our revised triangle allows us to look at a modified stack and reach (which takes into account this cockpit dimension). Then using the wheelbase and chainstay measurements we have a couple other data points to look at. I’ve called them Grip Center to BB Center and Grip Center to Front Axle Center. If it ends up being a more utilized geo reference I’m sure it will get some crazy name (ask Joe or Cody Kelly about ‘the people’s reach’ sometime…)
OK so some numbers based on this concept.
Large Ripmo V1 160mm fork
Wheelbase 1220 mm (from Ibis)
Headtube 65.9 degrees (from Ibis)
Chainstay 435 mm (from Ibis)
Vertical Grip Center from Axles: 689.3 mm (calculation: right triangle)
Horizontal Grip Center to Axle: 308.3 mm (calculation: right triangle)
Horz. Grip Cen to BB Cen: 476.7 mm (calculation: WB – Chainstay – Hor Grip Cen to Axle)
Large Ripmo V1 170mm fork
Wheelbase 1224.1 mm (calculation)
Headtube 65.5 degrees (calculation)
Chainstay 433.7 mm* (quick calculation of 1/3 of a percent change – similar to discovered on wheelbase change. good enough for conversation, don’t send a mission to mars on it…)
Vert. Grip Cen to Axles: 696.21 mm (calculation: right triangle)
Horz. Grip Cen to Axle: 317.3 mm (calculation: right triangle)
Horz Grip Cen to BB: 473.4 mm (calculation)
Large Ripmo V2 160mm fork
Wheelbase 1238 mm (from Ibis)
Headtube 64.9 degrees (from Ibis)
Chainstay 435 mm (from Ibis)
Vert. Grip Cen to Axles: 683.8 mm (calculation: right triangle)
Horz. Grip Cen to Axle: 320.31 mm (calculation: right triangle)
Horz Grip Cen to BB: 482.7 mm (calculation)
Large Ripmo V1 170mm fork
Wheelbase 1242.28 mm (calculation)
Headtube 64.5 degrees (calculation)
Chainstay 433.7 mm* (quick calculation of 1/3 of a percent change – similar to discovered on wheelbase change. good enough for conversation, don’t send a mission to mars on it…)
Vert. Grip Cen to Axles: 690.6 mm (calculation: right triangle)
Horz. Grip Cen to Axle: 329.4 mm (calculation: right triangle)
Horz Grip Cen to BB: 479.2 mm (calculation)
So what’s it all mean?
That branch is too thin to step out on now, especially as we’re already nearly 1300 words in. I’d speculate, and I’ll leave this to the designers and mule test riders, but my speculation is that balancing wheel “feel” or balance is the new holy grail on bike design. (Of course assuming you have good suspension – shit suspension is a shit product…) Essentially the compromise on how to best balance the weight on the wheels for a wide range rider sizes and terrain is the challenge. How steep of terrain will the bike typically live in? How quick will the direction changes be?
Dialing in trail, chainstay, front center, distance from grip center, headtube angle and how a suspension works – it’s a lot to try to find the middle ground on.
Deciding where that balancing point is – well there are a lot of people working really hard on that for you! Our role is to dial in the best bikes on the market for our riders. My job is to help clients understand the basics of what’s going on, kind of a reverse engineering storyteller. I’ll let others design and develop them for now..
So you read all this and got nothing? I hope not…
170mm Fork on Ibis Ripmo
Hopefully you learned a bit about how a taller fork slackens headtube, shortens reach and increases stack. You may have to modify your cockpit accordingly when you play with fork travel. BTW it also slackens and moves your saddle position. If you have SUPER long legs this can actually be a pretty big deal due to the extended length. But another conversation for another day.
You’ve seen that a 170mm air shaft on the Ibis Ripmo V1 can blur the headtube angle between stock and the new Ripmo V2. Looking at the wheelbase, front center, grip centers, etc you can see that along with the slacker headtube the Ripmo V2 is a bit longer overall which will help it’s footing at big speeds. It’s trail measurement is nearly 6% bigger 160mm fork to 160mm fork. You can go down a ton of rabbit holes on wheel flop, etc…
One of the factors that sets BikeCo.com apart from our competition is the understanding of these concepts as well as the ability to dial our clients in for the ultimate fit. We invite you to work with the best – the best spec, setup, service, tunes, after sales service and pricing in MTB.
See you on the trail! Nate at BikeCo.com
Fascinating piece. Genuinely appreciate the effort! Was wondering how different offsets might affect steering feel as well. Using the V2 as an example, would a 170mm with 51mm offset approximate a 160mm with 44mm offset in trail? Would you then have more travel without too much change in steering feel?
You know, while trail is definitely a factor if I had to put money down I’d be looking at wheel flop. There’s a formula we’ve used a handful of places in blogs about it (and wikipedia has it listed in an article about how to calculate trail for bikes / motos). The percentage of change in wheel flop makes the most sense to me as a “personality” factor so to speak. That’s to say that these bikes do have tremendously different feelings changing directions – more than one might attribute to just trail. But, then you have to think, well how much steering input to I actually use? Now that I start thinking about all of this typically when I really need to force a direction change I’m going to countersteer more and push with my feet. Which would use the wheel flop in the opposite direction… so many factors!! Guess that’s why it’s fun to play around with between rides.