
MTB Riding Tips – Good Practices and Techniques for MTB Riders
Here at BikeCo.com we work with a wide variety of riders. From pro racers, seasoned experts all the way to first bike purchasers. We thought it would be useful for riders to have a singular place to reference for tips to take their trail experience to the next level.
We plan aupdates to this blog so check back frequently!
Jump to page
3/2/18 Putting Together a Line, Easy on the Front Brake
3/9/18 Adding Suspension through Movement
3/16/18 Weight Back, Heels Down
3/23/18 Body Positioning in Corners
2/23/18
Ride at 70% of your capacity
Enjoy riding? Don’t want to miss time off your bike? We feel the same. One way to ensure you miss rides is to injure out. Crashing a mountain bike is probably going to happen now and then, but the less you let it happen the happier you will be. Ride at 70% of your capacity and you will always have 30% left for the unexpected or mistakes. Your 70% will become more and more competent, i.e. faster and faster while keeping you upright more often than going harder. Riding well within your control will probably expand riders willing to go out on trail with you too – no one wants to use their limited ride time constantly playing paramedic for the reckless one.
Scan the trail, See the line
A super common mistake is dropping your vision attempting to see every, single, possible detail about the terrain you’re riding. Reality is a properly setup mountain bike is quite capable. If you allow the bike to do its’ thing it will often surprise you. When in doubt settle a bit rearward on the bike to lighten the front end and stay loose. Don’t fight every small wiggle in the dirt. Learn to let the bike move a bit under you while remaining focused forward on where the bike will be, not where it is. Riding at night is an excellent way to learn not to sweat every little thing. You won’t see every little thing anyhow and your bike will move beneath you!

Keep Your Head Up!
The left image makes me feel like I’m about to go over the bars. Partly, because you tend to go where you look. Also staring down at the wheel tends to increase the next obstacle’s difficulty, which leads to riders cranking on a front brake diving the front end. (There is no terrain issues in this photo – I was trying to stop somewhere I wouldn’t be in the way to get quick pics!)
On the right the trail is much easier to scan allowing more confidence. You’re going to see an obstacle sooner providing much more time to decide what to do. You’ll see other riders, hikers, animals and be able to deal with them easily rather than surprised terror slides on full locked brakes.
Even looking at the left image on my computer gives me a super uneasy feeling.
The right is much more natural – scan forward, look for movement, see the line and go.
See the line. Whether on a mountain bike, motorcycle, racecar where you look is almost always where you go. Stare at the “scary” thing on the trail (or track) and you’re going to drift at it. It’s an amazing fact.

Look Where You Want To Be
Riders who lock onto the roots in the image above are almost without fail going to be closer to them. Hopefully not IN them! The best technique is to scan the terrain from further down trail, acknowledge the root bundle, see the line around it and ride through it without locking your head down while passing.
It blew me away when I first got into riding that the truly fast riders basically didn’t see anything offline. I would comment on whatever crazy thing I had avoided, or scared myself of, or whatever and the response was almost always “where?”. Learning to focus on where you want to be rather than where you don’t want to be is an important skill. It will make a huge difference in your riding.
Some other tips on Seeing The Trail:
Learn to use your peripheral vision to your advantage. Your eyes are in the front of your head. You are a predator capable of visually taking in a lot of information very quickly. I find that moving my eyes and not my head creates less offline drift. Keeping my head aimed down trail helps me keep online even if I’m scanning far ahead, say down trail to see if people are imminent.
3/2/18

See the Entire Line
This is a great image from our own Chris Fuller which highlights a handful of concepts.
First the job is seeing the entire line. Use the vision skills discussed earlier, which will put together a couple features.
Let’s start by looking at it from a newer rider’s perspective.
You can see the trail has a pair of chunks which veer slightly right followed by a left. It may seem unimaginable at first – but with experience you will see and react to these almost subconsciously. Newer riders can at least have the knowledge that there’s going to be two “thumps” of sort, slightly to the right, followed by a left. Knowing there is a second feature can be intimidating, but dealing the first in pure survival mode while ignoring the next might put you offline or eliminate the speed you need.
It’s a bit of a balancing act knowing yes, factually, you need to deal with each of them but you also need to consider them in tandem. I seem to ride my best when I don’t focus too much on an actual single feature (obviously don’t ride into a tree or crevasse or something – I’m speaking within reason) but the general totality of a section.
If I need to be between the rocks after both features I will focus on that and sometimes bounce through, under varying amounts of control, other obstacles. I suppose it’s best described by “I can’t change the exact ‘now’ but I want to be there next” feel. Stay loose: flow with the trail, use your body as suspension up and down. Stay low: don’t stand straight up dead sailor it makes everything much harder. Ride strong: physically exert control and stay in an “attack” mentality. These basic concepts on the bike will help you in a ton of situations. Practice within your skill set and at or below 70% to improve.
As you advance as a rider there are more line options available as well.
Several of our pro riders will simply see a jump from where Chris’ wheel is to the bottom of the second feature. Other riders will see a drop in rut option as well as a roll option to the left. Since we’re not writing a book on race craft remember that you’re pleasure riding. Take a fun line for you. Change it up now and then.
Looking at this section in the picture I believe it’s important to keep my wheels in the same basic line. Or at least not letting the front wheel slip into the rut if I was riding a higher line. My goal is never to go over the bars – that adds a ton of height and lot of viciousness to a fall. If your rear wheel slips “down” a second face you have a better chance of salvaging the section or at least sliding off the back of the bike. If your front wheel slips “down” you must react almost instantaneously to avoid folding the bike over.
Easy on the Brakes
If you’re riding a modern mountain bike, with a proper setup, it is pretty robust and capable. Remember that now and then. Put the bike in a situation where it can do it’s thing.
A couple common issues new riders create are from trying to slow down too much or too late before an obstacle.
Brake Dive is when you hit the brakes and the bike squats down. Simple concept right? Well when the bike dives down it takes up suspension so, your 160mm fork suddenly isn’t a 160mm. Not only is there less travel but the suspension is now deeper in the ramp, in a more reactive, higher PSI charged state. It’s not going to have the plush feeling you might expect and can feel fast, harsh, or bouncy.
Rolling Over Obstacles doesn’t work if the tire isn’t rolling. An extreme example would be chalking a truck tire with a 2×4 when you work on it. With no momentum the 2×4 will likely be enough to help hold a heavy vehicle in place. Any level of speed has the truck roll straight over the 2×4. The same concept holds true riding mountain bikes.
Stuttering the front wheel across obstacles makes everything harder. Locking the front wheel into obstacles is a quick way to lose control. Rolling with some momentum in a proper riding position makes chunky obstacles much easier.
The goal is to brake prior to an obstacle, turn, berm, drop, whatever and let the bike reset to a neutral position for the best performance. Hit the brakes hard and slow down to your ideal pace for the obstacle. Efficiently being on and off the brakes allows the bike maximum time for suspension performance. Riding within 70% of your total skills should have you able to deal with a bit too much or too little speed in obstacles within reason.
On an incline your front brake has proportionally more power so make sure you learn to balance it with rear brake and body position. If you have to check down speed in less than ideal terrain its best to be balanced on the brakes as well as positioned low and back on the bike.
Hopefully these tips add confidence and make your riding journey more fun. These are concepts to keep in mind throughout your riding. To this day there are times that I have to remind myself to roll off the brakes and let the bike do its thing. More often than not the results are good. Momentum goes a long way in the two wheel world.
3/9/18

Adding Suspension with Body English – or Don’t Ride Dead Sailor
This week’s Trail Tip highlights an underutilized trick – using your body to add suspension compliance and performance.
There are three basic factors in how your “suspension” feels.
Suspension Performance: pretty obvious, if the suspension is setup poor or won’t function it’s not going to feel confident or compliant.
Tire Pressures: rock hard tires will lead to chatter. Too little tire pressure will lead to squirm which is an unpredictable feel.
YOU! Doesn’t matter if you’re a 100lb feather weight or like me at 230lb – you are the heaviest component on the bike. And you’re mounted at the tallest point. Your body is the cause of most of the precise performance of your bike – so don’t just be a passenger.
In the image above BikeCo’s Joe Binatena (top) and Ryan Taylor illustrate solid riding positions.
On the far left and right images you see the classic “attack” position. Bent knees and elbows provide a position of strength while lowering their center of gravity as well as allowing for extension (straightening) and flexion (opposite of straightening) depending on upcoming terrain features.
In the top center image Joe extends his arms and legs pushing the bike down the feature. This gives him the advantage of absorbing energy with his arms and legs when the bike touches down. Basically, Joe is buffering the amount of “strike” through the suspension by slowing his body’s direction change while he allows his arms and legs to reset to the attack position.
In the lower image Ryan is riding up a similar feature. He starts in the attack position and absorbs the feature, allowing the bike to rise by decreasing knee and elbow angle. In the final image he has reset to the attack position by extending knees and elbows.
In the middle images, both down and up, you will notice the riders push the bike slightly ahead. This is a great practice and increases your trail control. Particularly by allowing you to push back on the bike if it hangs up for a split second rather than flinging yourself over it. Remember – going over the bars or OTB is never ideal…
Defining Dead Sailor and Why it’s Bad
You hear the “oh they dead sailored through that” or something similar. It’s not a bizarre X-Games trick and it’s not a compliment!
Dead sailor is a overly rigid, reactive riding style. It’s common when riders feel intimidated or uncomfortable. They stand up too tall, become rigid, lose focus on the total line seeing only the next feature, and demand the bike does all the work. Sound like your average ride? Don’t feel bad as this happens to everyone now and then.
sidebar: one of my motivations for creating this series of write ups is I’m learning to ride Enduro motorcycles and find myself making mistakes reminiscent of my early MTB days. At some point this stuff becomes very intuitive – keep practicing and you will improve.
Riding dead sailor means the bike and suspension are having to work harder to control your mass and leverage. Which we’ve decided is in fact the heaviest thing on the bike. Impacts will fling your weight around bouncing / dragging the bike with it. Can’t quite visualize this? Find an easy rock section, even an uphill rock section, and lock your arms and legs. You’re going to bounce around through it. Unlock your joints and your bike will track straighter with much more confident feel. Period.
Looking to improve? Ride in the attack position and practice pushing the bike down as well as pulling it up across features. You will notice you can ride faster and generate free speed as you are now essentially “pumping the trail”. Push down into holes and pull up out of them – that’s the simple definition of pumping the trail! More on that in a future write up.
If this concept it totally new you might exaggerate the motion in comfortable terrain to really get an idea of how to do it. It will become second nature quickly.
Descending Confidently: Weight Back / Heels Down
It always makes me smile during the over adamant “I’m in the sport for the climbs” conversation. What I hear is “I’m not sure how to descend” or “My bike is feels like it’s going to kill me, so going downhill is terrifying.” No problem either way – we’ve all been there.
Building confidence downhill is a distinct step in your riding. Even true XC racers should learn how to competently descend as it gives them a chance to recover energy. And downhill is fun. Like real fun…
Saddle Down, Weight Back, Knees Bent, Heels Down. These basics are required from beginning mountain biking to pro level racing.
Saddle Down: Dropper posts changed MTB forever in a positive way. There’s a reason you have it, use it. With your saddle lower you can ride in a more aggressive position.
Weight Back: Notice Anneke bends her knees and moves her body rearward. Relocating weight over the rear tire improves control downhill. As we’ve established that going over the bars is always bad, this is a good way to minimize the risk of the OTB launch. The steeper the descent the lower and further back a rider will be positioned.
Heels Down: Flat pedals or clipped in, when descending drop your heels. This position allows riders to input more strength to the bike which dramatically increases control. The steeper trail I ride the more drop my heels. The goal is to establish a position that keeps you far enough back on the bike for the terrain while keeping your body in a position of strength to deal with terrain challenges.
Saddle down and weight back are pretty easy to instill into your riding. You might over exaggerate the motion at first to really understand the balance point while developing muscle memory for being low and back (and using knees / elbows as suspension as discussed earlier).
Dropping heels may take a bit more practice but when you get it right you’ll know it.
Watch videos of Manual Mondays or riders killing turns. You will see the pedal angles that provide the strongest squat position to maximize leg muscle input. Work this into your riding and improve your confidence by feeling more like a “rider” and less like a “passenger” on the bike.
3/23/18

Body Positioning in Corners
It blows me away, frequently, to watch fast riders disregard basic cornering techniques which would make them quicker and more confident. As with many of the Trail Tips this is something that with practice becomes second nature.
We deliberately shot an image of BikeCo Pro Rider Kevin Aiello in a common turn. Fairly flat, non aggressive lean angle, most the corners you come across on trail will be like this. A larger portion of my crashes over the years have been in turns like this rather than to built up berms or whatever. Whether it’s a ratio of exposure frequency, turning my brain off thinking it’s easy, or physics / tire engagement I’m not 100% sure.
I do know learning to carry speed through corners confidently will take your riding to the next level.
The Basics – we’re going to reference the image, invert to turn left…
Turning Right.
Standing with left leg down and weighted.
Right leg up and ready to accelerate out of the corner.
Right arm in “attack” position (bent elbow), weight down on the bar.
Head up, looking downtrail, shoulders squaring up where the rider wants to come out of the corner.
Left arm also has a bend in the elbow and is helping control bar direction, but not particularly loaded.
The Expanded Reasoning.
Footwork. This does a handful of things. First it lowers your center of gravity by modifying the leverage point on the bike. Second it pulls your inside foot up providing more clearance as you lean into a corner. If you’re totally new to the sport this is the best technique, flat footed is ok when you’re learning but you give up leverage and grip, inside foot down is a problem so don’t do it! Timing, getting the correct foot in the correct position, into corners should be done pedaling forward whenever possible. Back pedaling can cause chain drop or other issues.
Handwork. As you lean a bike into a corner you are actually slightly counter steering it into the turn. I believe the CA DMV form for motorcycles is “push right, go right” – when you push, or weight, your inside hand while beginning a lean the bike dives over a bit more quickly. This helps you carve turns a faster and more confidently. Except in very, very tight corners downhill you will seldom “steer” the handlebar – it’s more weight and lean. Keeping a bend in your elbows will allow you to pump the trail and absorb unexpected terrain.
Shoulders / Head. You go where you look. That’s the way it works. Riding faster means looking further ahead. Turning your shoulders into a corner helps point your entire body on exit as arms, leg and bike reset under you. Remember not to ride faster than what you can see…
Out of the Saddle. It really, really, really blows me away how often I see new riders descending seated on the saddle. When seated the saddle takes a great portion of your weight. Then it takes that weight and inputs it into the top of a pendulum. That’s not helping you ride faster or more confidently. Stand up, put your weight into the bike at the cranks. This changes the pendulum drastically! For an exagerated example think of how easy it is to balance a garage push broom (the big wide ones) when the head is down versus up… Bend your knees for added suspension feel and to absorb unexpected terrain.
Another common issue: bicycles and a motorcycles require different inputs, which can be a bit confusing. Recall one of my motivations writing this blog is learning to ride adventure motorcycles and recalling all of my previous bad habits? Well, with way more MTB experience when I get nervous on the motorcycle I come back to these habits until I think through it. Seasoned dirt bike riders newer to MTB might have the opposite reactions. On a mountain bike your body weight makes up nearly all of the total mass making proper positioning very critical to performance.
Like anything, riders looking to improve should take some time and practice techniques on comfortable trail networks. Riding at 70% of your total speed will give you the ability to confidently navigate and improve. Riding over your head, where you get down and wonder “whoa, glad that all worked” typically ends up off trail in a yard sale at some point… Work on your skills, utilize your skills, and you will be a better rider for it.
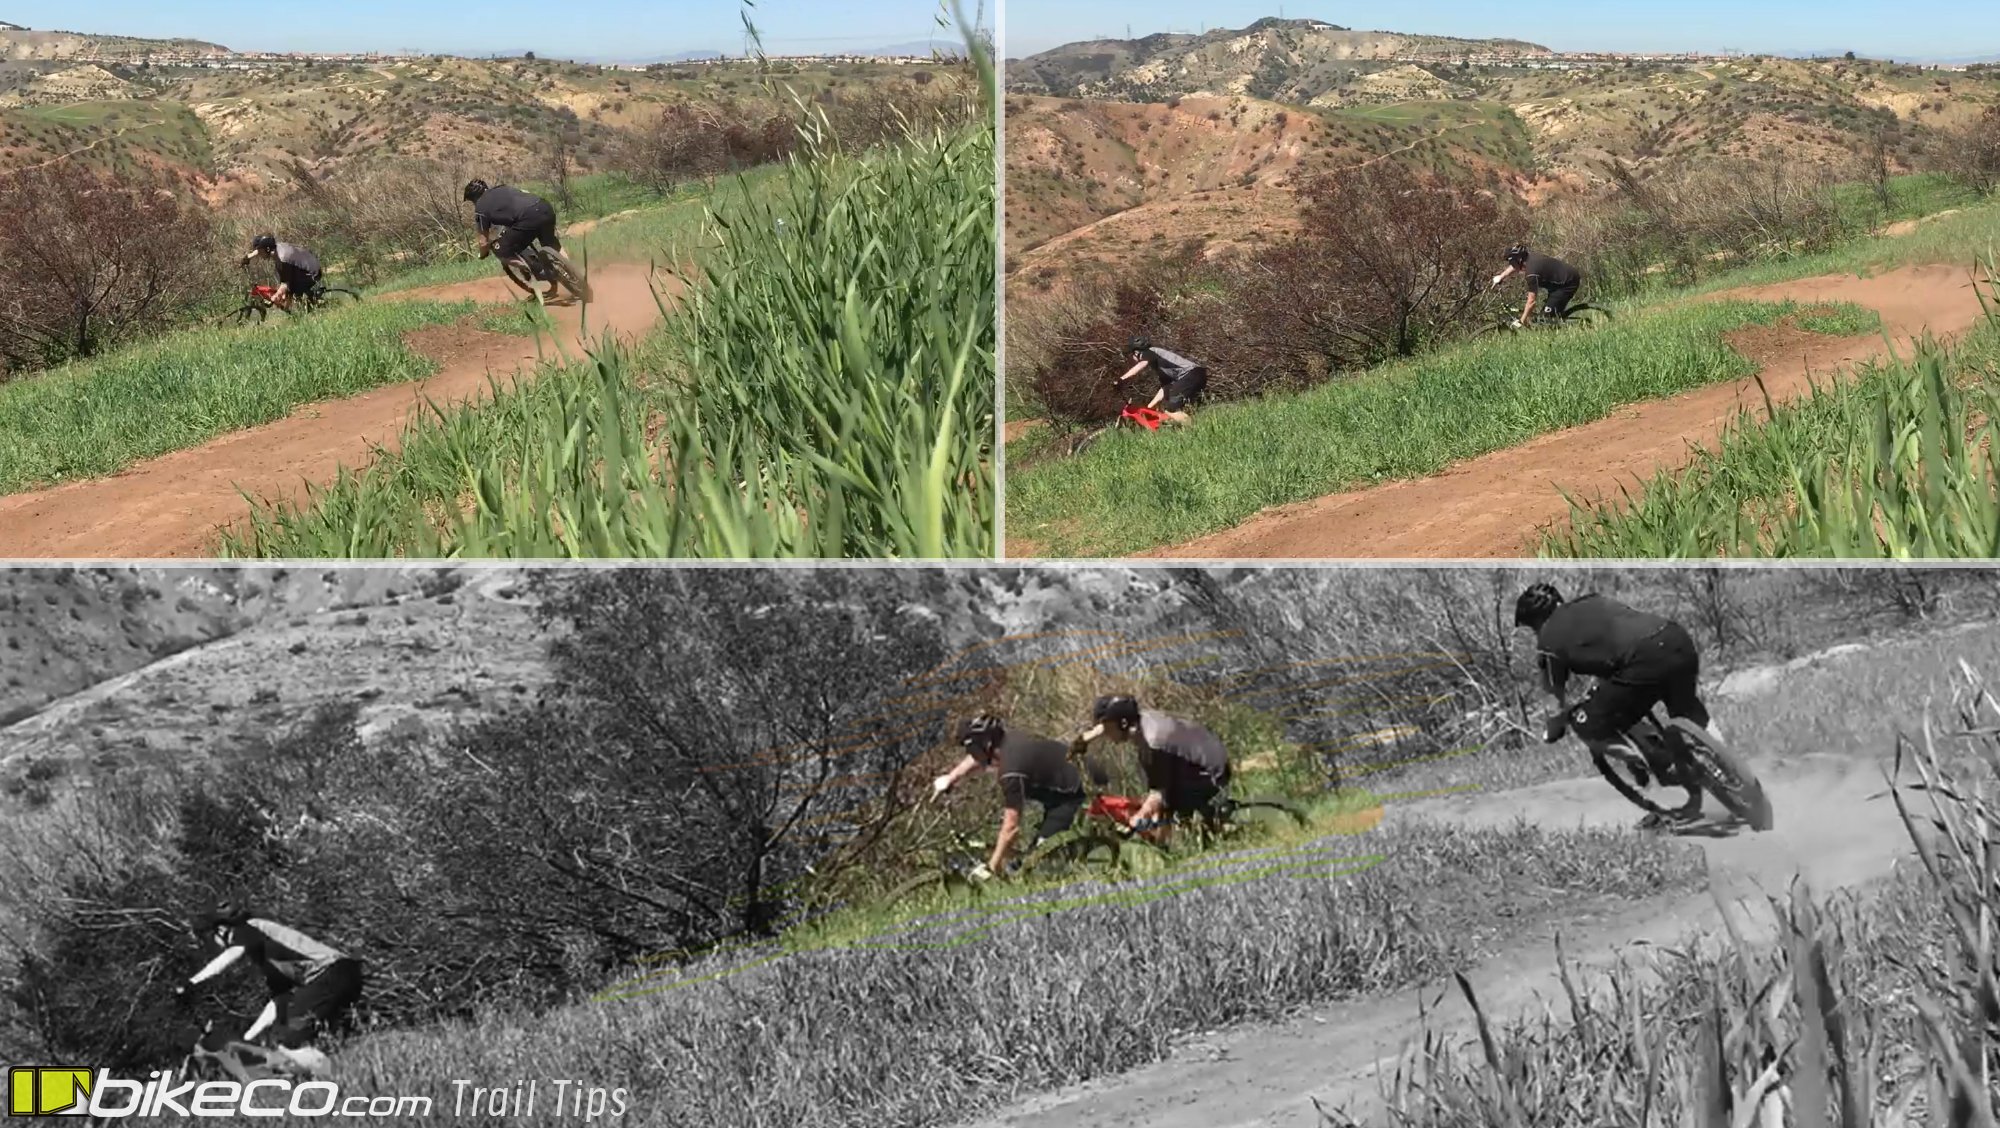
3/30/18

Screen grabs from our ill-fated “let’s video this entire trail, nah, let’s go ride more” day illustrate similar technique when overlaid. Riding comfortably behind a friend is a good way to see body positioning as well as line choice then apply it to your riding.
Follow your friends, well, the right friends…
Let’s get the disclaimer out of the way right here – use your head when you pick which friends to follow and emulate! There are a lot of riders who are really, really fast – but are sketchy beyond sketchy. Don’t learn those habits. Those habits crash. Hard. Riding MTB is supposed to be fun, crashing, in particular crashing hard isn’t fun…
Ask that buddy who out rides you to occasionally whoa it down so you can see the line or technique. All of us had people show us along the way – it’s part of the responsibility to community – so few riders will blow you off for the occasional insight.
Remember to ride at about 70% of your skillset so you an concentrate on practicing proper techniques. A common mistake following your buddy is riding above your head in “survival” mode. You might get through the section but likely didn’t practice the best technique and commit it to muscle memory. Take a pace that allows you to focus on your technique and correct if needed.
Following a more experienced will help you gauge braking zones, approach lines (the best lines often aren’t the most used ones), body positioning and more.
Are you the friend who’s being followed? Some tips I’ve come across over the years that might help you out a bit…
Protect your buddies – don’t take people down things that you know they’re not capable of riding. If I look at something more than twice it’s not the day I’m going to do it. That mentality has helped keep me in one piece more often than not.
Don’t overload information. I’ve been on both sides of this. A couple good practice concepts are useful. A full dissertation on trail? Not so useful, and can be frustrating to be the recipient of… I get to ride with pros a lot and they often will drop behind me for a minute giving me “easy” tips – and it’s rad – until you’re overloaded and frustrated! You might start thinking, “ya, sure I could huck that whole section, except you know, I’m not a world champion like you…” ok – specific example I know hahaha… Point is that helping a friend advance as a rider means being able to provide them a tidbit or two that quickly clicks an “ah-ha” moment rather than a complete riding encyclopedia when you’re trying to enjoy the outside.
Remember it’s fun. Someone probably showed you a line or two through the years – now it’s time to reciprocate. If the teacher is stressed the student is terrified.
Finally for this week – sorry it’s short we’ve been slammed at the shop – I learned I should always wear light gloves so you can see my finger off the brake… Style points are points just the same. hahahaha…
See you on the trails.