Posted on Leave a comment

Tips & Tricks: 3 Tips to Mount MTB Tubeless Tires with a Handpump

Tips and Tricks Handpump Mounting MTB Tubeless Tires

Whether you’re on a trip, or helping someone out at the trailhead (or helping yourself occasionally…) some quick tips will help you successfully to Mount MTB Tubeless Tires with a Handpump. Check out this quick video from BikeCo.com or glance through the short write up below.

Mount MTB Tubeless Tires with a Handpump

Tip One: How Much Air How Fast?

The first tip to mounting a tire easily, whether with a handpump or a compressor, is to ensure the most volume of air is pushed easily into the tire.

For this I love valve stems that have a removable core.

By removing the core I greatly increase the volume of air I can get quickly into the tire. This will notably help to bead the tire onto the rim.

Mount MTB Tubeless Tires with a Handpump First Tip Remove Valve Core

Tip Two: Grip.

The next step is to get a grip that allows you to easily hold the pump head onto the valve while having your hand wrapped around the tire.

Mount MTB Tubeless Tires with a Handpump Grip the Pump and Tire

Position your hand so two fingers can hold the pump head while you wrap your thumb onto the top of the tire. With this grip you’ll have a good grip for the next step.

Mount MTB Tubeless Tires with a Handpump Bounce and Squeeze

Tip Three: Bounce and Rotate.

While pumping bounce the tire and squeeze with your hand.

The bouncing and squeeze will help reduce the volume inside the tire. This also increases the PSI and to help bead the tire.

This method tends to work quickly. If you’re struggling take a look and make sure there’s nothing obviously wrong.

Quick list of things that are SUPER annoying if you’ve tried this for a while… Are both beads of the tire on the same side of the air valve (so your pumping goes straight into the atmosphere)? Is a bead sitting on the valve?

Depending on the tire it may help to rotate as you bounce it. This provides a bit more pressure in different spots of the tire.

Hopefully this quick video and writeup help you Mount MTB Tubeless Tires with a Handpump!

Stay on the site and shop #thebestinMTB (and eMTB) including our unbeatable selection of tires.

Posted on Leave a comment

Nukeproof Ride Review: Mega 290 & Reactor 290

Nukeproof Ride Review Mega 290 and Reactor 290. Reactor and Mega with Riders looking at bikes on fire road in cloud.

Mike, Tracy and I had a chance to take out two of the most popular bikes in the Nukeproof lineup.

While we didn’t have the most cooperative SoCal June weather we defined what we liked about the spec and how the Nukeproof Mega 290 and Reactor 290 ride on trail.

Mega 290 & Reactor 290: Nukeproof Ride Review

Nukeproof Mega 290 Carbon bike Review on The Luge

In this Nukeproof review we’ll glance at the spec of both the Mega 290 Factory and the Reactor 290 Elite builds.

Where do the bikes stack up in the BikeCo lineup? What are some variants we’d see on our personal bikes?

Later we’ll get into HOW the bikes ride and the overall Nukeproof trail personality.

Nukeproof Build Kits

Learn more about the Nukeproof Factory and Elite Build Kits with these tabs or keep reading for more about the Reactor 290 and the Mega 290’s trail personality.

Nukeproof Mega 290 Carbon Factory Spec Highlights

The Nukeproof Mega 290 Carbon Factory build is essentially an XT bike with FOX Factory Suspension.

The Mega 290 has 160mm of rear travel paired to a 170mm fork and is a confident Enduro or All Mountain bike.

The FOX Factory fork and shock both provide adjustment through PSI, volume spacing, high and low speed rebound as well as high and low speed compression settings. This gives the bike a wide range of tuning options for any rider size.

Shimano’s XT drivetrain and brakes with 203mm rotors front and rear perform as you’d expect.

Spec’d with Double Down tires front and rear it’s set for aggressive riding from the get-go.

DT Swiss EX1700 wheels provide a great platform to mount an Enduro / All Mountain appropriate tire selection from around 2.3″ or 2.4″ to 2.5″ or 2.6″ if you prefer.

Nukeproof Mega Carbon 290 Factory build climbing trail in low cloud cover.

Mega 290 Factory Build Thoughts

While the three of us tend to build very different bikes for our personal quivers we actually had a lot of parallel thoughts on the Mega 290 Factory build.

This is a bike that’s spec’d nicely from the factory. We each had a short list of what we’d probably change if we were going to make this bike our own and really we only had a single build “issue”: the saddle. It’s slippery! Now, you can see in the images we were riding in a low cloud which probably made everything a little more slippery – but everyone noted that the saddle would be the first thing off the bike for any of us.

Mega 290 Factory Spec Upgrades

So what are some personal upgrade or swap ideas for the Nukeproof? Well take this with a grain of salt as the three of us have more years riding then we’d like to admit as well as enough gray hair to be really particular (note Mike’s jersey…), so our upgrades or swaps would all be pretty personal preference things.

Each of us have a preferred brake setup that would go on the bike but as far as spec brakes the Shimano XT are absolutely workable.

All of us have a go to cockpit. Most likely we’d all gravitate to higher rise carbon bars and I would have to have my preferred grip too.

Tracy likes the Double Down tires front and rear. I might go to my EXO+ setup or at least the EXO+ in the front with a DHF for maybe a touch faster rolling setup.

Mike’s finally entry on this was a GX AXS derailluer, he rides wireless drivetrains and was convincing us how lowering the work load on my thumbs would improve my climbing (not much could make my climbing too much worse compared to these guys haha)

If you want to go through the notes on a Nukeproof Elite build (basically an SLX bike) click over to the Reactor 290 tab for more details.

Nukeproof Reactor 290 Elite Spec Review. Reactor 290 climbing on trail in low cloud.

Nukeproof Reactor 290 Carbon Elite Build Highlights

The Reactor 290 Elite build features Shimano SLX drivetrain and brakes as well as FOX Performance Elite suspension giving it a very credible setup. The Reactor is a 130mm travel frame paired to a 150mm fork for a nice Trail and Light / Medium Terrain Enduro bike.

The Performance Elite suspension features the more advanced dampers with improved compression control similar to the FOX Factory options, just without the Kashima coating.

Shimano’s SLX bits feature excellent performance in a bit more cost-conscious at a small weight penalty compared to the XT spec of the Factory builds.

Nukeproof Reactor 290 Elite on trail surrounded by green bushes.

Reactor 290 Elite Spec Review

Our conversation on the Reactor 290 Elite spec had a handful of tangents.

Before we get too deep into what we would have done to “make it ours” so to speak let’s take a glance at the SLX buyer’s opinion.

This is a nice SLX spec. If you didn’t have an established go to for say, like almost every bit on your bike there’s little on this bike that really glares at you. Except the slippery seat. It’s slippery.

Beyond the tires, brakes, cockpit setup preference changes (like we touched on with the Mega 290 Factory build in the other tab) the only other bits that stand out for consideration of upgrade are the wheels and maybe the seatpost.

We started debating about if you were to throw a little bit more cash at this bike where would it go?

Wheels play a big part in a bikes personality so we tossed around ideas on well if we did this, or that to this bike but when we looked at the price consideration it put us into the neighborhood of the Factory build with improved wheels as well as the XT drivetrain and brakes.

And frankly – that’s how models should be spec’d. I like that Nukeproof has a relatively closely grouped build price point and that you can see the value in all of the available models.

Devil’s advocate though: how mean would the Elite look with some carbon hoops on it and new hubs?

Nukeproof Reactor 290 Elite Ride Review bike on trail going downhill

So how did each of the Nukeproof bikes ride on trail?

Well as you’d expect, even though the Mega is a 160/170 bike and the Reactor a 130/150, they had some brand personality similarities when we compared notes.

Nukeproof Trail Personality

Nukeproof Sizing

Mike, Tracy and I are sort of close in height. Well, close enough that I can’t really think of who’s the tallest or shortest.

Each of our current personal bikes is a Large, albeit mine is a Mondraker Foxy so it’s a LONG large.

I’ve always been kind of between sizes at 6’1″ with long legs and arms. Lately I’ve been riding longer bikes and think it has been helping my lower back some – so I went with the XL Nukeproof Mega for our test ride.

Mike tends to ride Large although some bikes he may adjust depending on top tube length to keep him in a better position for his neck and back.

Tracy and I have traded bikes a lot over the years and generally we’re super close in setup. I think most of his personal bikes have been Large lately.

Once I jumped on it I had no doubts it was the right size. I never felt “lost” in it at all. In fact I kind of struggled to see how a 20mm shorter reach would have worked either. So I started giving Tracy a hard time about his Large selection. By the end of the ride he agreed that the XL would have been a nicer fit.

Mike rode the L Reactor 290 and seemed like he enjoyed the fit as its closer to his current quiver of bikes although the reach is a little shorter on the Nukeproof compared to other brands.

With almost all size bikes having room for longer dropper posts these days fit has become height as well as leg length and determining where you are on the “average” comparison of that.

I come in on the X-Large for height and the XX-Large for leg length according to Nukeproof. The XXL was going to be much to long for me but the XL was a good fit.

For taller riders, it makes sense that Nukeproof offers an XXL if the XL is a comfortable fit for me.

Nukeproof Mega and Reactor Trail Review Bikes at the top of The Luge in the cloud

Nukeproof: On Trail

All of us enjoyed the miles on the Nukeproof Trail / Enduro models. Mike has actually ridden both of these bikes as well as the Giga and is a great resource for our team on the overall Nukeproof personality as well as the variations in their lineup.

Nukeproof Personality

As a disclaimer: we didn’t get the greatest conditions to really test these bikes.

But between the three of us, with a lot of years of doing this, there were a handful of things we agreed on about the Nukeproof trail performance.

Planted / Balanced Traction.

The bikes have a notable even balance on the front and rear wheels. In just about any reasonable riding position it was very easy to feel both wheels working together. You had to get way, way too far off the back to get the front end light. And I was uncomfortable getting far enough forward on the bars to have the rear wheel feel light (with one exception I’ll get into later hahaha…)

Along the same lines as being “planted” the bikes had an appropriate front to rear wheel feel climbing and descending.

I found the Mega 290 was a very forgiving bike to ride which became important on the descent as conditions turned more sloppy than any of us frequently ride.

Overall the Nukeproof rode most similarly to Ibis models we work with.

It might have had a little more “up and down” pedaling variation than my Yeti or Mondraker – but like the Ibis bike’s this motion directly equates to rear wheel traction so I didn’t find the bike sluggish to accelerate. It was well behaved even up some of the slippery climbing sections when the wheel was clawing up and over rocks or terrain shifts.

The Mega and Reactor had a little less “pop” than you might expect from a Yeti or Mondraker on trail. Some of that is from the suspension’s design but some of it is from the shock and fork setup as well.

I suspect with time I could have put more “pop” back into the Mega to have it ride closer to my preferred quicker out of corners, pumpy style bikes (but that style also tends to break free from traction faster too – so it’s really a personal setup preference at that point – read on for my detail notes and why understanding a review is helped by understanding the reviewer…)

Lively at Any Speed

Another aspect that’s important for bike performance, does the bike require a certain speed to come alive? Class leading bikes have good handling characteristics whether you’re riding at consumer, expert or even race paces.

The Nukeproof felt good in the range of speeds I was able to get it into. Some bikes struggle with sluggish handling at lower speeds or get nervous at high speeds. Bikes like Nukeproof, Ibis, Mondraker and Yeti put a lot of effort into their testing to ensure the bikes are playful and fun for the widest range of riders.

The Mega felt like it had more in the tank than I got close to giving it, but never felt like that school bus on a figure eight track that some “bigger” bikes parallel at lower speeds.

Nukeproof Reactor 290 Elite build review on trail downhill

Nukeproof Reactor 290: On Trail

Mike’s notes carry a lot of weight as he puts many miles on a variety of bikes. From Nukeproof, Ibis, Mondraker or Yeti he’s very familiar. So it was interesting to listen as he fit the Reactor 290 between other BikeCo models.

“The Reactor rides a like a little bigger than pretty burly built Ripley. You know the Ripley with the bigger fork and shock that we’ve done in the past.

I’d say maybe closer to the Ripmo even. Not quite as big as the Ripmo travel wise but the Reactor is closer to a ‘fast’ Ripmo setup more than a big ‘Ripley’ probably.

The Nukeproof suspension feels similar to the Ibis although it would take me a little bit to get the Nukeproof as precise as the bikes’ I’m comparing since I’ve had more time on them.

On the Reactor I felt confident that the bike would turn in and hold a line. It felt pretty good over the chunkier stuff but we were kind of going slower today because of conditions too.

For me, this is a very well equipped bike at the price.  The Elite build I rode had the Fox Grip 2 damper on it which is all you really need or want.
We see many “DTC” bikes come into the shop and the client needs to spend more money to get the bike in a rideable condition.  You could ride one of these off the floor and it is ready to go.  Comfortable and super competent for the price point”
Nukeproof Mega 290 Carbon Factory Review dropping into the Luge

Nukeproof Mega 290: On Trail

Tracy and I have ridden a lot of bikes, in a lot of terrain over the years. Generally we both gravitate to a similar model capacity even if we ride different brands. So it made sense that both of us wanted to test the Mega 290 out of the Nukeproof lineup.

Overall we had pretty similar trail notes. I’m going to go deeper into my thoughts a little later as there’s A LOT of things that you feel and have to take into account on a demo ride and I think it’s important to be transparent and realistic – you can get an idea of how the Nukeproof bikes behave from this review but there is so much range of adjustment available as well. Anyway – back to the quick takes on the Mega 290 On Trail.

Tracy had some good insight

“The bike didn’t feel twitchy or nervous. Even as the trail got slick I felt like I could hold the lines I wanted.

It pedaled like I would expect for a 160/170mm bike. It wasn’t a slow pedaling bike at all. Could be tough to tell given how sticky the ground was too. But with the road ride before the dirt I felt like it compared well with other bikes its size.

I never felt the bike get nervous at speed. Couldn’t tell with today’s conditions but it might have that Yeti personality where it loves more and more speed.”

I agreed with all of his notes after the ride especially the speed capacity. I was able to get the bike up to a lively pace in a couple of the areas that weren’t as soupy and the bike never gave me any indication that it wouldn’t like a little more.

Both of us noted that the Mega was quite notable at holding lines in both the dry and wet conditions. You’d roll the Mega into a corner, get that lean angle going and that bike just carved in.

With the setup I noted the bike would take a lot of weight input from your feet while keeping the front end planted.

Nukeproof Mega 290 Factory Review Test Riding

Quick Conclusions: Nukeproof Riding Review

So what’s the quick take on the Nukeproof Mega 290 or the Nukeproof Reactor 290?

Well drawn from the combined notes we had really positive notes overall on both the bike’s spec and value as well as the on trail personalities.

Nukeproof Mega 290 Carbon Factory Review. Bike turning on trail.

The Mega and Reactor both feel well planted, confident and forgiving on trail. These aren’t bikes with knife edge personalities and even a pretty basic setup provided a really enjoyable ride.

Nukeproof bikes overall feel like they have a bit of “monster truck” in them, similar to Ibis bikes, and ride comfortably feeling maybe slightly “bigger” than they are.

I know I put the Mega into situations that it was well behaved in without requiring over the top theatrics or heroics from me as a rider.

Wondering how the Nukeproof might fit into your personal riding? Chat with a member of our sales team. They’re all versed with the class leading brands BikeCo works with: Ibis, Mondraker, Nukeproof and Yeti. Our staff is trained on where these brand’s personality is as well as what tuning options are available to modify a bike to your desired requirements.

Remember: class leading bikes, ones with not only the “right” geo (which has converged somewhat over the years) but also the RIGHT suspension and balance have a setup range. And it can be hard to really understand it from a demo ride.

Since I’ve bitched for so long about those doing reviews being more transparent about “what” and “how” they ride you can keep reading for more details on my ride and how experience allows a better understanding of what a bike is about and where it fits.

But first enjoy some pics of Mike and Tracy from our Nukeproof Ride Review on the Luge!

Reviewing the Reviewer

I’ve been pushing for a long time that reviewers give more personal insight to their experiences that go into a published review. So to wrap up this Nukeproof Ride Review I’d like to provide insight to what I thought, what my exact notes were, what I ride and how I come up with some of my conclusions during a review.

There are a handful of things that experience will help you quickly define and if you know how those are about to effect your ride you can more accurately speak to a bike MODEL and not a SETUP so to speak.

What Did I Notice in Setup?

Some of my notes on while I setup the Mega 290 would help me better understand what the bike WAS doing on trail and what it COULD do as well.

Mega 290 Ride Review Notes on Setup

Factory Suspension

Both the fork and shock were low on volume spacers for my preference. This means I used the compression settings to increase support that would be more finely tuned by increasing the ramp rate.

It’s a demo bike – the odds it would have a perfect package are low. Knowing that I was running more compression meant that I would forgive a little bit of potential harsh small bump compliance in the rear as well as initial support into corners.

Cockpit

First, I have bad hands and hate grips with outboard collars. It hurts my hands, messes with my ulnar nerve and causes numbness and pain up my arms. This bike had grips I didn’t like but I would try to run my hands further inboard than I usually do.

Bars were aluminum and 25mm rise with not a lot of stem spacers. I generally like to have larger rise handlebars and carbon (it makes a big difference in my hand and arm condition to ride with carbon bars)

Tires

Double Down Assegai front and Double Down DHR rear. An aggressive setup but appropriate for the bike. I typically run EXO+ DHF / DHR pairing so I knew that tire package would be a bit heavier than I’m used to.

Setup Forgiveness Based on Spec

Will it ride Harsh?

So based on the volume spacers, compression settings, grips and bars I knew I would potentially have to forgive some front end “harshness”. In other words, it would not be a fair fork test for sure if that’s what we were testing!

Luckily the fork was freshly serviced and overall it felt good. I think the oil and seals being new helped this a lot (and actually made me think I really need to service my 38)

Can I Get It In Control?

Hand height is important to me for a couple reasons. First, I have back issues which mean I kind of need my bike setup in a certain way to minimize that. This is a personal issue and varies from rider to rider. If you’ve got enough gray hair you’ll probably understand and if you have the gray hair and don’t understand it I’m jealous for sure!

Second you gain or lose a lot of control by having hands in a position you can get power applied. This applies to both your hand height as well as width. Just like riding too wide of bars having your stack too high or low can numb the handling reducing your ability to have quick adjustments with minimal input.

I did notice that the Mega liked to be leaned in to corners more than my usual setups that I tend to understeer slightly and lean which snaps them into corners a touch faster. I’d still give the Mega passing grades on this because my hands were low combined with the fork setup not having the precise feel I’m used to after all the years of Pro Tune forks and a specific setup.

Acceleration

Some would say climbing. I don’t climb well enough to speak to it! So, for me to feel a bike’s efficiency I’m looking at how it handles burst acceleration. Heavier tires are going to change that around which I noticed on the road climb to the Luge but not as much once we got in the super tacky and then super slippery dirt…

Geo Differences

My personal bike is a Mondraker Foxy RR with a 170mm fork. So all and all most of the geo between what “I’m used to” and what I was testing was relatively close (especially when you factor the published Mondraker numbers are from a 160mm fork so mine has a slightly slacker headtube, higher bb and longer wheelbase).

The exception that I saw was on wheelbase. My Mondraker is setup with the shorter chainstay and shorter wheelbase. The published wheelbase is 1253mm – given the longer fork I’ve added a couple mm to that but I’ve never really bothered to calculate it out.

On the Mega XL the wheelbase is 1275mm which would give it a touch more planted feel and change a little bit of the direction change personality.

On the road when I put a twitch through the front end I could feel the front end was a bit more planted than my bike. I couldn’t decide if that was the MaxxGrip tire or the longer front center.

During the descent I could feel that the Mega XL was “longer” in the first few corners but that quickly went away once I had four or five turns down.

Finally – let’s take a quick look at the conditions we rode in.

Between some morning rain and being in the cloud the conditions were pretty variable. We got in some sections that were hero dirt levels of excellence – no brakes just ride in, lean as much as you want and rip through it.

Then, well, it got sloppy…

Nukeproof Mega 290 Factory Review by bikeco

Being SoCal locals none of the three of us really ride in sloppy stuff. So the details of the ride have to go back to the conditions were we have experience and kind of look the other way in conditions that are outside of the norm for us.

For instance some riders are always looking to fall in love with a demo or review bike. That’s not always going to happen (even for a bike you’ll love) and breaking down the experience can be important.

Here’s a good example of this for me:
First Ride Demo on the Mondraker FOXY
(didn’t love it but saw potential)
Extended “First” Ride when I bought one
(starting to love it – testing some stuff out, riding is ‘work’ you know!)
Extended Ride Review
(loved it by then)

Sorry for the sidebar, but the point is that you’re not always going to “love” a bike at this level at first sight. They’re technical pieces and you should treat it like that and go through what you’re really looking for out of the bike to make sure you get a bike that will get there with you. BikeCo’s staff is unbeatable at this…

Like overall – it was fun to get out with Mike and Tracy on the Nukeproof, but by the end of the ride I was kind of “blah” about having messy muddy everything to clean up, I was cold and I had a fall that dampened my spirits (and for a split second or two really scared me).

OK, not to dwell on crashes but this one was pretty funny and not that bad. If you’re familiar with the Luge picture the deep pocket turns before the trail “turns left” down the canyon with the right hand exposure. I think it’s three or five like left, right, left, right, left. Anyhow, I went in too hot as the flatter section of trail wasn’t too slippery, but as soon as it rolled into the steeper stuff it got sloppy. First corner I lost the bike, back end comes around and I’m sliding down, still up on the bike, but both wheels full drift. Into the next corner where the front end climbed up the rise and now the back wheel is in the trough, front wheel almost in the bushes still up. Still sliding. About then I see there’s really only one more turn before that left, which if I miss I’m going off the side, so my heart kinda thumps. Still at a full slide 90 degrees from the ideal direction I decide to smack my leg into the side of the trail to try to slow down and get off the back of the bike. Never fully fell just kinds slide all over and bury my leg in mud. Anyhow – I get down trail to take some more pics of Mike and Tracy and Mike’s like “ya, did you see those tracks through the corner? What a mess” or something along those lines. Then looks at me and puts together that those were all my “tracks” across the nearly the entire trail width…

When demo-ing or reviewing a bike you have to kind of put that aside to have a critical look at the bike, the setup and the spec to decide what you’re really feeling or not. I suggest that riders try to find 3 things they like, 3 things they didn’t really like and 3 things they’re neutral about to help your sales team understand if you’re on the right type / model of bike, size, spec and how the setup was.

Overall I can confidently say the Nukeproof Ride Review of the Mega 290: it’s a bike that rides planted, comfortable at speed, well behaved and consistent without knife edge performance. My experience says that for me, I would prefer ramping the suspension up to add some more “pop” to the bike to give it a little more when pumping the trail through terrain or in corners. The Mega rode “bigger” than either of my last two bikes the Mondraker or a Yeti SB130 Lunch Ride – but it should as it is a longer travel frame than either of those options.

I think it compares best to the Ibis Ripmo, maybe even a Ripmo with a 170mm fork.

Overall a fun Enduro bike comfortable and confident in terrain and speeds you’d expect!

Chat with our team today about the Nukeproof lineup or shop Nukeproof below:

Posted on Leave a comment

Will SRAM Transmission Fit on My Bike?

We’ve got a lot of questions on what bikes are compatible with the new T-Series SRAM Transmission Drivetrains.

So, Will SRAM Transmission Fit on My Bike?

It’s pretty easy to tell:

Does your bike have a UDH rear derailleur hanger and is it designed with a 55mm chainline?
(at this junction I havne’t seen a UDH bike, not 55mm – so basically – is your bike UDH?)

Here’s a quick look at the details that allow the SRAM Transmission to really stand out as the next generation in drivetrains, particularly with it’s automated setup.

SRAM UDH

Will SRAM Transmission Fit on my bike?

So when you heard SRAM was making derailleur hangers what was your thought?

Until I heard chatter about the Transmission system I was kind of like, great, another standard eh?

But as the advancements of the new SRAM Transmission and T-Series components came out it made a lot more sense.

Above on the Left is the hub mating surface of the new Derailleur and on the right is the surface of the UDH.

This is really the piece that allows the SRAM Transmission to take its performance to the next level: Bikes designed with the UDH provide SRAM a dedicated measurement and contact point with the hub, and therefor with the cassette.

SRAM Transmission UDH connects Derailleur directly with hub and cassette in contact

In this illustration you see how the SRAM Transmission Derailleur directly contacts the hub while also accepting the bike’s axle.

This is the importance of bikes being designed around the SRAM UDH in order for Transmission to function.

The 55mm Chainline

The latest in the ever evolving standards of MTB right? I know, part of me wants to make fun of it but the majority of me has a lot of appreciation that this sport values your dollars and continues to innovate – even if it means seemingly continual change! (I swear the next remade 1980s or early 90’s movie or TV commercial I see is gonna make me puke – at least in MTB its always doing something new…)

The wider chainline allows the Transmission system to work, provides a slightly stiffer and more robust rear triangle and requires specific cranks.

You can see the axle difference below between the SRAM GX DUB 52mm and 55mm DUB Wide cranks.

SRAM 55mm chainline versus 52mm chainline GX Cranks

So – what if your bike doesn’t have a UDH? Well non-UDH boost bikes can run the previous SRAM AXS technology available in GX, X01 and XX1 configurations.

In fact, the SRAM AXS system will still mount on a UDH bike as well if you want very specific cranks, chains, etc outside of the T-Series range.

Quick Differences between Transmission and AXS

Transmission provides automated setup and tuning as well as notable improvements to component strength and longevity.

SRAM AXS has an automatic trim tool but does require a bit of setup prior.

If you’re building a new bike most riders shopping wireless shifting will gravitate the new Transmission series as it is more robust and has some interesting design upgrades such as replaceable bash plates as well as other considerations to minimize potential damage in an extreme scenario.

If you’re updating or upgrading your current bike it tends to depend on budget (you’ll need new cranks with specific chain rings with the Transmission system), how important auto-setup is and whether your bike is UDH or not.

Whether you choose Transmission or the previous AXS you’re getting the best in wireless shifting available in MTB or eMTB.

Questions on wireless shifting options? Give us a call, email or use the chat and we’ll get you the right parts for your project.

Shop BikeCo’s favorite drivetrain kits below

Return to Top of Page

Contact Me Regarding Wireless Shifting Kits

  • Please contact me by:

  • Question on availability? Spec? Compatibility?
    Our team will be in contact within 24 hours!


  • Hidden
  • Hidden
  • Hidden
  • This field is for validation purposes and should be left unchanged.

Posted on Leave a comment

Five Ten Stealth vs Ride Concepts Max Grip

Five Ten Stealth vs Ride Concepts Max Grip

A lot of flat pedal riders ask about the difference between the Five Ten Stealth vs Ride Concepts Max Grip soles. Well let’s take a look at why we stock both the Five Ten and Ride Concepts shoes here at BikeCo.com.

So what’s similar? They both work well. Confident and predictable grip is critical to enjoying your ride. Both of these shoes offer that.

Both the Stealth and Max Grip utilize lugs flat with the shoe’s edge and a gap left between pads.

The Five Ten use a circle while the Ride Concepts design features hexagons. Pretty close size between them as well.

Differences Five Ten Stealth vs Ride Concepts Max Grip

At BikeCo we’ve been working to provide our online shoppers as close to an in-store experience as possible. To that end we’ve developed a series of tests that allow us to publish a scale to help with product comparison.

With experience on both of these platforms the Five Ten and Ride Concepts shoes were a big part in developing a system that provided numbers that passed the experience test.

Let’s look at the three numbers in the scale and how they apply to the Stealth and Max Grip soles.

Durometer

Durometer is a basic “hardness” test – but if you really get researching it durometer is kind of vague on what it actual measures. In the world of MTB shoes it’s a decent barometer for wear as well as how easily pedal pins will “bite” into the shoe. When measuring durometer a series of readings are taken and averaged.

With our durometer scale Five Ten Stealth rubber measured 65 on average

Five Ten Stealth Rubber Durometer measurement

The Ride Concepts Max Grip sole on the TNT shoe measures a bit softer on the durometer scale coming in at 55.

Ride Concepts Max Grip Durometer measurement

Surface Tension, or Tack, or Grip, or Sticky…

So durometer doesn’t necessarily dictate how much “tack” there is on the sole of a shoe. A lot of variants go into that – but we wanted to have a repeatable test and developed this weighted drag reference.

Dragging this sled across the sole, averaging the results and taking into account the contact patch size we define a value (watch the video if you want to learn more about what we’re up to!)

Five Ten Stealth Rubber Surface Tension test

The Five Ten stealth rubber tested to 16.1 on the sled test.

As a reference, a standard pair of Puma casual shoes I had in my office tested to 5 and the Five Ten gum sole tested to 10.8…

Ride Concepts Max Grip Surface Tension

The Ride Concepts shoe came in with the highest surface tension of anything I’ve tested so far at 22.4.

This result compared to the Stealth rubber makes sense to the “finger test” when you have the shoes in your hand – which really was the goal of putting these metrics together. We want to have some tangible comparison for clients reviewing product here at BikeCo.com.

Finally we looked at the sole’s ability to damp impact.

Damping Test

Five Ten Stealth vs Ride Concepts Max Grip Damping

This is probably the most exciting test, with a drop rig, steel balls, electromagnets… And comparing shoes it’s probably pretty close overall since the shoes all went onto the same jig in about the same way.

We take an average of 3 to 5 drops, disregarding any way off the average since they might have hit funny or whatever. We divide the drop height by the average rebound distance (and move the decimal point) so that the higher the number the more damping it has (or the smaller rebound measurement on the bounce).

The Five Ten Stealth came in with the most damping of anything we’d tested so far, a 5.8.

The Ride Concepts also had good damping at 4.8.

Improved damping helps neutralize trail vibration back into the rider. As a reference the gum sole Five-Ten had much more rebound with a score of 3.2.

Riding the shoes I believe that the Ride Concepts insole actually provides a lot of additional damping as well, and I’m not sure how much of that is factored into this particular test.

The TNT is a slightly more “robust” or aggressive shoe and the insole feels slightly taller than the Freerider.

So, our final numbers came out as follows:

Five Ten Stealth: 65-16.1-5.8

Five Ten Stealth Rubber Sole design

The Ride Concepts Max Grip sole on the TNT model came out slightly softer and tackier.

Ride Concepts Max Grip: 55-22.4-4.8

Wrapping It Up…

My experience with the shoes, which I have to admit end up as both riding and work shoes – both at the shop and chores around the house, parallels what we’d expect to see from numbers like we calculated.

Both shoes are MUCH more tacky than others giving you great pedal feel and grip. Pedal pin penetration (how’s that for alliteration) is confident in both while you can still move your foot when you want.

It’s interesting that the Five Ten’s sole has more damping properties and that in general Ride Concepts uses a thicker, more aggressive in-sole. I imagine that’s how they end up with a similar trail feel between the two shoes.

If you’re using them solely (more shoe puns right?) as riding shoes both offer good wear intervals. Doing a bunch of walking and working in them? You’re going to notice the Ride Concepts will wear faster than the Five Ten. Both have good grip when hiking even in wet conditions (albeit I don’t get to test much in the wet here in SoCal…)

I would recommend either of these options – since we only offer the best in MTB it’s easy to get it right shopping at BikeCo.com. Other shoes may have one of these factors similar to the class leaders, but getting them all balanced and right is harder than it looks. The slight differences are really notable on trail.

For instance, the Five Ten gum soles I tested (my daily shoes since they’re non-marking) tested at 72-10.8-3.2. And those shoes are horrible to ride in frankly. Part of it is the model (which we don’t stock) is too soft and part of it is the sole is too slick.

Interested in learning more about this new scale?

Well we have you covered. Check out this quick video with more examples of how these tests will bring a better understanding to riders about the performance of grips, tires and shoes.

BTW, looking at Five Ten or Ride Concepts models that will be right for your riding? Shop them here!

BikeCo Tactile Scale

Over the years we’ve worked to provide online shoppers as close to an in-store experience as possible. One thing we felt could be expanded on was a scale to better define the feel, particularly of items like Tires, Shoes and Grips.

BikeCo.com wants shoppers to be able to have more than “it’s stickier, because that’s what they say” when picking #thebestinMTB

This video is a quick explanation of the system that you will see being applied across our site over the next few weeks and to new product offerings.

In short, we’re measuring the durometer (or surface “hardness”), the surface tension with a weighted drag test, and the damping with a drop test measuring rebound percentage. Our system will allow you to more easily compare apples to apples across a range of product manufacturers.

Shop the best in MTB at BikeCo.com including Ibis, Mondraker and Yeti factory completes, customs, semi-customs and more!

Posted on Leave a comment

Increase Support & Improve MTB Small Bump Compliance

Products and Tips to Improve MTB Small Bump Compliance

As your riding progresses your settings and preferences are going to change. Faster, more aggressive riding puts different demands on your equipment and balancing your setup with these changes will help you improve your riding experience. You’re likely to find you need additional support from the suspension. This is typically done with increased compression or ramp rate which can compromise some of your small bump compliance. Let’s take a quick look at other components and techniques that can add some of your small bump compliance back as you ride faster.


Faster tends to be smoother

Imagine a boat going slowly riding up a series of waves. Up each face and down the back. Then the next. It has a certain “rock” to it right? Well if that boat is able to increase the speed it can decrease the vertical motion of “rock” by not dipping all the way down into each trough. Like “whoops” in moto – skipping across the top decreases the vertical motion. Same with your mountain bike.

Now, should you just skip out of control across everything? Nope. But momentum is often your friend.

Increase Support and Improve MTB Small Bump Compliance Cornering

Why You Need More Support

How does your setup need to change with that speed?

Well you’re going to need more support. If you’re running soft suspension it’s going to do a couple negative things.

First, it’s going to tend to “pack” and stay deeper in the travel then it needs to be. This will actually create a harsher ride as the PSI has increased while still being too soft for the next concern.

Burying the bike… Really a bummer and frankly can be kinda dangerous especially if the fork is too soft and buries itself into a hole or the front side of a rock you’re trying to roll past. Front end stuffs, bike slows way down or stops, your momentum keeps going and you’re a lawn dart. No fun.

So as your ground speed increases its important to give yourself that additional suspension support. While you might adjust sag a few percent most of this support is going to be through low and high speed compression as well as volume spacing to increase the air ramp rate and support.

Increase Support and Improve MTB Small Bump Compliance Support Image with proper compression

But, I Don’t Want A Bike That Chatters All The Time

No, you don’t want a bike that loses all of it’s small bump compliance.

And, sorry, but for just a second I’m getting on my soapbox: a lot of suspension talks about “small bump compliance” as the travel between full extension (you’re bike’s in the garage) and sag (with you sitting on it). This isn’t small bump compliance to me. This is droop. Sorry I’m a car guy and when the suspension goes away from me, or droops down – well that’s not what I consider absorbing a small bump. It’s falling away until the weight catches up. So, for this, Small Bump is referring to bumps that engage the suspension travel past the sag point in compression, ie you’re riding and hit a small bump and the suspension absorbs it…

OK, back to my point.

So you’ve had to make your suspension stiffer, or less compliant, in order to have it be able to “punch back” at the terrain without diving in and out of the travel. How do you keep your teeth from rattling out?

There’s a handful of places to look at that you can find small bump compliance outside of the suspension.

Rubber is a Damper

Many of the more “grippy” compounds actually are designed to incorporate additional damping. A lot of our racers will run the MaxxGrip front tire to get just even that bit more compliance since their suspension is so aggressive.

Tire sidewalls are playing a bigger and bigger role in fine tuning MTB riding compliance. Heavier sidewalls provide additional protection as well as damping through mass and material properties.

More aggressive sidewall technology provides additional mechanical support assisting the tire’s “air spring” to support your weight. This tends to allow riders to run a lower overall tire pressure providing better tire compliance and grip.

And yes, the air in your tire is a spring. And like your suspension it as it is compressed the pressures rise. The tire’s mass and sidewall properties effectively are the damper on this spring force. A heavier, stiffer sidewall is going to help slow the tire’s air spring better. This will help minimize harsh “run through” or even prevent or minimize rim strikes (which man, you can feel those in the hands!).

Another product that can help with compliance are CushCore tire inserts.

CushCore provide three unique modifications to a tires performance.

First, it’s a mechanical damper for the last bit of tire compression prior to the rim. Think of a jounce bumper in a shock: it’s a compressible item designed to absorb impact prior to it hitting a less compressible, and certainly less ideally compressible rim…

Second it works as a volume spacer in your tire. Similar to suspension adding volume spacers allows a lower starting PSI to more quickly ramp up to the proper supporting PSI.

Third and perhaps most notable and at the same time kind of the hardest to describe is how the CushCore’s contact point lowers the sidewalls leverage ratio in many conditions. That’s to say that by putting pressure on the sidewall, or maybe support is the better term, it shortens the available length of the sidewall which allows takes away some of the mechanical advantage the ground can apply to it. Think of waving a ruler holding onto the far edge, then holding in the middle. Lowering the leverage makes a big difference right?

Learn more about Maxxis tire compounds, sidewalls and tread patterns here

Magura MT7 HC MT7 and MT5 Levers Compared

Top to Bottom: Magura MT7 HC, Magura MT7 and Magura MT5 brake levers. Shop the Magura and Shimano brake lineup here.

Brakes, Braking and Slow is Fast

Stay with me on this one, it’ll make sense. Bigger brakes will help your small bump compliance. Well, bigger, more powerful brakes and a bit of technique.

You’ve probably seen it on trail – the rider heading into a chunky section who gets timid, grabs a handful of brakes, stuffs the suspension 1/3 down into the travel and then is, at best, jostled horribly across the terrain trying to regain control? So two things wrong there.

One, momentum is your friend like we mentioned earlier.

Two, especially with your fork, grabbing a bunch of brake OR staying on the brakes too late just stuffs the bike into it’s suspension. Instead of hitting the chunk at sag with say 80% of the travel left (and at the sag PSI) you’ve gone in at like half travel, cutting down both the amount of travel you have left as well as making the bike way more harsh as it enters chunk. No good!

Sort of like how when you corner there’s a point you need to be off the brakes and let the bike roll in (ya, you can trail brake to a point – but you’re not like smashing brakes while trail braking or braking through the corner) anyhow, so you ideally have a point that you need to get off the brakes and let the bike reset its rake and sag before you go blasting through chunk.

This allows you to take advantage of the more plush suspension further in the fork’s extension, have more travel left to absorb the terrain as well as resetting the headtube angle, and therefor trail measurements as well. All good stuff.

Handlebars, Grips, Gloves and Hands

So frankly, the two tips above are going to provide you the biggest jumps in small bump compliance as you up your compression settings. There are a few places that you can get a bit more feel, and every little bit does help.

Handlebars

Carbon fiber has a unique balance of stiffness while being able to slightly damp vibration input. Really that’s the beauty of carbon bars. Being a bit lighter is great too, particularly high up on a bike where center of gravity makes a big difference, but the real draw is the feel.

OneUp Components Carbon Handlebar Shape

Carbon also can be manufactured in a variety of shapes that would be really difficult in other materials. This allows two advantages. Weight saving and performance tuning. Removing material where it’s not needed such as the Tag T1 Carbon Bar with ovalized bar ends is an example of both.

The bar that probably takes the most advantage of this is the OneUp Components Carbon Handlebar. With it’s unique shape the OneUp bar is designed to improve small bump compliance by eliminating off-axis material in the rise transition.

Handlebar Width = Leverage Rate

Handlebar width is important to how your bike rides.

Obviously you need your hands in a comfortable position that allows you a power position to push the bar into corners and pull the bars over terrain. We’ve touched on that in other blogs over the years.

In regards of small bump compliance you’re looking at the leverage ratio of your bar’s design as well as your final bar width. As you narrow your bar you decrease the leverage ration which increases the bar’s stiffness.

We’ve actually seen handlebar manufacturers try to push a “one size fits all” on some stiffer bars because if you lower the leverage ratio they become like teeth rattling stiff. We don’t all need to run 800mm bars. (at 6’1” I run 785 as a point of reference)

If you’re trimming bars it’s worth a look how stiff the bars start out. If you’re trimming towards the minimum cut widths it might be worth looking at a less stiff bar to start.

Shop our favorite handlebars here!

Grips

Some riders are big fans of the grips with a slight rotation designed into them. We setup some clients on those if they want them – but – we don’t really ride those in the shop.

Personally, I don’t like the idea of the grip rotating and taking away some of the feel when I really clamp down on the handlebars. There’s also a part of me that doesn’t particularly like having more moving bits than needed on my setup.

Gripping

Now I’m not saying you death grip the bar. Far from it. Letting the bar slightly rattle in your hands helps minimize trail feedback. In fact one of the tips from my younger brother years ago on really long descents like San Juan Trail he would pick his spots and push his thumb into his middle finger and literally let the bar bounce in those circles. I never wrapped my head around that really – but he was doing 50 and 100 mile races and keeping your body feeling good was critical.

While we’re on how you grip the bar, it won’t change small bump compliance, but if your brakes or controls are out of position and require you to rock your hands “up” or “down” the trail feedback is much more likely to cause pain when you ride.

Similarly if you ride in gloves that are too big and “bunch” up in your grip position you can expect discomfort in your hands.

Gloves with large contact pads tend to create hand discomfort. Rather than minimizing trail feedback the extra movement thick contact pads either creates hot spots or perhaps has riders gripping a bit too much.

Wrapping It Up

Ok. Eighteen hundred words. That’s a bunch right? So to wrap it up in a quick paragraph:

Increase your compression and ramp as you ride faster to aid support at speed. Remember momentum is often your friend. Don’t slam on a handful of brakes into the terrain features and pack the suspension up. Run tires with appropriate support. Hold on right, not necessarily always tight. Should I have started with all of that and saved you the read? Hahaha… See you on the trails – Nate@BikeCo.com


Return to Top of Page

Posted on Leave a comment

Clipless or Flats for MTB?

clipless or flats for mtb? Pedal Comparison

Wondering if clipless or flats are right for you? Let’s take a minute and go through some of the differences and preferences that will help you define Clipless or Flats for MTB.

First let’s look at some pedaling basics that will help you whether you choose to ride clipped in or on platform pedals.

Good Pedaling Practices

Spinning Circles

Spin circles. Seems simple right? Ironically after all the years of riding this probably one of my least applied practices… I’m going to reference a clock face with 12 being straight up, 3 being forward and we’re talking about the drive side crank, clock reference is flipped for non-drive.

Ideally you’re using a combination of muscles and movements when you pedal your bike, not just smashing down in the say 1 to 4 o’clock positions. (I’m so guilty of that).

Now, whether you’re running clipless or flat pedals you can take advantage of spinning better circles. It’s more efficient, it’s easier on your body, it probably looks better (according to my riding buddies who give me a hard time). How does the concept work?

Even though there is clearly a position of the most power you can still “drive” the pedals throughout most of the pedal stroke whether you’re riding flats or clipless. On the bottom of the pedal stroke, like say 4 to 8 o’clock you “drag” your foot back. Think of it like a moonwalk move or scuffing your foot almost. On the top of the circle you’re pushing that “scuffing” until the pedal drops back into the optimum power position.

Does this add a ton to your speed? Nah. But it is more efficient (when I remember to do it) and it fires different muscles that in turn helps ease the load across the rest of your legs.

One of the things new riders imagine is that with clipless pedals you can “pull” up on the opposite of the power down stroke. And, sort of you can, but again, it’s not nearly as efficient as the down stroke but every bit does help.

Footwork Matters

Getting the right foot “down” at the right time makes  a big difference. Learn to corner with your outside foot down. It greatly improves your ability to weight the bike and “drive” it through the corner with your feet. It also improves your ground clearance as you lean the bike over.

Heels Down

Again, this is for either pedal type. Get your heels down when you’re descending. It improves how the bike is weighted and gives you much more control, particularly in steep chutes.

Downsides?

Let’s get these out of the way right off the bat and move on with the day right? Here are the most common fears for each type of pedal.

Clipless: “What if I don’t get out of them?”

Yup. It’ll happen, but, from my experience it is absolutely not in the situation you’d think. I’ve run full speed out of crashes and then thought about, man, I never even mentally made the choice to clip out. It becomes automatic really quickly.

When I found it “more” likely to happen frankly is tired, at the top of a climb, when I would think I clipped one foot out and lean over only to find that I had in fact, clipped the other foot out. Almost always happens when there’s people watching. It’s like Murphy’s law.

Flats: “What if they hit me in the shins?”

Ya. That happens too. The last real good one I had was at the top of a trail bouncing off like a 6″ tall by 2′ long “table” messing around while chatting with friends. I wasn’t paying real attention and just kinda tried to save a foot coming off and then yup, snakebite.

The few times I’ve had bigger get offs with flat pedals I’ve been well clear of the bike pretty fast.

So there are the typical worries. Let’s compare some other aspects.

Comparing Cliplesss & Flats

Where are the real differences in your day to day riding? Let’s take a look.

Efficiency(?)

I started out riding clipless and went to flats the last few years. Honestly I haven’t noticed any efficiency differences – but – I’ve never been renowned for my pedaling prowess.

I’d imagine that clipless pedals are slightly more efficient for the average rider. I haven’t really looked into the weight differences between flats and clipless plus cleats either. If you’re riding XC / Trail and long adventure days that weight will mean more than an hour and a half rip after work.

Technique

Clipless pedals tend to hide technique issues. You can cheat on your bunny hops, you can pull the bike up or yank it around side to side in the air a bit easier if you’re offline, etc.

Here’s the scoop on that though: probably no one is grading your technique at the end of the ride except you right? So if you’re more confident clipped in then go for it.

When I rode clipless I kept a pair of flats around for the occasional rip to work on technique. It’s interesting as I found that where I thought “flats will be great in the gnarly stuff” once I got bouncing around in it I realized “hmm, I miss being attached to the bike a bit more!”. The bottom of our local Car Wreck trail was my big eye opener on that.

Once I moved permanently to flats I found that I had to corner slightly different or my “upper” or inside foot tended to bounce off the pedals. Clipless had kept me hooked in for all those years and it was an eye opener that I had been just floating that foot essentially.

If you ride flats you’re going to need to concentrate more on keeping your feet “planted” on the bike consistently. Whether bunny hopping the obstacles, or ripping through the chatter.

Using your knees as “suspension” to absorb the bike up and drive it down is a great technique to practice whether you’re running flats or not.

Confidence

You know, your riding is really about you. What are you confident on? What causes you concern? Sounds over simplified, but really if you’re thinking about “extra” things when you really should be concentrating on other things that’s no good right?

I’m going to use a recent experience as an example, although not MTB related. I was on the freeway the not too long ago on my motorcycle. Now, I’ve got a lot of years and a ton of miles on motorcycles so admittedly it can seem a bit “autopilot” at times. It was a high speed day but with traffic – nothing too out of the ordinary heading up to the shop from San Diego. Anyhow, when the hills dropped away into Del Mar and I got a cross wind there was a repetitive thumping on the side of my head… Turns out I hadn’t fastened the helmet! Instantly that was all I could think about. I didn’t want to pull over in the construction area and get creamed by a car so I rode on a bit looking for an offramp. I’m big on helmet safety and this was really not a good feeling and I got hyper focused on it. To the point that when I got off the freeway to correct it I ended up pulling over onto a steep grade and nearly dumping the adventure bike on my legs! I had been so mis-focused that I made a mistake I probably never had made in 20+ years of riding moto… Point is, if you’re having to really put tremendous thought into something it will have other consequences.

Are you worried about that technical single track and whether you could get a foot out before you tumbled off the edge? Well, being aware of that is one thing. Hyper focusing on it to the point you are scared isn’t fun or effective.

If you’re confident or even cautiously confident or aware you’re much better off.

Clipless Pedals Explained

Clipless pedals use a cleat to engage with spring loaded “clamps”.

As you saw in the video most clipless pedals are engaged by stepping “in and down”. The forward tab of the cleat fits under the forward bar and then you step down with your heel. As you step down the rear of the cleat’s radius will put pressure on the spring loaded bar (shown as rear in the video, but could be either front or rear depending on design) opening the bars allowing the cleat to pass before the spring clamps the bars in place.

To exit clipless pedals you pivot your heel outboard. This rotates the cleat in the clamps allowing the cleat to disengage. The geometry of the design means that it generally takes less pressure to clip out than to clip in as the spring loaded bar doesn’t need to move the same amount.

It’s pretty simple and your muscle memory will pick up on it quickly.

Differences in Clipless Feel

The main difference in clipless pedals is the amount of “float” they have in the design.

Float can be two different motions: lateral or rotational.

Lateral float is how much extra area there is for the cleat to move inboard or outboard while staying engaged. For instance Time pedals tend to have more lateral float than Shimano pedals.

Rotational float is dependent on cleat design. Most pedals have a similar range of rotational float before the pedal disengages, although some manufacturers may offer cleats that have different shapes providing quicker or later disengagement.

Many pedals offer adjustable spring rates. This adjusts to rider preference for clip in pressure, hold while clipped in, and to a lesser extent the clip out pressure. When I rode Time pedals I like a mid pressure setup. If I ride HT clipless pedals I tended to tighten the spring more to provide a more confident clip out feel (seems sort of counterintuitive I know, but it works).

Shopping Clipless Pedals

As mentioned previously there is a feel difference between clipless pedals.

Riders looking for a very “set in” almost like a ski boot feel gravitate to the Shimano lineup.

Those who prefer a bit more movement in their pedals tend to shop the Time lineup. The lateral float is felt most during climbing if you are a rider who likes to wiggle around.

Shopping Flat Pedals

Flat pedals come in a variety of sizes and shapes.

Pedals generally are somewhat “sized” depending on your shoe size. If you’ve got big feet you should shop bigger pedals – makes sense right? (Luckily we list the platform dimensions to help riders compare our selection of platform pedals).

clipless or flats for mtb PNW Loam Pedal Dimensions

Thinner pedals will slightly improve ground clearance. Thicker pedals may tend to have better bearings for heavier riders.

Some riders prefer more mechanical concave to help sit “into” the pedal.

Hell, some riders love the look and color of a model and that’s enough! We only carry proper pedals so you don’t have to worry about falling in love with a garbage brand or model here at BikeCo.com

The Worst of Both Worlds

OK, this is a bit of a soapbox rant based mostly on my opinion. Grain of salt if you want – or agree with me and be right! (hahaha, just kidding)

What about pedals that have clips on one side and flats on the other? Well, they’re the worst of both worlds.

Reasons to commit to one or the other:

Clipless side – if you’re trying to clip in and only one side of the pedal has the assembly what are the mathematical odds that it’s facing the correct way? You might think 50% – but you’re wrong. Murphy’s law comes into play and its almost ALWAYS on the bottom and you have to flip the pedal around with your foot till you get it to step into it.

Flat pedal side – ever seen the road biker clippty clomping around the coffee shop and then WHAM!! slipped on the cleat? Ya. Cleats are metal. Metal on hard surfaces tends to be slippery as hell. Clipless shoes have a large area removed to accommodate mounting cleats and allowing them to move forward to back and side to side. So, your clipless shoe with a cleat in it essentially has a big void of traction right near the contact point of your shoe. That means your choices on the platform pedal side are total shit traction, or you can move way forward on the pedal to get to the shoe’s sole around your midfoot or further back. Which isn’t great for control.

Hopefully you’ve learned about the differences between clipless and flats for MTB – we invite you to shop both types of pedals as well as The Best in MTB here on BikeCo.com!

Return to Top of Page

Posted on Leave a comment

Understanding MTB Suspension Controls

Comparing How Pressure on Air Suspension Is Applied

Understanding MTB Suspension Controls

Air Pressure, Volume Spacing, Rebound and Compression work in concert to fine tune you bike’s performance.  Watch the video and read through the blog to be a step closer to understanding MTB Suspension Controls!

Video: MTB Suspension for Beginners

Click through the tabs below to learn more about the specifics of Air Spring Pressure, Volume Spacing, Compression and Rebound tuning.

PSI / Spring Rate

MTB suspension must accommodate a wide range of rider weight. To achieve this nearly all forks and rear shocks use an adjustable air spring.

By varying air pressure riders set a desired sag, or percentage of travel that the bike “sits into” under neutral loading.

Modifying this sag percentage will change small bump compliance as well as bottom out characteristics.

Learning how to Pre-Charge your suspension pump will help you make finite adjustments to sag.

Typically 15% sag is for a firm setup and 20% sag is considered plush.

Fine Tuning Control: Volume Spacing.
Air springs ramp rate, sometimes called Spring Rate, is based on how air compresses in the containment cylinder. As the air is compressed the PSI increases according to the decreasing volume of the containment. This is done via non-compressible volume spacers in the air chamber.

Opposing Control: Rebound.
Higher spring rate will drive the suspension back to neutral with more force than a lower spring rate. To keep the bike from skipping across trail rebound damping is utilized.

“Helping” Control: Compression.
Compression controls provide hydraulic damping to slow the fork through its travel.

Volume Tuning

As suspension compresses (travel reduces) a piston moves closer to the end of a sealed container. By decreasing the volume of the container the PSI pushing back on the piston is increased.

By adding or removing non-compressible volume spacers riders modify the air spring’s ramp rate which directly changes the amount of support and bottom out feel of the fork or shock.

By removing volume spacers a rider increases the available volume in the suspension. The larger volume compresses less per mm of travel resulting in a lower PSI per mm of travel. This creates less support and is utilizes more travel.

Adding volume spacers decreases the available volume. With less air volume the PSI per mm of travel increases providing more support and greater resistance to bottom out.

Opposing Control: Rebound.
Rebound may need to be adjusted for volume tuning depending on how drastic of a PSI change is being tuned in or out of the suspension.

“Helping” Control: Compression.
Compression provides additional support and bottom out resistance.

Compression

Compression controls provide damping to slow suspension travel as a load is applied and the suspension is compressed. (easy one right?)

When riders have found sag and volume spacing preferences compression controls provide minute adjustments to dial in performance. Adding compression provides more support allowing the suspension to ride taller in its travel which is important when dialing in a bike’s personality in corners, etc.

With too little compression a bike will sit deep in the travel. This compromises cornering and braking force resistance. Headtube angle, bottom bracket height, front to rear weight bias, etc are modified as a bike goes through its travel. Maintaining control of the use of travel is paramount for good performance.

Since compression hydraulically slows the suspension’s use of travel it therefor lowers the air spring’s PSI. Properly setting compression controls will help ease the load on the rebound system by controlling the air spring’s push back onto the rebound circuit.

Too much compression will cause a bike to feel harsh and not use appropriate amounts of travel.

Generally, compression settings are fine tuned after sag and volume spacing have riders “in the ballpark.”

Low speed compression controls mid-stroke as well as support in cornering and against brake dive.

High speed compression helps with bottom out and high shaft speed inputs.

3 positions switches are a type of compression circuit with Open the most plush, Mid providing some additional support and Firm for climbing. If you climb in firm remember to put it back to plush for the downhill or you’re in for a potentially rough ride.

Rebound

Rebound damping controls a suspension’s shaft speed returning to a neutral position. Or, how fast the air spring pushes back as the load changes.

More rebound damping slows the suspension by decreasing the amount of fluid allowed to pass through the hydraulic design.

Less rebound damping allows the suspension to return faster with less hydraulic restriction on the damper.

Rebound setting is based on weight, ground speed, terrain and aggression. Setting the rebound properly means finding the right frequency or feel for your riding.

If your rebound is too fast, or doesn’t have enough clicks of rebound, the bike will tend to skip and suffer poor small bump compliance.

When the rebound is too slow, or you have too many clicks of rebound, the suspension may “pack up” creating a harsh ride as each bump uses progressively more travel forcing the suspension deeper into the travel, which will have higher spring rates.

Opposing: Air Spring PSI / Spring Rate.

“Helping” Control: Low & High Speed Rebound.
Some suspension is designed with 2 rebound circuits. The High Speed Rebound circuit is designed to provide additional control resisting increased PSI late in suspension travel. Typically High Speed Rebound settings are used as the Low Speed Rebound controls edge towards closed. Example: you might not use any clicks of High Speed Rebound until you reach “X” clicks on the low speed.

More on Understanding MTB Suspension Controls

While illustrating what started as a real basic, kind of introduction to understanding mtb suspension controls there were some visualizations of “oh, I knew what that felt like, but when I ‘see’ it it makes even more sense”.

Getting a proper suspension setup involves balancing the available adjustments into windows where each characteristic functions. Quality suspension manufacturers tend to have their adjustments in a ballpark for about 140lb to close to 275lb riders.

What this means is that the 20 some clicks aren’t  all “for you” all the time. (which is one of the big benefits of our BikeCo Pro Tunes where we narrow the performance window for your riding style, goals, weight, ground speed etc meaning each click is controlling a smaller performance window giving you more options but more on that another time).

Your needs will dictate a smaller window of adjustment “works” for you. Then you have to find the sweet spot that all of the adjustments are in a functional state.

It’s kind of like a mixing board with a bunch of slider adjustments. There’s settings that produce a great sound – even, balanced. But if you get one of the dials way out of it’s sweet spot you’re going to have to try to use the other controls to compromise the sound (or bike performance in our case) but it’s never going to be that real true, great sound.

Understanding MTB Suspension Dial Comparison

If you want your suspension to work at it’s best you need to identify the “green” zones for your setup and work to keep Air Pressure, Volume Spacing, Compression and Rebound in high functioning areas.

Really the most influential animation in the video, for me at least, was the visualization of when rebound slows the air spring’s return to neutral creating a momentary impact until the forces trying to compress the suspension equalize and overtake the air pressure.

Let’s look at this a bit further.

Simplified Air Spring (eliminating heat) Equation

Pressure A / Volume A = Pressure B / Volume B

The smaller the volume the more the air compresses and pushes back on the walls and piston head.

It doesn’t matter if its your riding weight, an ACME anvil from a cartoon, a tie down strap or a hydraulic circuit that “keeps” the air spring compressed – when the suspension compresses and lowers the volume the PSI rises.

For the following example we’re going to look at too much rebound, or a setup where the rebound is too slow. Mind you this is happening in instants – but it is happening.

The suspension compresses and begins to return for the next feature.

Ideally the system resets with the air spring returning able in a range to support the next input as evenly as possible.

If there is too much rebound dialed in the suspension isn’t going to return to the ideal extension. This does a few things all kind of instantly.

It may change the roll over angle or approach on the next feature. It also may effect the bike’s geometry. This is particularly a bummer in square edge hits that might try to stop the bike while you go flying over the top.

Even in less consequential terrain you lose the suspension’s float momentarily. Since the air spring is being held compressed more than ideal its PSI is higher than ideal. This means when the suspension reengages it might as well be rigid until the forces applied over take the PSI on the piston and allow it to begin to compress.

As an extreme example imagine the difference between punching a padded wall or missing and putting your fist into the block wall behind it. The pad, or air spring, begins to absorb and dissipate that energy so there isn’t the “hard stop”.

This is also the reason you pump the trail when riding. Pushing the bike down and pulling it up give you a secondary, active, suspension system to minimize the shock loads.

Want the worst of all worlds? Set your bike to ride unbalanced on the air spring and then go ride it dead sailor! It’s going to rattle your teeth out, hurt your hands and skip of trail. Exactly the opposite of the balance we’re looking for when understanding MTB suspension controls!

Comparing How Pressure on Air Suspension Is Applied

In the image above we’ve illustrated what we’re using colors to represent loads (or weight, or pressure depending on what makes it easiest for you to understand).

On the left we show a setup with ideal rebound allowing the air spring to extend into a range equal to the next input load. The air spring will absorb the increasing forces from yellow into the orange range.

On the right we show a slow rebound setup. Slower rebound keeps the air spring compressed, lowering the air volume and thus raising the PSI / spring rate.

This means the energy from yellow to orange is forced back onto the rider until the darker orange of the air spring equals the load applied at which point the air spring will begin to carry the load.

This translates as a harsh feeling through the bars or pedals.

Similarly compression settings ideally work in a range with the air spring to allow a comfortable pickup during the suspension travel. If the compression setting is too aggressive the suspension will suddenly come “off” the air spring’s ramp rate and work only off the hydraulic damper.

This creates a harsh ride and sometimes will actually feel quite “notchy” as the suspension transitions from air to damper and back.

All of this circles back to a basic understanding of the ideal ranges of setup and performance and trying to find that sweet spot where the systems are truly working together and helping fine tune performance throughout the travel.

We thank you for the read and hope you took something away that will help you better understand how to dial in your MTB suspension.

We invite you to check out the other content and the best products in MTB here at BikeCo.com

BIkeCo clients have access to our team to help them fine tune stock or Pro Tune Suspension.

Return to Top of Page

Posted on Leave a comment

Interactive Ramp Rate Comparison with Graph

Ramp Rate Graph Blog

Ramp Rate Graphing Example

To help our clients better understand volume spacing and ramp rate we built an interactive google sheet.

This google sheet may not work with all browsers and navigation – if you find issues please let us know and we can help you navigate as needed.

Ramp Rate Comparison: How It Works

In short, viewers are invited to modify Rider Weight as well as choose Sag and Volume Spacers (the white boxes) for up to three setups. This will produce both a chart of PSI at travel percentage as well as a comparative graph with the three series for review.

Now we don’t claim these numbers are “go-to” for your setup – rather they are a reasonably accurate comparison to help you visualize how you can modify your air suspension. This example allows you to visualize differences modifying Sag % (15, 18 or 20%) and Volume Spacing (0-5).

What you’ll notice is how relatively small variations can make a big difference. Particularly in the 60% to bottom out portion of travel.

We hope the additional understanding of how the air system is actually behaving will help riders better modify setup to hit their goals.

After working with the google sheet you can read more below to better understand what the graph shows and why as well as the formulas and reasoning we’ve used.


NOTE: Mobile Users – most mobile applications will require opening the sheet in Google’s App using the link below (but we suggest you check it out on your computer for full functionality)

Ramp Rate Comparative Graph Google Sheet

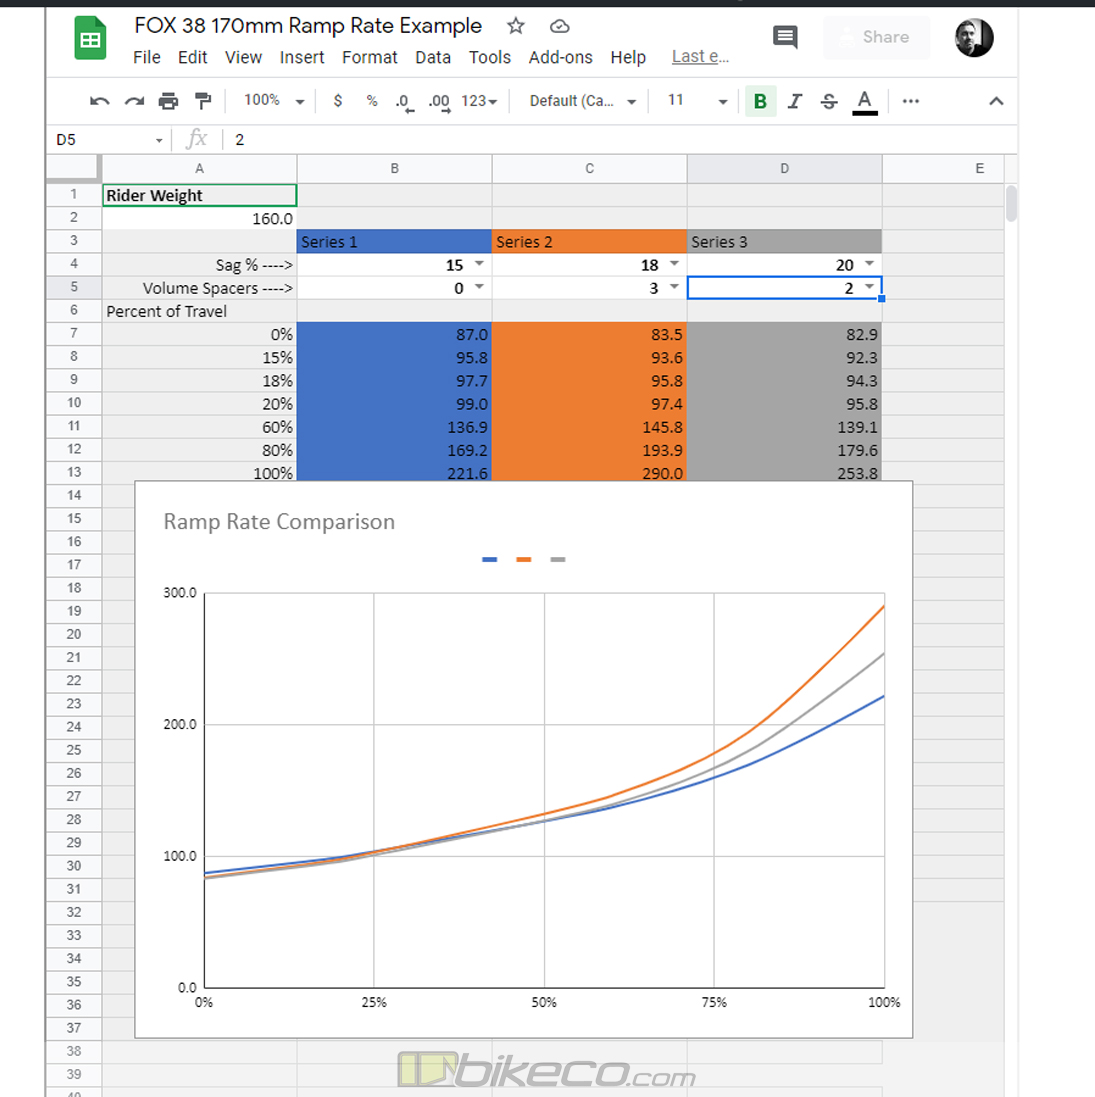
More About Ramp Rate Comparison

Did you see how the ramp rates vary depending on setup? Some changes and the series are very close to each other, while other changes make large swings.

That’s why its’ important to have some basic ideas, or access to a team to help you determine what your suspension is actually doing versus what you’d like it to be doing.

Each point on these graphs represents an “instant” as the air suspension is either rebounding to extension or continuing compression based on load. Understanding the ramp rate will help you fine tune suspension, particularly on components without compression controls.

Forks and shocks with compression controls offer another level of performance hydraulically damping (slowing) the shaft input adding resistance with the air spring. Understanding how to setup compression to balance small bump compliance, mid-stroke support and bottom out can make a big difference in the direction your setup takes.

What Does Ramp Rate Change

How much pressure your suspension produces effects support. Without enough support (too low of PSI) the suspension will sit too deep “eating” up more suspension travel then required by the terrain. Too much support tends to produce a harsh ride as the bike skips across trail.

Ramp Rate effects bottom out and total amount of travel used. With too little air pressure to resist the compression riders suffer hard bottom out, excessive dive, etc. Too much pressure will limit amount of available travel. Remember to mentally review your ride when you compare travel – just because you have the travel doesn’t mean you’re always going to use it. Riding in steep terrain or smooth lines often use less travel than say, slamming straight into a curb.

Using this graph you will have an idea of changes available to you with ramp rate. If the bike “is close” minor sag or volume spacing differences may help with the dial in along with using compression controls if available. If you need larger changes this graph can help you visualize directions that will make bigger impacts.

Other Factors on Setup

So you’ve got your sag, volume spacing and compression pretty good, or even really good in portions of the travel. But, you’re still struggling to really get that “dial in”?

There are other factors to consider, and frankly few “magic bullet” options. Let’s look at some of the common culprits.

Poor Small Bump Compliance

Too much air pressure for your ground speeds is a common cause of a bike skipping across the trail. Tip-toeing down trail tends to be hard on suspension as well. Sometimes, as counter intuitive as it may sound, a bit more speed will smooth out your ride.

Remember force is mass times acceleration – so to add some force to drive the suspension speed is your friend.

Other factors to consider include rim and wheel build spec based on your size and ground speeds. Some rims are very stiff and take pretty high forces to be compliant.

Are you a very light rider? Or medium weight and medium ground speed? Having your wheels built to accommodate you will dramatically help with small bump compliance and traction.

Air pressure comes into play on both poor small bump compliance as well as higher speed “shouldering” issues.

Un-Damped Air Springs

Your fork and rear shock have rebound and compression dampers. But, you know what doesn’t? Your tires.

Remember how hard it was to dial in suspension for Plus tire bikes? With such large masses of air the tires became very efficient secondary suspension but without the ability to really be tuned.

Wider rims and higher volume tires, although not the plus size the marketeers all said we’d be running by now – just sayin – sometimes the hype is just hype eh, but wider rims and higher volume tires made this secondary suspension more of a factor.

Luckily riders have access to different sidewalls which help to damp the tire’s air spring. Rubber is an effective vibration isolator and the additional sidewall technologies help control terrain inputs through the wheels and into the suspension.

Setup & Tune

One of the things we pride ourselves on is unmatched after sales service. Helping client’s take their setups from “decent” to “dialed in” is truly gratifying. Is bottom out, ramp rate, rebound, compression and how they interact confusing? No problem. When you purchase a bike, suspension or Pro Tune suspension our team is here to help you. We can walk you through what the concepts mean and help you articulate what’s working well and where adjustments may be needed.

Our Pro Tune Suspension is a popular option for riders of all levels. Taking the industry leading FOX suspension and narrowing the performance window for individual riders based on ground speed, aggression, riding setup, terrain, goals, etc means that every click of compression or rebound has a narrower adjustment window. Each click has more minute adjustment allowing a more precise dial in.

Questions? Call, chat or email our team today!


Formulas and Concepts for Ramp Rate Comparison

Some insight on the concepts and formulas we used to produce this graph.

Suspension setup has a couple quirks that muddy the water conceptually.

We work with PSI values at full extension during setup to achieve a specific sag. At the sag point, where the suspension settles based on weight, the air pressure has increased from the PSI at full extension (the value we read). Using the same air piston size to support a given weight requires a certain pressure is achieved no matter at what point in the sag.

For our example rather than working with the starting PSI (at full extension) we are using a calculation to determine approximate PSI at sag. This calculation is based on rider weight and starting PSI averages between FOX & Yeti’s FOX 38 170mm setup for 18% sag.

Once we have the PSI at 18% sag with 2 volume spacers we are able to extrapolate a variety of different setups using the support PSI in the proper configuration.

These setup numbers are calculated using volume changes as the fork is compressed in ratio with the defined PSI times Volume at defined Sag. This is done with Boyle’s Law of Pressure1 x Volume1 = Pressure2 x Volume2 which becomes Desired PSI = KnownPressure1 x KnownVolume1 / KnownVolume2

Now, these numbers in the real world would be effected by heat and a handful of other variants that aren’t critical to our reference graphs. Since this is a conceptual visualization for teaching a concept our numbers provide reasonable accuracy.

New Bike Suspension Setup Concepts

New Bike Suspension Setup Concepts

Learn more about setting up your bike’s suspension. At BikeCo.com we pride ourselves on after sales service and helping clients dial in their new bike or Pro Tune suspension is one of our favorite tasks.

Check out this video were Nate goes through some basics of MTB suspension and commonly posed questions during setup.

See the links below for some of the tools and bits mentioned to help you get your setup just right.

Tools to make your MTB Suspension Setup Easier:

FOX Digital Pump, 350 PSI

FOX 350 PSI Digital Shock Pump

FOX Chamferless Sockets

FOX Chamferless Top Cap Sockets


FOX Fork Volume Spacers

FOX Volume Spacers


FOX X2 Volume Spacers (3 rings)

FOX X2 Volume Spacers

FOX DPX2 Volume Spacer Kit

FOX DPX2 Volume Spacers


Return to top of page

Posted on Leave a comment

MTB Handlebar Setup Concepts

MTB Handlebar Setup Main Image

MTB Handlebar Setup Concepts

Dialing in your setup – MTB Handlebars

MTB Handlebar setup is important to a bike’s personality. Suspension, Tires, Brakes are important as well, but if your cockpit isn’t setup appropriately this can be all for not. A proper handlebar with the right setup will be comfortable and predictable across a variety of terrain.

Handlebar dimensions are provided in width, rise, upsweep as well as backsweep. Continue reading MTB Handlebar Setup Concepts