Compare eMTB & MTB FOX Coil Spring Rates

BikeCo.com: eMTB & MTB Compare FOX Coil Spring Rates

note: calculator is easiest to use on a computer, laptop or tablet with landscape screen orientation

Click to select your Shock Size (Eye to Eye x Stroke) in B2 and the Spring Rates in B4 as well as B13 to compare.

[Since this is a google sheet I’m not sure how many users it can accommodate at a time – if it’s being strange you can select another “sheet” at the bottom (Coil_Compare_1 thru Coil_Compare_5) and that might correct it depending on users on the site]

Available Coil Springs with correct fitment for the Shock and Spring Rate are displayed to the right of the chart.
Scroll down for more explanation and details of this eMTB and MTB Coil Calculator’s function.

Find a coil you’re looking for? Or have more questions? Keep reading or use the contact form, chat, email or call 949-470-1099!

Calculator Details and Caveats!

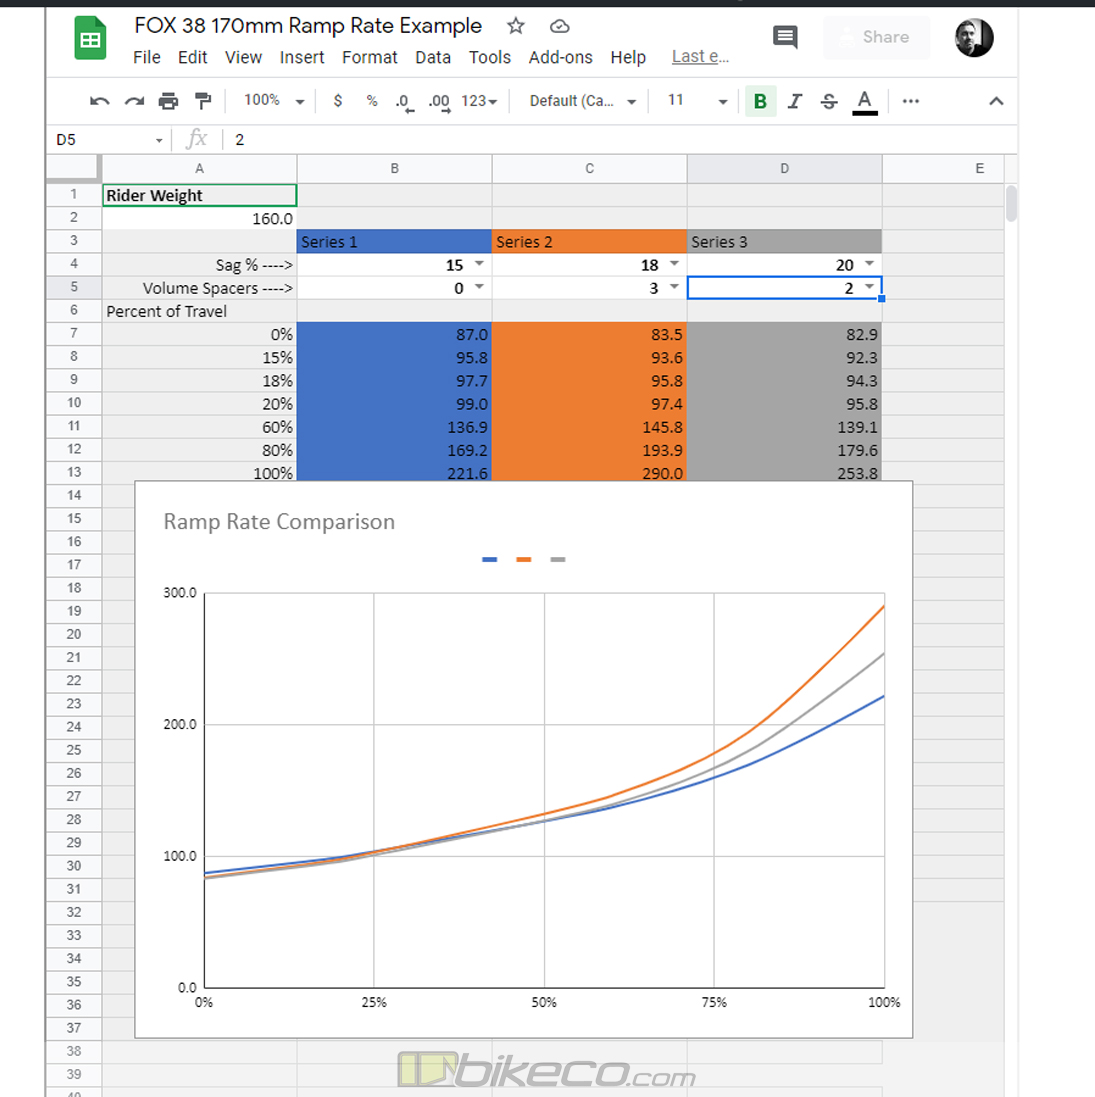
This spring calculator is based around the actual support produced by the spring at full extension with Pre-Load, 30%, 60%, 90% and 100% of the available SHOCK STROKE.

The methodology is calculating the distance that the SPRING STROKE would be compressed in those various states of SHOCK STROKE, in inches, times the Spring Rate in LBs/IN.

Since variations in Pre-Load will create shifts in the total compression length of the SPRING STROKE that is factored into the results.

This calculator DOES NOT take into account bike specific details such as leverage ratios, rising / falling rates, etc. It is available to easily compare cross-over as well as spring specific output.

Quick Details on Rising / Falling Rate Suspension

How much of the spring’s power is actually applied into the linkage varies in part tied to the angle of the linkage compared to the spring’s “push”. As this angle is variable with suspension linkage the percentage of the springs actual output to the suspension system will vary.

eMTB and MTB Rising and Falling Rate Suspension Concept

Rising / Falling Rate Suspension Illustrated

Above you’ll see a basic illustration showing two rising then falling rate suspension linkages.

What makes this important – a coil spring (or air spring) is only 1 to 1 effective when the spring’s power is pushing at 90 degrees to the linkage arm. On the upper graphic this is shown in the Orange details.

Continuing to reference the upper graphic: at full extension the spring’s effectiveness will be slightly less than the spring’s power rating. As the linkage rotates (clockwise in this case) to the 90 degree angle (shown in orange) it is a Rising Rate suspension.

As the linkage passes the orange 90% point until full compression it is a Falling Rate suspension.

How does this matter or effect you?

Well if you’re read this far I hope you’re learning something and it’s interesting right?

Let’s compare the red details between the upper and lower illustrations now.

In the upper illustration the angle between the spring and linkage is more exaggerated than the lower illustration.

This means at full compression the upper spring is exerting a percentage LESS of it’s rated power compared to the lower red detail which is closer to the 90 degree position, thus it is exerting a HIGHER percentage of the spring’s rated power to the linkage.

If I was considering two spring rates I would likely consider using the HIGHER Spring Rate with less Pre-Load in the upper concept and the LOWER Spring Rate with more Pre-Load in the lower scenario.

Is this somewhat splitting hairs? Of course. But, the data is out there, the components are out there so what harm can the knowledge do? (and, I hope that a disclaimer like this eliminates the snarky comments, or at least some of them!)

Final Thoughts on the Above Calculator

So, the calculator won’t tell me what spring to use? Correct. There are too many individualized factors in each bikes’ design to make that really feasible. This calculator ideally gives you a comparison point if you’ve started with some understanding or data point on your setup.

Your bike dealer or manufacturer should be able to provide you with some basic setup concepts and the calculator would provide a reference to compare options around what they suggest.

eMTB and MTB FOX Coil Spring Fitment

Here are some physical dimensions to take into consideration when shopping for the right eMTB or MTB Coil Spring.

FOX Coil ID: Inner Diameter

Current FOX Coils are Inner Diameter: 1.385″

The correct inner diameter ensures proper clearance to the damper body and proper upper and lower “spring perch” sizing.

Coil Stroke versus Shock Stroke

We’ve listed the published stroke or coil travel for each part number.

The Coil Stroke should be greater than, at least slightly, than the Shock Stroke (taking into account that some coil stroke is used with the Pre-Load adjustment – more on that on the next tab).

If your Coil Stroke is equal or, much worse, LESS THAN the shock stroke you will have Coil Bind.

Coil Bind

Example of Coil Bind on MTB or eMTB suspension

Example of Coil Bind on MTB or eMTB suspension shown above.

Coil Bind is when a spring is compressed completely sitting each coil against its neighbors.

Coil Bind may cause damage to the damper body, suspension, bike and rider.

When a coil is completely compressed it is no longer a spring, so the spring rate goes to infinity (like a hard tail bike). This typically results in a bounce which then unloads the spring to “pogo” making the entire situation worse. Coil Bind should be avoided by ensuring that your spec’d Coil Stroke or Coil Travel is greater than the Shock Stroke.

Coil Total Length

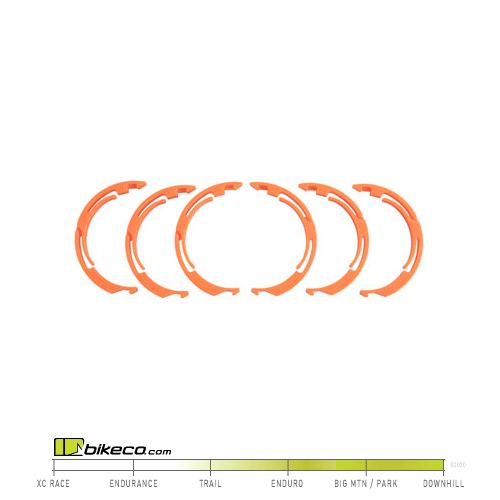
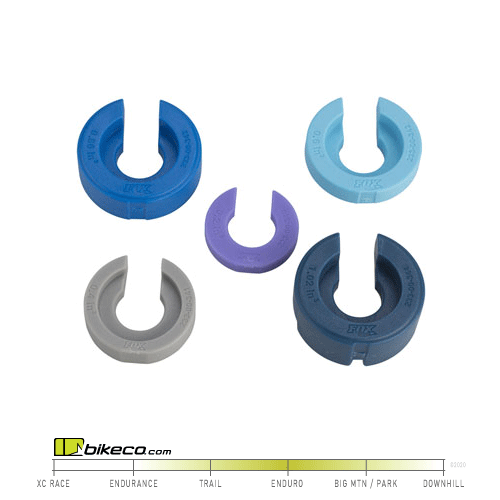
The coil capable FOX dampers have an adjustable ring for Pre-Load as well as to accommodate various Total Length coil springs.

FOX DHX2 Coil Total Length Fitment Chart DHX
FOX DHX2 Min & Max Spring Total Length per Eye to Eye Measurement
Eye to Eye Min Spring Length Max Spring Length
7.5″ 4.32″ 4.38″
7.875″ 4.32″ 5.21″
8.5″ 4.82″ 5.83″
9.5″ 5.32″ 6.84″
10.5″ 5.82″ 7.83″
185mm Trunnion 4.48″ 5.30″
210mm 4.49″ 5.60″
205mm Trunnion 4.88″ 6.09″
230mm 4.88″ 6.39″
225mm Trunnion 5.27″ 6.88″
250mm 5.28″ 7.18″

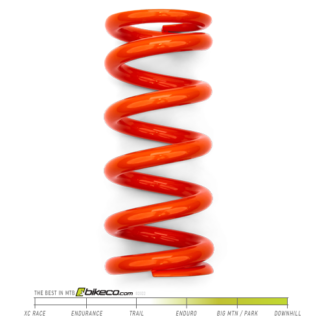
Shop eMTB & MTB Fox Coil Springs


Contact Me Regarding This Product

  • Please contact me by:

  • Question on availability? Spec? Compatibility?
    Our team will be in contact within 24 hours!


  • Hidden
  • Hidden
  • Hidden
  • This field is for validation purposes and should be left unchanged.

Return to Top of Page

Posted on Leave a comment

Comparing FOX GRIP2 and Ohlins RXF Forks

Comparing FOX GRIP2 and Ohlins RXF Forks Trail Test

It’s our goal to ensure we know what parts are right for what rider. Sometimes that means trying a new part, although mostly that’s left to our racers. Sometimes it means looking at a new tune option. This time, it meant finding the edge of the Ohlins suspension on my Mondraker Foxy Carbon. Let’s take a few minutes and compare the Ohlins RXF and the FOX GRIP2 platform.

Not currently shopping forks? Well, keep reading you might find some ways to improve your setup based on the notes on which fork did what on trail and how the fork’s controls affected that.

Take a look at some comparative footage and go through the details comparing the FOX GRIP2 and the Ohlins RXF 36 M.2 forks!

First, Mondraker spec’ing Ohlins on the FOXY is a good choice.

BikeCo owner Joe Binatena tested Ohlins forks as well as shocks, and it’s the first time I’ve seen him run stock suspension in, maybe ever. Joe ended up with Ohlins on his personal Crafty eMTB.

Our purchasing agent Mike has a FOXY Carbon with Ohlins RXF and TTX which he loves. Mike tends to prioritize compliance and traction to add to his riding confidence on bigger bikes. He’s told me that the RXF is notably more planted than this current Rock Shox fork on a similar sized bike.

Both Mike and Joe are on the slightly skinnier than average I would say. Between the two of them a good deal of trail disposition, ground speed and feel can be assessed.

I know both had the Ohlins suspension dialed in within a couple rides since I didn’t hear any behind the scenes chatter about it.

2022 Mondraker US Dealer BikeCo

BikeCo Owner Joe Binatena riding his Ohlins’ equipped Mondraker Crafty Carbon XR

First, Mondraker spec’ing Ohlins on the FOXY is a good choice.

BikeCo owner Joe Binatena tested Ohlins forks as well as shocks, and it’s the first time I’ve seen him run stock suspension in, maybe ever. Joe ended up with Ohlins on his personal Crafty eMTB.

Our purchasing agent Mike has a FOXY Carbon with Ohlins RXF and TTX which he loves. Mike tends to prioritize compliance and traction to add to his riding confidence on bigger bikes. He’s told me that the RXF is notably more planted than this current Rock Shox fork on a similar sized bike.

Both Mike and Joe are on the slightly skinnier than average I would say. Between the two of them a good deal of trail disposition, ground speed and feel can be assessed.

I know both had the Ohlins suspension dialed in within a couple rides since I didn’t hear any behind the scenes chatter about it.

Jumping ahead a couple months, I pulled the trigger on an Ohlin’s spec’d Mondraker.

Even has a heavier rider I didn’t have many reservations purchasing the FOXY with Ohlins suspension. After all, Joe’s riding an eMTB which carries additional mass, and he candidly speaks highly of the platforms.

I knew Ohlins design parameters and goals weren’t a mirror of my previous suspension: Ohlins was looking for a more plush and linear feel for ultimate traction.

Ohlins RXF Fork Main Air Spring Side

If you read my first ride thoughts on the Mondraker FOXY you’ll know I felt like I had the rear pretty close and the fork in a workable area, albeit I knew I could be looking a bit outside the box.

As I continued to ride I found the Ohlins, particularly the fork, lacked midstroke support at my weight and ground speed.

What it felt like and what it was doing on trail just wasn’t there for me. I felt some of it and put it in my notes. Some I spotted in footage. (BTW: the ride footage actually illustrated how well the HSC worked even as the rest of the fork was pushed past it’s limit for me)

Now, I’m not saying that the Ohlins RXF doesn’t work, I’m saying at 275 and looking for a punchy suspension it didn’t work for me. This review isn’t as fair as it could be since the RXF is pushed beyond its limits a bit. If you’re a lighter rider who wouldn’t have that issue keep reading to learn more about how a fork without enough mid-stroke support and too fast of a rebound setting will ride on trail – maybe you’ll unlock your existing or next fork with that knowledge!

Lack of Support: On Trail Symptoms & Adjustments

Here’s a look at the symptoms, why the RXF didn’t make the grade for me (and how the RXF does for both Joe and Mike) and a comparison to the FOX GRIP2 platform.

Early on I was looking for more mid-stroke support from the RXF. The front end would dive into the corners deeper than I expected. On lips or rocks it lacked a bit of the punch back that puts you up and over instead of driving you “backwards”.

I never quite found that in the fork settings.

2022 Mondraker FOXY Carbon RR Review

Ohlins RXF 36 M.2 Settings

I maxed the Ramp Up Chamber PSI. This would give the fork the maximum ramp rate like adding volume spacers. (make sure you fill the ramp up chamber prior to filling the main air spring – it makes a huge difference.)

I also maxed the main air spring. This put the sag into a fairly standard 15-20%, so I didn’t feel like oh no, I’m just plain too heavy for the RXF 36.

I began with Ohlins rebound and compression setup, but I steadily increased the low speed compression until it was maxed. I worked with the high speed compression as well (more on HSC later). I was running the rebound at max and it still was fast, working hard trying to compensate against the main chamber’s PSI.

After the early rides I chatted with our suspension tuners. We tore down the air shaft assembly (it is very very nicely made fyi) to get a better idea how the three chamber system was implemented.

Ohlins RXF Fork Air Spring Disassembled 1

Ohlins RXF Air Cartridge

At first glance the Ohlins system is reminiscent of an older design concept: adjust the main chamber PSI on top, adjust the negative chamber on bottom.
But, on the Ohlins’ lower port you’re not charging the negative chamber. As mentioned, the RXF uses a third chamber.

When setting up the Ohlins RXF you first charge the Ramp Up Chamber at the bottom of the fork. This controls how linear or progressive your fork will feel and there is a range of PSI suggestions assigned to your weight.

After setting the Ramp Up you set the main chamber PSI. As the fork cycles slightly the piston passes an equalization port and charges the negative air chamber.

In short:
Ramp Up = Ramp rate control. Adjustable. Set first during setup.
Main Chamber = Supports your weight. Adjustable.
Negative Chamber = Prevents top out and minimizes initial piston stiction. Fills based on main chamber PSI.

Early on the fork felt kinda close. But no matter what I did I couldn’t force it into a state of too much support, from which I would need to back down either Compression or Ramp Rate.

I didn’t even find a “this is the right amount of support but I have everything maxed” feel.

With more rides I noticed performance attributes I didn’t particularly like but hadn’t put my finger on the solution or given up on the product at that point. I spent some time looking at my notes and watching some footage.

Extended First Ride Mondraker FOXY Carbon Review

My initial riding notes: Ohlins RXF 36 M.2 Fork

Felt too soft into corners, couldn’t counter steer into turns and drive off feet. It felt like to change direction requires a lot of steering input.
(Turning in with your hands increases the chance of folding the front end and going over the bars compared to counter steering and leaning, which tends to generate and outward slide when traction is lost and is easier to “catch”.)

Too soft landing and taking up bumps on takeoff. Lacked “punch back” in rocky or chunky sections and pop off lips.

High speed compression is works WELL! With the fork notably soft, I tried to compensate with the HSC.

I was hoping to “cheat” the HSC into activating lower in the travel.

But, the RXF High Speed Compression seems truly isolated to high shaft speeds (which is how it’s supposed to work). The fork didn’t bottom out when I had the HSC cranked way up (like just short of a pedal platform feel) it kept me out of the last 20-30mm of travel. (more on this in just a second)

I started to come to terms that the RXF wasn’t for me when I began to work with lower tire pressures. My first few rides had been on aggressive tire pressures. As I started down in pressure the lack of midstoke support was much more notable.

Also, in bigger terrain I couldn’t slow the rebound down quite enough to maintain traction. I hadn’t noticed in the flatter terrain as I was able to compensate with knees and elbows, and a bit of slide didn’t hurt. But at speed in bigger terrain the bike wasn’t quite as sure footed as I expected.

The final straw, trying to new content angles I mounted a GoPro on the front triangle with the fork stanchion in frame. The video is choppy as hell (I was trying to pull stills from it) so I doubt I’ll publish it – but it showed an interesting attribute.

Through a series of bermed corners I noticed when I jumped (or more like floated I suppose is a better word) but if I was in the air, landed and changed direction the fork was riding taller in the travel compared to corners I just “rode” into.

I attributed this to landing pushing the fork at speeds that engage the HSC, even lower in the travel. This improved mid stroke support, albeit not in a way that was useful consistently. It also gave me an idea why sometimes I felt the bike cornered better than others.

Well, that was enough for me to call it a game.

Mondraker FOXY FOX X2 Float 38 with Nate

So why didn’t the Ohlins fork work for me?

Well, Mike and Joe are both notably lighter, even with the extra mass of Joe’s Crafty eMTB.

Mike runs the ramp up chamber at a higher psi then listed for his weight to fine tune the ramp of the RXF. But running at the top end of the PSI charts I didn’t have that adjustment window.

It seemed like adding standard volume spacing to the main chamber would have pushed the fork into the realm for me, but, based on the way the air shaft is produced it would be a lot of machining bits and would be difficult to adjust.

In short, I was looking at a lot of work that wasn’t very consumer friendly to try to make the Ohlins ride punchier, like a FOX GRIP2, when, you know, there’s a FOX GRIP2 on the market…

FOX Factory 38 GRIP2 170mm

I’ve got a lot of years on the GRIP2 at this point. My previous bike had the 36 GRIP2 and I find it’s personality very parallel to the FOX 38 that I put on the Mondraker FOXY.

Why the 38 on the FOXY? I wanted the 170mm option – but I’ll have another writeup on my Extra FOX FOXY… haha..

So. Put the 38 GRIP2 on the FOXY. I decided to set it up the air spring similarly to the RXF – so I looked at the leg and found the highest number and set it to 123 PSI (which it stated was for 250lb riders). When I looked deeper at the FOX manuals I found that the fork has a max PSI of 140, however I had pretty good sag at 123 so I’d probably keep it in that range either way.

I increased the stock 2 volume spacers (20cc) with an additional 10cc. At 170mm the fork has a max capacity for 5 volume spacers.

Even in the parking lot the bike had a better disposition. On trail it unlocked the bike.

I could counter steer and lean deeper into corners. The bike punched over the rocks and chunk instead of stuttering into it.

With more support in the front end the bike felt dramatically more confident in steep chutes or rocks by taking advantage of the headtube angle instead of nosing in making the bike “steeper”.

Rear braking, which was already ridiculously good on the FOXY, improved notably as well without as much front brake dive.

When the front end dives in it will slightly unload the rear wheel. Re-weighting your feet can help to drive the wheel back down into the ground, but simply having less rake change under braking is an easy way to achieve the same thing.

In short, the bike did all the things my previous GRIP2 bike did that I loved so much…

Mondraker FOXY Carbon with FOX 38

But what definitely seals the deal on it the rebound and compression controls were both in an adjustable range, not fully max’d out. Even if my bike works at a max adjustment it still sits in my head like “hmm, I wish I had one more just in case” hahaha…

With the 38 GRIP2 on my FOXY I have tons of low speed compression still available – although – if you go too high into the low speed settings it tends to make a bike harsh and hard to hold onto in big, fast terrain.

So I would say I’m in the proper range on the LSC – I wouldn’t want to add more than a click or two without starting to wonder about it.

High speed compression on the 38 is in the right setup range as well. It didn’t require a very polarized setup to adjust the bottom out and high shaft speed control.

Both high and low speed rebound are set with some adjustability in either direction.

After my first two rides on the 38, the same rides as the RXF, I reviewed my notes. Maybe the 38 could use just a touch more to balance with the X2 rear shocks setup (I changed rear shocks too – more on that in other posts!).

I chatted with Joe and we decided that going to the 4th volume spacer would probably be the play. But while researching a couple things for this writeup (never want to give you guys bad info – we appreciate the reads!) I found that the max PSI for the FOX 38 air chamber is higher than the 123 I saw on the sticker. (when all else fails check out Manual right?)

According to page 3 of the manual the 38 has a max PSI of 140. So, There are two choices to increase the PSI or increase the volume spacers and thus increate the ramp..

The beauty of options right? Which is really what I’m going to conclude on here.

Mondraker FOXY Carbon with 170mm FOX GRIP2

UPDATE: Soft Support & Fast Rebound = Harsh Ride

OK a quick addition to this blog. Working on the video supporting this FOX GRIP2 versus Ohlins RXF comparison (above) I sent rough footage to a handful of riding buddies and reviewed it with Joe and our suspension team to better understand what story the footage told versus what I felt versus what we knew mechanically about the different forks.

I hadn’t laid up any graphics or anything, just two images next to each other timed at the beginning of each section. When I mentioned one was the FOX with much better support almost everyone initially thought the fork that visually was riding harsh had to be stiffer option. Maybe I confused them since I had the FOX on the left and they knew I rode the Ohlins first? I dunno. But no, the harsher looking fork was actually the setup that was too plush overall for me.

The combination of running through travel and rebound that couldn’t be slowed into an ideal range created a harsh ride visible on the video. The harshness is probably mostly attributed to the rebound speed, although the overwhelmed LSC and air system weren’t helping that.

In the video you can see a handful of turns that the RXF does well at when landing before the turn engaging the HSC (which worked really well even on a fork that I was pushing outside it’s performance window).

The lack of support is notable in the footage by the increase in “hand” steering. As the fork would sit in deeper it would require more input to change direction and MUCH more input to exit the corner. Compared to the more supportive fork which would turn in easily, allow the bike to lean in to take the rest of the turn “through” my feet before exiting the corner, usually with an increased exit speed compared to the softer fork.

Like I mention in the video, and above – this isn’t a truly fair “comparison test” between the GRIP2 and the RXF since the Ohlins was pushed beyond its capacity. But, you can look at this data comparing a better setup versus a setup that’s too fast and without enough support.

Mondraker FOXY Carbon with FOX 38 GRIP2

Am I saying the FOX 38 GRIP2 is better than the Ohlins RXF?

For me? 100%. Done and done. Heavier rider, prefers punchy suspension, decent ground speeds. Ideally (even if its just mental) want to have a bit of range on my setup to fine tune.

The RXF didn’t have it in the tank at my size. (also, full disclosure having the BikeCo Pro Tune options on the FOX 38 and X2 allows me to improve my adjustability range even a bit more)

For you?

Not going to tell you the GRIP2 is better or worse than the RXF without knowing more about your size, riding style and preferences!

Riders I know well, who know suspension well, who really enjoy the Ohlins product.

Are you in the 140-220 range? Looking for a slightly more linear, high traction, planted setup? Well then the Ohlins is 100% on your short list for review.

As a product review, without being in my shoes, or similar shoes I suppose it’s hard to look at the two top suspension options and say you should always do “X”. In fact, maybe you’re on the right product with the wrong setup? That’s one of the reasons we continue to work with our clients after bike or suspension delivery to help continue to dial in performance to unlock your rigs full potential.

Like we mentioned at the top, even if you’re not shopping forks right now some of the ride notes might resonate with you and you can improve your setup. We work hard with our clients to ensure initial setup as well as helping with developing setup as their riding speeds and skills increase.

Check out some pics of the 170mm “Extra FOXY” Mondraker FOXY Carbon with FOX 38 and Float X2 here.


Return to Top of Page


FOX 38 Manual & Details: Fox’s Site

Ohlins RXF 36 M.2 Manual & Details: Ohlins’ Site

Posted on Leave a comment

4 Common Reasons Your MTB Shock is Losing Air

4 Common Reasons your shock is losing air

You’ll hear this a lot from MTB and eMTB riders: my shock (or fork) is losing air. Every time I check it it’s lower than I left it.

Well there are a few reasons that a functioning shock will show lower PSI.

Are you Pre-Charging your Pump?

The most common is not pre-charging the pump line prior threading the pump on and opening the Schrader valve.

This one is pretty easy to explain – the gauge is located at the end of a volume of hose. If you do not pre-charge that hose to approximately what you have in the shock when you open the Schrader valve to your air spring you increase the volume of the main chamber which will lower the overall PSI.

The smaller the suspension’s main chamber the more dramatic the PSI drop will be.

That’s why it’s a good idea to pre-charge your suspension pump. Thread the pump on until it makes a seal with the shock but hasn’t yet opened the valve.

Charge the pump to approximately what is in the main chamber.

Finish threading the pump onto the fork or shock. It will show a more accurate pressure of the main air spring as it doesn’t have the volume loss as a non-charged pump.

Like I mentioned this is the most common cause for “air loss” in suspension. It is seen in both the fork and rear shock.

Did You Cycle the Shock and Charge the Negative Air Chamber?

Another common cause for lower pressure, particularly in rear shocks, is setting the pressure and not charging the negative air chamber.

This is typically seen when large PSI jumps are made in the shock such as a brand new piece of equipment.

What does it look like? You set the pressure to the suggested PSI. You jump on the bike and go ride. Bike feels soft. You check the air and it’s dropped from the beginning of your pedal.

Unlike most forks, which usually charge the negative air chamber at full extension and thus see less of this, your rear shock most likely has an air divot to charge the negative chamber somewhere a bit into the stroke.

That means it takes a few compressions of the suspension to engage the negative air chamber. And once the piston allows the negative air chamber to fill it effectively drops the volume of the main chamber. Then when the shock extends and you check the PSI it will be lower.

It is a good practice to give a rear shock a few bounces during setup, especially when large PSI changes are made to ensure that the negative air chamber has charged and the shock will have the support you expect.

Does it Need Seals? Or Just Had Seals Installed?

It is actually more rare for a shock to be truly bleeding off PSI than for one of the above two to be the culprit on new suspension.

As the suspension ages seals may degrade and can be the cause of air loss. Suspension manufacturers have suggested service intervals based on hours of operation, but if your more aggressive on your equipment, such as a racer, you may find that shortening the service window keeps your bike running smoothly.

Some common causes of premature seal wear include dirt ingress, which is why it is so important to keep your stanchions as clean as you can before each ride. The less dirt the suspension pulls into the seals the less abuse on the seals, shafts, etc is incurred.

Occasionally a recently serviced fork or shock may ‘roll’ a seal or have been nicked during installation. Typically you’ll find this out when you’re setting back up for your ride or on your first ride. This is very rare on a professional level as the quality control of parts and service techniques eliminates the chance for most of this. But, there’s typically a handful of small to medium seals which make create an air-tight chamber and if one of them isn’t working you might have a slow leak.

Dirty or loose Schrader valves can cause air loss, although most shocks have a decently sealed cap these days.

Extreme temperature or altitude changes will effect your PSI and should be accommodated for. Check your sag before your chair lift day at altitude!

A less common cause, but it is out there: chemical degradation. Seal materials are susceptible to being attacked by other chemicals – so be aware of what comes in contact with your suspension.

A typical way to test for faulty seals is to set the shock at a test pressure, say 100psi, and allow it to sit overnight. Pre-charge a pump and check the pressure. A notable drop, ie more than might be expected from the pump increasing the main chamber volume, is likely worth an additional look.

Another test, although I must disclaim this one a bit, is to submerge the shock and watch for bubbles. I try to avoid this option as much as possible personally as I find it has to be a pretty decent leak for me it to be losing air visibly and can tend to be detected using the overnight pressure test. If it is leaking and pulls water in you’re going to have remove the water and any contaminated oil or grease since you don’t want water diluting or boiling in your suspension’s air chamber.

Very Rare PSI Loss Causes

The least common cause of air loss would be a crack or micro-crack in a casting. This can be a hard one to determine, particularly as it may require the shock to cycle and load up before the pressure rises enough to “open” the crack and vent air pressure.

Occasionally seals will have a similar end of service life where the air loss is occurring as the PSI increases, but, it’s fairly uncommon.


In conclusion, most of the air loss attributed to new or newly serviced product can be traced back to the pump increasing the volume, and thus lowering the pressure or in the case of rear shocks the negative air chamber charging.

If you’re using good practices with your setup and still noting air loss the next step is most likely to do a seal service, especially if the shock is near the service window or if its’ been used in extreme conditions.

If the new seals aren’t helping it’s probably worth digging a little deeper and possibly using a professional resource to help you locate the issue.

Local or ride in the South Orange County area? Come by and have our team service or tune your suspension. We are located at 21098 Bake Parkway #112 in Lake Forest near the corner of Bake and Trabuco.

Return to Top of Page

Posted on Leave a comment

Adding Volume Spacers to Ohlins TTX Air Shock

Adding Volume Spacers to Ohlins TTX Air Shock

Enjoy a quick video, blog and some detail photos which detail adding volume spacers to Ohlins TTX Air Shocks. Now, Ohlins has some great data on their site as well, we’ll provide a couple links below, but here’s a couple real world tips and tricks for the Ohlins TTX Air Shock spec’d on the 2022 Mondraker FOXY Carbon RR.

Airing Down an Ohlins TTX: A Bit Different Than I’ve Been Used To

Let’s start with really the biggest difference I felt like I came across when changing volume spacers on the Ohlins TTX. When you release the air the shock compresses. With some force!

Ohlins TTX Air Shock Compressed with No Air in can

Aired down – and compressed! I took out the valve stem just to make sure I had all the main system open…

This created two interesting problems for me until I got it confirmed from our mechanics…

I watched the Ohlins video and saw the shock compress but didn’t think much of it (or didn’t think of what I was really seeing I guess!)

So, I went to air down the TTX like I had so many other shocks with a 3 way wrench. Except, when the TTX compressed the head of the shock grabbed the wrench and pinned it to the frame! Well, I thought, I’ll just air it up – oh wait, there’s a three way stuck in the way… It wasn’t too hard to get some leverage on the rear triangle to free the wrench but I did feel like a rookie for sure. I included the clip in the video since its kind of funny I suppose.

Now, the other issue, I immediately recalled other brands of suspension that if you aired the shock down and it went down (suck down as it’s called) it was going to be a somewhat sketchy problem to disassemble it. So I grabbed Tracy and made sure that 1 I hadn’t skipped any steps and 2 wasn’t going to have a shock detonating with a loaded negative air chamber damaging anyone in the work area…

Turns out this particular shock just needs to be unthreaded for a bit to come loose and allow for the volume spacers to be accessed.

If you watched the video the rest of this is just to help reinforce your understanding – and it’s great for SEO too right?

Loosen the Air Shaft

Loosen the air shaft which clamps down the outer sleeve. This is done with a bottom bracket tool. Be patient and get a good grip on it. After a couple turns you can easily turn it by hand and put the tool back on the table.

Once you’ve cleared the threads the shock will extend like the image below.

Ohlins TTX Air Shock Unscrewed and Extended

Ohlins TTX Volume Spacers

This TTX carries two different types of volume spacers, in two different places. When you open the shock you will see the two band volume spacers spec’d on the 2022 Mondraker Foxy’s shock.

Ohlins TTX Air Shock stock volume spacers

The other volume spacer, which gives you the most amount of ramp rate increase is located at the other end of the shock on the shaft.

It is a puck style volume spacer and 1 and only 1 spacer should be installed on the inner shaft.

First pull back the retainers.

Determine volume spacers in Ohlins TTX Air Shock

Carefully move the retainers out of the way and pull out the volume spacer.

In this case the was the Ohlins E volume spacer (the biggest available in the kit) and since I wanted to max the volume spacers I simply put it back in its place.

Determine volume spacers in Ohlins TTX Air Shocks

Maximum Volume Spacers for Ohlins TTX

At this point I needed to determine how many volume spacers I could add to the shock.

Using the Ohlins chart from the TTX owners manual, and a distributor to figure out the part number for the shock I determined I could run 20,000 cubic mm’s.

The stock puck was 12,000 and the 2 bands were 2,000 each – meaning I could add two additional band spacers.

Ohlins TTX Maximum Volume Spacers Installed

which I did.

Adding Volume Spacers to Ohlins TTX Air Shock

To finish adding volume spacers to Ohlins TTX Air Shock simply reassemble the shock in reverse order of disassembly.

One thing to make sure of – the outer air can has a locating tab, insure that it is fit into the proper slot during reassembly.

IF YOU HAVE ANY DOUBTS OF YOUR MECHANICAL ABILITY, HAVE A PROFESSIONAL SERVICE OR CHECK YOUR WORK!

Ohlins TTX air can tab

Check out more on the Ohlins’ TTX on BikeCo.com:

Extended First Ride: A Mondraker FOXY Carbon Review

Ohlins TTX Owners Manual (page 11 illustrates volume spacer options)

(note – one of the manuals indicated a higher max PSI than was shown on my shock. I deferred to the detail ON MY SHOCK. If you have issues or questions with that contact your sales team or Ohlins for confirmation)

Ohlins Volume Spacer Video

Return to Top of Page

Posted on Leave a comment

Mondraker MIND Telemetry Unavailable in the US

Mondraker MIND Telemetry Unavailable in the US
(clip from) Mondraker FOXY Carbon First Ride Review: Extended

Mondraker MIND Telemetry Unavailable in the US


I DON’T MIND

 
A question my, rather small, set in our ways, group of riding friends asked was what I thought about the Mondraker MIND Telemetry.
 
Well, for whatever reason: App licensing? Patent limitations? Something else I don’t know about? I dunno. But, however you cut it: MIND telemetry is not available on the US bikes.
And it doesn’t bother me.
 
Don’t get me wrong, I enjoy data. It’s interesting and you can look at it a lot of ways. But, like an old boss of mine was apt to say: figures don’t lie, but liars can figure…

APP DRIVEN TELEMETRY

 
So, app driven suspension suggestions (turn this dial put in this PSI) even based on a good deal of telemetry input, well it’s just not 100% credible to me. (funniest one was a GPS setting that rated like smoothness – What? How? Why?)
 
Telemetry sheets are graphs with spurts of data points. Usually spikes or arcs and all kinds of shapes. Any app that’s telling you “twist this 2 clicks and that 1 click and do this with the PSI” is using an algorithm of what it sees to make those suggestions.
 
Does data help a pro racer with a competent suspension tech? Yup. But a large part of that relationship is talking about “this is what I felt when I was riding best”, “this might have led me to be in the wrong position during ‘x’” and “ya, I just fluffed the lines there and the data is outlier.”
 
Working with a person who can chat about all the minutia has huge dividends and that’s one of the focal points of our bike suspension setup, delivery, and follow up process here at BikeCo.com
(which is SUPER important on the heavier eMTB rigs – if your eMTB isn’t setup right, well, sorry. You’re gonna chase that for a while and it’s going to compromise your ride quality)

CAN YOU SEE THE INPUT?

 
Riding footage adds an interesting dynamic to fine tune setup (notice the racers tend to practice with them?).
 
Being able to watch and see: “ya, that’s a proper line within my skill set and I think the fork should have rode taller” versus, “whoops, ya, I smashed through the travel because of rider error there – glad the bike was there at all!”

MY EXAMPLE: DEMO RIDE QUESTION

 
On my Mondraker FOXY demo I came across an example I think would have confused an app and led down the wrong rabbit hole.
The demo (which lacked the low and high speed compression controls on the FOXY Carbon RR Ohlins or the RAZE Fox Factory suspension) was quick to turn down, or dive into corner entry.
 
However, it felt like it would “stall” for lack of a better term when I tried to drive it to full lean angle around the apex.
 
So what was going on? What were my options? And, getting to the point of this blurb – does an app have any chance at this or did I need a certain amount of data and review with a competent person? (bet you know which way I’m going)
 
Joe and I chatted about it over lunch after the ride. (I have access to Joe Binatena one of the most sought after suspension people in MTB – and you know, if you buy a bike, suspension or a Pro Tune from The Bike Company so do you through our team…)
 
Mid to fast Bermed corners. Suspension PSI setup properly. Tire pressure OK, possibly a little high (I hate flats, and I hate flats more on test rides…)
 
I generally don’t trail brake through corners (in fact the demo bike had brakes I hated so I was braking super early to insure it would slow down…) so the bike was sitting at a proper attitude going into the turns.
 
If you brake too late or into a corner it creates a “nose down” attitude. This creates issues as the bike runs deeper into travel giving up some traction and having a more “harsh” feel – maybe harsh isn’t the right word, but a faster or more aggressive push back since it’s running at a deeper PSI?
 
Not to toot my own horn, but it might take a bit of experience to feel the bike “hang” during the lean. Of course, now that you know it can be a thing you’re ahead of where I was then right??
It might be more likely that a rider would note the bike felt slow rotating around the corner and wanted to push (understeer) to the outside of the corner.
 
Those complaints are probably going to lead to softer tires and possibly a softer suspension right? Help keep more grip to get around the corner?
 
Except, in my case that’s not what was happening. Those changes would just make the bike squirmy (too low of tire pressure) and slow out of pocketed corners as the suspension would use too much travel compromising momentum and steer input.
 
Would it have killed me to go the wrong direction with those setup mods? Probably not.
 
BUT! If I came back after the ride with lower pressures and still had the complaint and went well, if SOME was a good idea MORE must be better… I’m quickly off into the weeds of suspension setup and probably frustrated with my purchase.
 
Here’s where a live, thinking person with access to a team (am I describing BikeCo? Of course I am) has a huge advantage. If I had lowered the pressure and spoke with my contact and was like “WHOA, didn’t help” we’re probably looking at other setup options.
Because what was the fix? More ramp, more compression. The bike wasn’t exactly “pushing” or over-steering as much as it was unable to maintain the tighter early apex cornering line which then set me wider at exit.
 
Going frame by frame with the riding footage it seemed like the fork was setting in a touch deep into the travel into the corner apex / pocket, but then kind of slowly settling down a touch deeper as well. Probably the split second of the bike compressing (and slowing) drove my body slightly ahead in the bike which then added to more of front end settling in.
 
Watching the video the trail showed the bike SHOULD have load through the suspension at that point, but it was setting in (as you would expect) then kind of slowly continuing to load.
 
It made sense to have the suspension loaded into the corners, so I wouldn’t want to increase rebound as that would decrease overall grip and ride quality bouncing me around.
 
Air pressure was an option – however the bike wasn’t sitting super deep on the first section of the lean or cornering. So again, increasing air pressure would decrease grip and could induce skip.
 
So where were the answers?
 
Increasing Ramp Rate: make each MM of the suspension past sag take a little bit more load to compress it.
 
Increasing Low Speed Compression: similar to the ramp rate adjustment increasing compression slows the forks progression through the travel giving it more support.
 
Perhaps a small increase to High Speed Compression: Adding high speed compression in small increments can be helpful too.
 
Back to my point on having my phone send me a post ride SMS (not sure if that’s a function any have but it seems funny to say) to make all those ideal changes?
 
Yaaaa, I don’t think that’s gonna happen? So, no telemetry? I don’t MIND.
 
 
Posted on Leave a comment

Interactive Ramp Rate Comparison with Graph

Ramp Rate Graph Blog

Ramp Rate Graphing Example

To help our clients better understand volume spacing and ramp rate we built an interactive google sheet.

This google sheet may not work with all browsers and navigation – if you find issues please let us know and we can help you navigate as needed.

Ramp Rate Comparison: How It Works

In short, viewers are invited to modify Rider Weight as well as choose Sag and Volume Spacers (the white boxes) for up to three setups. This will produce both a chart of PSI at travel percentage as well as a comparative graph with the three series for review.

Now we don’t claim these numbers are “go-to” for your setup – rather they are a reasonably accurate comparison to help you visualize how you can modify your air suspension. This example allows you to visualize differences modifying Sag % (15, 18 or 20%) and Volume Spacing (0-5).

What you’ll notice is how relatively small variations can make a big difference. Particularly in the 60% to bottom out portion of travel.

We hope the additional understanding of how the air system is actually behaving will help riders better modify setup to hit their goals.

After working with the google sheet you can read more below to better understand what the graph shows and why as well as the formulas and reasoning we’ve used.


NOTE: Mobile Users – most mobile applications will require opening the sheet in Google’s App using the link below (but we suggest you check it out on your computer for full functionality)

Ramp Rate Comparative Graph Google Sheet

More About Ramp Rate Comparison

Did you see how the ramp rates vary depending on setup? Some changes and the series are very close to each other, while other changes make large swings.

That’s why its’ important to have some basic ideas, or access to a team to help you determine what your suspension is actually doing versus what you’d like it to be doing.

Each point on these graphs represents an “instant” as the air suspension is either rebounding to extension or continuing compression based on load. Understanding the ramp rate will help you fine tune suspension, particularly on components without compression controls.

Forks and shocks with compression controls offer another level of performance hydraulically damping (slowing) the shaft input adding resistance with the air spring. Understanding how to setup compression to balance small bump compliance, mid-stroke support and bottom out can make a big difference in the direction your setup takes.

What Does Ramp Rate Change

How much pressure your suspension produces effects support. Without enough support (too low of PSI) the suspension will sit too deep “eating” up more suspension travel then required by the terrain. Too much support tends to produce a harsh ride as the bike skips across trail.

Ramp Rate effects bottom out and total amount of travel used. With too little air pressure to resist the compression riders suffer hard bottom out, excessive dive, etc. Too much pressure will limit amount of available travel. Remember to mentally review your ride when you compare travel – just because you have the travel doesn’t mean you’re always going to use it. Riding in steep terrain or smooth lines often use less travel than say, slamming straight into a curb.

Using this graph you will have an idea of changes available to you with ramp rate. If the bike “is close” minor sag or volume spacing differences may help with the dial in along with using compression controls if available. If you need larger changes this graph can help you visualize directions that will make bigger impacts.

Other Factors on Setup

So you’ve got your sag, volume spacing and compression pretty good, or even really good in portions of the travel. But, you’re still struggling to really get that “dial in”?

There are other factors to consider, and frankly few “magic bullet” options. Let’s look at some of the common culprits.

Poor Small Bump Compliance

Too much air pressure for your ground speeds is a common cause of a bike skipping across the trail. Tip-toeing down trail tends to be hard on suspension as well. Sometimes, as counter intuitive as it may sound, a bit more speed will smooth out your ride.

Remember force is mass times acceleration – so to add some force to drive the suspension speed is your friend.

Other factors to consider include rim and wheel build spec based on your size and ground speeds. Some rims are very stiff and take pretty high forces to be compliant.

Are you a very light rider? Or medium weight and medium ground speed? Having your wheels built to accommodate you will dramatically help with small bump compliance and traction.

Air pressure comes into play on both poor small bump compliance as well as higher speed “shouldering” issues.

Un-Damped Air Springs

Your fork and rear shock have rebound and compression dampers. But, you know what doesn’t? Your tires.

Remember how hard it was to dial in suspension for Plus tire bikes? With such large masses of air the tires became very efficient secondary suspension but without the ability to really be tuned.

Wider rims and higher volume tires, although not the plus size the marketeers all said we’d be running by now – just sayin – sometimes the hype is just hype eh, but wider rims and higher volume tires made this secondary suspension more of a factor.

Luckily riders have access to different sidewalls which help to damp the tire’s air spring. Rubber is an effective vibration isolator and the additional sidewall technologies help control terrain inputs through the wheels and into the suspension.

Setup & Tune

One of the things we pride ourselves on is unmatched after sales service. Helping client’s take their setups from “decent” to “dialed in” is truly gratifying. Is bottom out, ramp rate, rebound, compression and how they interact confusing? No problem. When you purchase a bike, suspension or Pro Tune suspension our team is here to help you. We can walk you through what the concepts mean and help you articulate what’s working well and where adjustments may be needed.

Our Pro Tune Suspension is a popular option for riders of all levels. Taking the industry leading FOX suspension and narrowing the performance window for individual riders based on ground speed, aggression, riding setup, terrain, goals, etc means that every click of compression or rebound has a narrower adjustment window. Each click has more minute adjustment allowing a more precise dial in.

Questions? Call, chat or email our team today!


Formulas and Concepts for Ramp Rate Comparison

Some insight on the concepts and formulas we used to produce this graph.

Suspension setup has a couple quirks that muddy the water conceptually.

We work with PSI values at full extension during setup to achieve a specific sag. At the sag point, where the suspension settles based on weight, the air pressure has increased from the PSI at full extension (the value we read). Using the same air piston size to support a given weight requires a certain pressure is achieved no matter at what point in the sag.

For our example rather than working with the starting PSI (at full extension) we are using a calculation to determine approximate PSI at sag. This calculation is based on rider weight and starting PSI averages between FOX & Yeti’s FOX 38 170mm setup for 18% sag.

Once we have the PSI at 18% sag with 2 volume spacers we are able to extrapolate a variety of different setups using the support PSI in the proper configuration.

These setup numbers are calculated using volume changes as the fork is compressed in ratio with the defined PSI times Volume at defined Sag. This is done with Boyle’s Law of Pressure1 x Volume1 = Pressure2 x Volume2 which becomes Desired PSI = KnownPressure1 x KnownVolume1 / KnownVolume2

Now, these numbers in the real world would be effected by heat and a handful of other variants that aren’t critical to our reference graphs. Since this is a conceptual visualization for teaching a concept our numbers provide reasonable accuracy.

New Bike Suspension Setup Concepts

New Bike Suspension Setup Concepts

Learn more about setting up your bike’s suspension. At BikeCo.com we pride ourselves on after sales service and helping clients dial in their new bike or Pro Tune suspension is one of our favorite tasks.

Check out this video were Nate goes through some basics of MTB suspension and commonly posed questions during setup.

See the links below for some of the tools and bits mentioned to help you get your setup just right.

Tools to make your MTB Suspension Setup Easier:

FOX Digital Pump, 350 PSI

FOX 350 PSI Digital Shock Pump

FOX Chamferless Sockets

FOX Chamferless Top Cap Sockets


FOX Fork Volume Spacers

FOX Volume Spacers


FOX X2 Volume Spacers (3 rings)

FOX X2 Volume Spacers

FOX DPX2 Volume Spacer Kit

FOX DPX2 Volume Spacers


Return to top of page

Posted on Leave a comment

BikeCo Tips & Tricks: Understanding Rear Shock Negative Air Chamber

Understanding Rear Shock Negative Air Post

BikeCo Tips & Tricks: Understanding Rear Shock Negative Air Chamber

A fairly common question is “why does my rear shock lose air when I check it?” While there are mechanical issues that may cause air loss not pre-charging a pump or understanding how the negative air chamber works are more often the culprit.

Continue reading BikeCo Tips & Tricks: Understanding Rear Shock Negative Air Chamber

Posted on Leave a comment

BikeCo Tips & Tricks: Basic MTB Suspension Setup

MTB Suspension Setup Video

BikeCo Tips & Tricks: Basic MTB Suspension Setup

2020 brought a lot of new faces to MTB. We’re stoked to see more people benefit from the sport we all love. That said, a lot of shops simply can’t support rider development like we can. So, here’s a video & blog going through Basic MTB Suspension Setup.

We’ll look at sag, rebound, volume spacing, compression as well as high and low speed damping.

Continue reading BikeCo Tips & Tricks: Basic MTB Suspension Setup

Posted on Leave a comment

PreCharging a Suspension Pump – BikeCo Tips & Tricks

PreCharge Pump Blog Image

PreCharging a Suspension Pump – BikeCo Tips & Tricks

Let us show you how to precharge a suspension pump for the most accurate air suspension setup.

Many of our clients, and all of our racers, are looking to really dial in suspension. In order to accomplish this it is important to make minute adjustments to air pressure. This blog and video illustrate what’s happening in your air spring and why precharging a suspension pump is so important.


Continue reading PreCharging a Suspension Pump – BikeCo Tips & Tricks