
Better Small Bump Compliance Riding Technique
Every MTB rider is looking to improve their suspension. At BikeCo we offer the best products on the market as well as proprietary Pro Tune Services to maximize performance. Still having issues? Let’s look at Better Small Bump Compliance through technique and more powerful brakes.
Quick review. Poor small bump compliance causes a bike to skip across the trail. This leads to inefficient and somewhat unpredictable cornering as well as braking. Small bump compliance issues can be from product design, over compressed suspension circuits, oil flow, fitment and more. Custom tunes address these for many riders but occasionally we get a rider with intermittent small bump issues. Many times this comes down to technique.
Before we jump into technique best practices let’s take a look at what changes as suspension dives deeper into its stroke (or travel).
Air suspension has a progressive spring rate. This means deeper into the stroke the more force is pushing against the internal piston. It also means that the ramp rate will be more aggressive per mm of stroke.
Because of this, when your suspension runs deeper in the travel than necessary it is likely to have less small bump compliance.
Why would the suspension sit too deep? Two reasons come up more often than others.
Suspension Pack
Suspension pack from too slow of a rebound setting. This is when the rebound is too slow to allow the suspension to reset to neutral before the next terrain feature. Each consecutive hit without a return to neutral drives the bike deeper into the travel. “Packing” it down.
Rebound setup is particular based on terrain and riding speed. Too slow and it packs down, producing a harsh feel while being much more likely to bottom out. Too fast on your rebound and your small bump compliance goes away as you skip across the trail.
For the average rider there is a range of a couple clicks that should work for rebound. It is important to have a proper setup but ideally it’s not a knife edge like “4 is rideable 5 doesn’t work”…
A more common issue derives from braking technique.

Small Bump Compliance from Big Brakes
Most of us have seen it. Hell, most of us have done it at some point – staying on the brakes too late and making a feature way harder than it is. The bike noses down, suspension bucks all over, rider is terrified.
Well the same thing can happen if you don’t allow the bike’s suspension to neutralize after braking.
A somewhat extreme example:
Think about, I don’t suggest trying it, but rolling up a curb. With a modern mountain bike it should be fairly easy to just thump up the thing. Now imagine if you smash the front brake first. It noses down the bike driving the suspension deeper into the stroke then absorbs the curb forcing the suspension even deeper.
Now the fork has much more force loaded as it works to deal with the curb hit. (You riding position may also be compromised forward making you more likely to go over the bars as well.)
The suspension is going to feel stiffer or more harsh. The rebound damper is having to work much harder to control the energy. It can feel like a whole different bike.
Where this tends to happen on trail is brake bumps into corners, or in steeper chutes, things along this nature.
These Brake Bumps Feel Gnarly
You’re headed into a corner. Maybe your eyes were bigger than your stomach. Perhaps you got on the brakes a bit late. For whatever reason you stay on the brakes too late.
This drives the suspension into the travel creating a harsher feeling than necessary.
So now the minor brake bumps, because you’re not riding directly over the huge ones right, are capable of bouncing you all over. Since your exit line is relatively dependent on corner entrance if you’re skipping all over a make-able corner becomes kind of sketchy.
A similar issue happens in chutes or steeper terrain. If you are going to use the brakes you can expect a different feel from your suspension. If you’re prepared it’s really not too big of a deal. W
hen you’re unaware why the bike suddenly feels harsh it may lead you to more brake and harsher ride quality.
So What Can You Do? Brake Technique and Setup
We all have to slow down our bikes. Given. But dialing in how your slow the bike goes a long way towards optimum performance.
Don’t drag brake as it adds heat to the system compromising power. Get on the brakes, slow down, and get off to let them cool.
Try to find the best areas to slow down. ie where the brakes will easily do the most work. Slowing before the steep roll in is better than charging into the chute having to grab handfuls of brake on the way down. While you may slow a bit in steeper conditions the amount of heat the brakes absorb is disproportionate.
Having issues with with power and heat capacity? Well that’s why 4 piston brakes in addition to larger rotors with more heat capacity are popular.

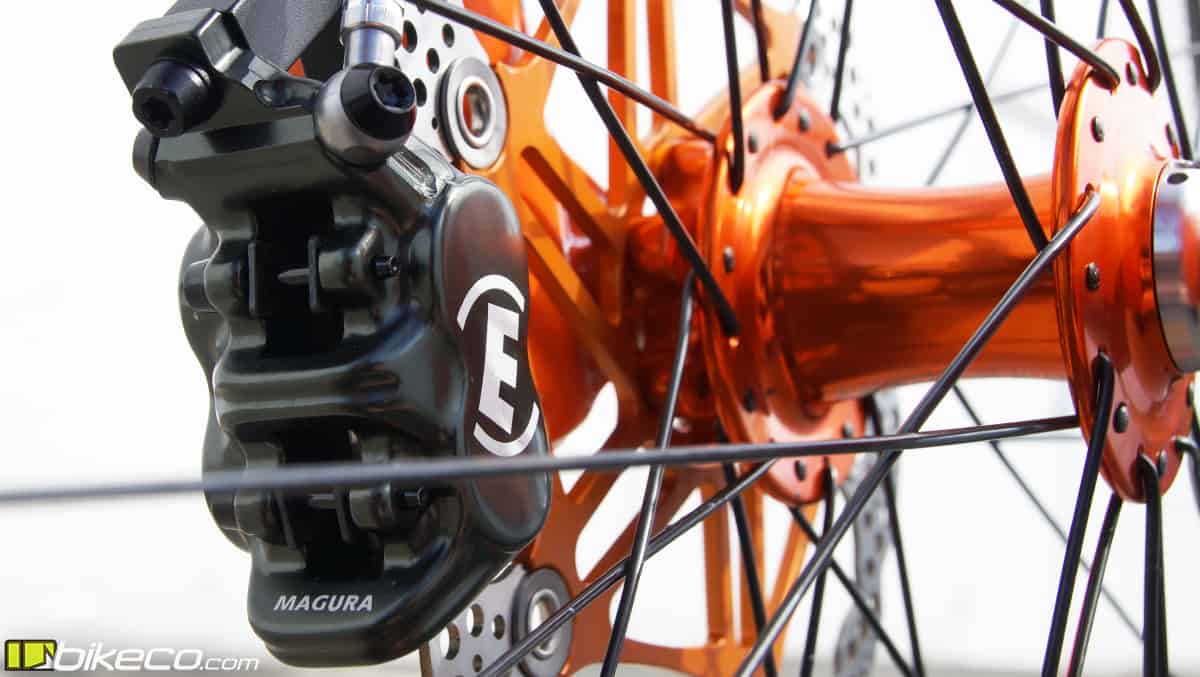
Hope & Magura
The most popular 4 piston brakes on the market are Hope and Magura. These have incredible modulation, control of power, as well as total power and heat capacity.
The great power control (modulation) allows predictable performance from Trail riding into the steeper Enduro or Bike Park terrain.
4 piston systems have increased brake pad area as well as larger caliper bodies. With the additional performance from the brake system different rotor sizes can be spec’d.
This is my personal favorite part of 4 piston brakes. I find that as a larger rider the additional heat capacity and power is a no-brainer. Rather than only having the option to increase rotor size, by going to 4 piston brakes I am able to balance rotor size with preferred trail performance.

The larger rotors the more heat capacity. True. This is partly due to the increased circumference between pad contact per revolution. The potential downside to the larger rotor is the additional leverage. While increased leverage adds to power it will also decrease the feel of modulation. Since I really value modulation in my brakes I find that a 4 piston setup with 7″ front and 7″ or 6″ rear depending on terrain is an ideal setup.
Smooth, predictable, trustworthy brakes allow me to confidently slow the bike. Releasing the brakes the bike resets to a neutral position and is ready to attack the terrain.
Check out the best from Magura and Hope. Have questions on which brake setup is best for you? Chat, call, or email with our expert staff today. BikeCo’s team will get you the best spec, setup, tune and pricing in MTB!