
Effective Seattube Angle Explained
Part two in an extended look at MTB Geo. (We started with explaining how Reach & Stack are directly connected) In this post we will examine how steeper effective seattube angles stretched bikes out, but actually made them more nimble and even may lead to riders downsizing. As counter-intuitive as it may seem… In short, modern seattube angles position riders further forward. This requires a longer reach dimension as well as extends the front center and wheelbase. But, riders are better centered on the bike. Pair this with quality suspension you gain additional control of both front and rear wheel.
Let’s jump right in.
Seattube Angle & Effective Seattube Angle
MTB geo requires a series of compromises. Rider position. Suspension pivot points. Stay lengths. Wheel travel. These are all factored into the modern seattube, and therefor effective seattube angle.
Unlike a beach cruiser or BMX frame a modern MTB frame typically hangs the bottom bracket behind the actual seattube. Along with better centering a rider, this provides improved clearance for the rear tire at full compression as well as other benefits. However to accommodate this change, it modifies how seattube angle is listed.
That’s where Effective Seattube Angle comes into play.
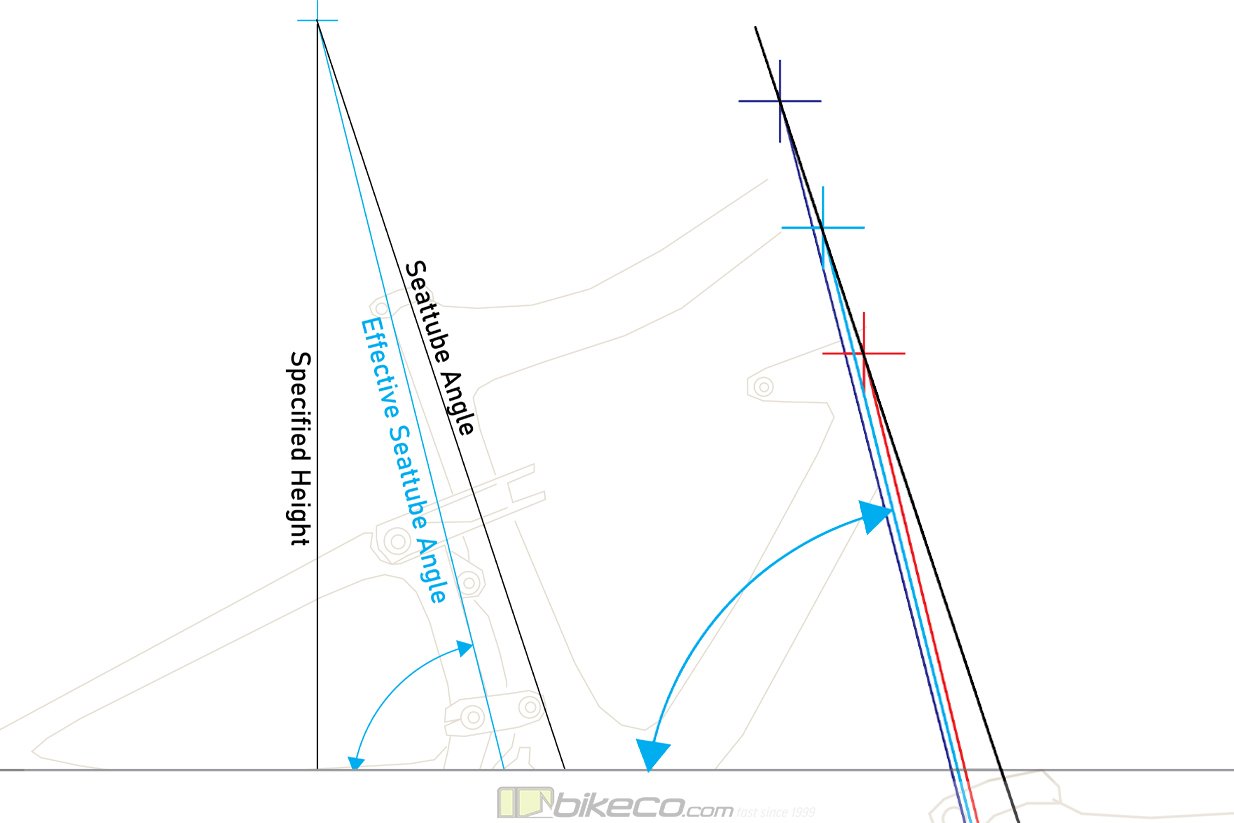
Effective Seattube Angle Explained
Effective seattube angle is the projected angle from the center of the bottom bracket to an intersection between the actual seattube angle and a specific height.

Since effective seattube angle is based on a brand specified height it is variable. This makes “apples to apples” comparisons of the dimension tougher.
In the image below we manipulate the specified height by 50mm (about 2″) and you can see the effective seattube angle shifts.

The taller rider (dark blue line and cross) ends up with a slacker seattube angle than the geo lists. The rider with the shorter inseam (red) actually ends up riding a steeper seat tube angle than published.
The shift measures about 1/2 of a degree either direction. Now that’s not much, but the point is: it’s an angle that can be dictated from a marketing team so you have to take it with a grain of salt.
On the illustrations above the actual seattube angle is moderately steep. If the frame’s actual seattube was slacker the change in effective seattube angle becomes more pronounced. Conversely, if the actual seattube angle is steeper, the saddle doesn’t travel as far rearward during extension. Both can cause issues.
During the off-season when one of our pro riders received a prototype frame to test. The bike had such a steep actual seattube angle that it felt like it was a size too small. After confirming measurements it was the right size. But, as the saddle extended it didn’t travel rearward very far. Pair this with a taller cockpit and the bike became cramped climbing, seemed too small, but was OK downhill, where it fit more as you would expect. Long and short (get it, reach joke?) it didn’t make for a fun all day rig.
Long bike, short fit?
So bikes can have monster reach numbers and still ride small? Yes, some.
In fact, with steeper seattubes and slacker headtubes we’re seeing more conversations about “upsizing” again.
As riders are positioned further forward frame manufacturers had to make space. Before we jump into that though let’s look at the benefits of these steeper seattube angles. Because they’re real.
Why Steeper Effective Seattube Angles?
Handful of reasons. Very top tier, priority one answer? It balances the bike climbing NOTABLY better. I suspect a couple distinct reasons for this. In particular I feel moving the rider weight when climbing closer to the descending position has leverage advantages. Well, err, let’s say it lessens the leverage disadvantage of having your weight further back when you climb.
When I first rode steeper seattube bikes I noted that they climb markedly better. It felt like you could utilize the suspension while climbing much more. Both pumping the trail or using the “pop” to help climb technical sections. Honestly it made climbing a bike a lot more fun (I’m, ah, not really in the sport for the climbs hahaha). I felt improved control right off the bat. Moving further forward allowed me to better control the front tire as well. So even in the tighter sections, say San Juan Trail’s switchbacks, having improved control of both wheels simultaneously had me confidently getting around the corners even with the longer wheelbase. Sitting too far over the rear wheel compromises front end control. So my shorter bikes actually were more challenging (not the fun kind of challenge) in those switchbacks as the front wheel pushed all over.
The further “behind” the suspension the more leverage you apply. This would mean more minute motions generate higher suspension movements. Well, none of us want a sloppy climbing bike so that had to be accommodated for. Problem is none of us want a bike with poor small bump compliance either. So, I mean, accomodate for the extra leverage climbing some, but, you know, don’t make it so stiff that when in your descending position it’s going to rattle your teeth out. Point is, the best suspension designers working with the best geo designers are finding ways to allow better tunes by narrowing the leverage input range. And it happens that it is 100% notable on trail. Bonus…
Another notable reason we touched on earlier – tire clearance. Bottoming a tire on your seattube isn’t good for anyone, or anything. So one option was longer stays, not a real popular idea as moving the rear axle back notably effects handling. The other option was to move the seattube forward, a bit ahead of the bottom bracket. This had another benefit maximizing the suspension pivot mount positions. Rather than hanging far off the chassis they could be incorporated closer into a more stout frame assembly. Lowering leverage on the pivots while reducing weight. Not bad right?
Pushing the effective seattube angle forward required reach to be compensated for accordingly. Which is how we ended up with longer and longer bikes. That, in some cases, actually fit smaller!
Steeper Seattube, Longer Wheelbase
Well we moved you forward and probably a bit lower. Maybe more “into” instead “on top of” the bike per se. We started working with shorter stems, say 35mm to 55mm average. So frame’s reach stretched out. And we’ve gone a little bit more slack with headtubes to relax the bike’s handling. These lead to longer wheelbase bikes.
But in my opinion, these longer wheelbase bikes actually behave much better, even in the tight stuff. Looking at my last three bikes, each was an evolution in geo and each rode notably better than the previous. To the point that comparing my SB130 to bikes I owned prior to my HD4 just isn’t fair. My large SB130 has a longer wheelbase than an XL Santa Cruz Bronson 2. But because of the geo and suspension it rides more confident and nimble.
Keep your eye out for the next in this series when we explore some concepts on cockpit fit versus front axle placement as well as weight input versus axle dimensions.
Until then see you on the trails!