

150 vs.160mm Fork on Yeti SB130
Close only counts in horseshoes and hand grenades right? Well when it comes to mountain bike setup a few millimeters create notable differences. Let’s take a look at 150 vs. 160mm fork on Yeti SB130.
After a extended review of the factory Yeti SB130 X01 setup I built my own, with a bit different spec. This article reviews these setup changes and the shifts in trail personality. Before you stop reading thinking “I don’t ride that bike” many enduro style bikes tolerate the types of spec changes we’re going to look at.
By no means am I saying my spec is perfect or right for everyone. There are positives and negatives to it all. Work with a competent resource if you have questions on what’s appropriate!
Fork & Geometry
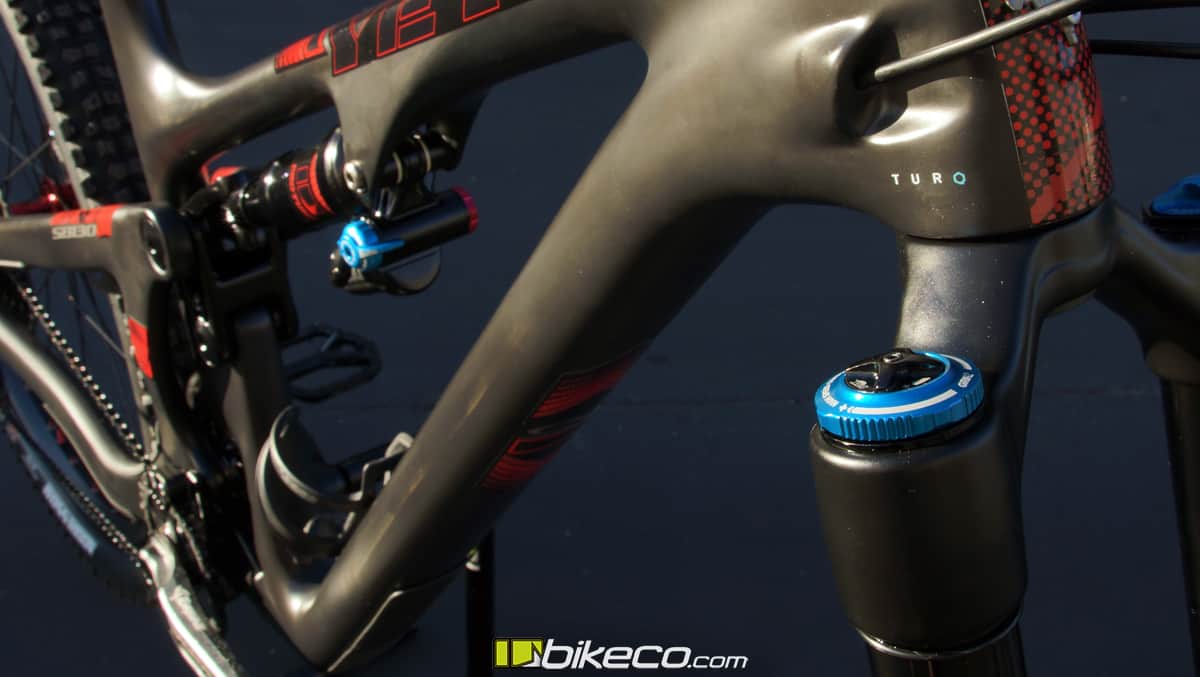
The factory spec Yeti SB130 features a 150mm Fit4 Fox fork. I built mine with a 160mm Grip2.
The extra 10mm has a greater impact on the bike’s geo than just adding 6.7% more travel. Increasing the distance from the crown race to axle slackens the headtube, increases wheel base as well as lifts the bottom bracket.
Slacker Headtube
I wasn’t able to get a precise measurement on the headtube angle change. I’d say it’s less than a degree, and in the world of modern mountain bike geometry that’s notable. It’s also a number that’s argued about with religious vehemence so, not going onto that limb with a number! Visibly you might not notice it unless you knew what you were looking for.
A slacker headtube creates more of a “thumper” personality when attacking terrain. The bike needs more force on the bars to change direction. You may notice the front end is more apt to wander climbing, particularly in technical terrain. Between the slacker headtube and longer wheelbase the front end may feel a bit “heavier” to manual or wheelie.
Conversely the taller front end can create a more supportive, balanced feel, with a bit more resistance to the over the bars feel.
Higher Bottom Bracket
I was able to get a pretty good measurement on the bottom bracket change. 3.2mm taller than stock. Factors are the fork as well as possibly a touch more height in my 2.5″ Aggressor rear tire compared to the stock 2.3″ Aggressor.
Bottom bracket height is another oft debated number in MTB. Where’s the balance between center of gravity, thus cornering personality, and the ability to smash over anything while pedaling? Depends. A rally car is faster than a desert truck, except when it’s not.
Sidebar on Bottom bracket height, crank length & pedal strikes. Professional EWS riders tend to run 170mm cranks. They’re racing, and pedaling through, essentially downhill level courses separated by seconds or less. I’m not! At 6’1″ I’ll stick with 175mm cranks for leverage and to ease my knees. Recently I realized that when testing new bikes I tend to have a couple pedal strikes on the first few corners. It’s because I’m not riding it at my normal lean angle. Check out more on this blog BOTTOM BRACKET HEIGHT AND CRANK LENGTH. Anyhow. Back to it.
Preference Spec Changes
Handlebar Height: Even before the gray hair I’ve had lower back issues. To help alleviate this I’ve gone to taller bars and stem stack for a more upright pedaling position. A 15mm taller setup on my personal bike versus the test bike is really, really notable. Upside of tall bars (beyond my back) when riding steep terrain they provide improved support, especially when paired with an extra click or two of compression into the fork. Downside, you give up cornering grip and front wheel tracking while climbing.
Rear Tire: In an earlier article we covered tire shape and it matters. I was able to lean past the cornering lugs on the 2.3 tire mounted to a 30mm rim. It made for some adventurous slides at times, which if I had done them completely on purpose would have looked awesome. If you saw my face you’d know I only had “so” much faith I was pulling it off! The 2.5″ Aggressor provides more grip at deeper lean angles. Downside? While I don’t feel the contact patch is increased too much, there is a weight difference that slows the tire a touch. Remember rubber is heavy. But it’s also the only thing really touching the trail – so, it’s a balancing act like everything else.
Grip2 vs. Fit4: Frankly both are awesome dampers. The Grip2 offers High and Low Speed Rebound & Compression while the Fit4 provides a 3 position adjustment. A real beauty of the modern Fox chassis is its ability to run any of the dampers as well as a variety of air shaft lengths. In short – my 160mm Grip2 can easily be a 150mm by swapping an air shaft. It could be a Fit4 by swapping the damper.
How It All Rides
Ok, abridged spec changes: slacker, taller bars, higher bottom bracket, larger rear tire. On trail on the new build, here we go…
Well, I straight blew the first corner! Now, I’m blaming a couple things. First I took a horrible entry line (I was trying to ride with 1 hand pulling up my shorts, which the first ride multi-tool and pump were pulling down. I guess I should get some sort of pack hahaha.). My tire pressures were too aggressive (I went with my 27.5″ settings which were too stiff when adding the extra volume of the 29″ tire as well as a 2mm wider rim combo.). But, mostly I didn’t get enough weight on the bars.
Aired down the tires. Dusted off the ego. And dropped back in between a couple other riders. I ended up catching the rider in front of me, but there wasn’t anywhere to get by so I tucked in. It proved to be good as I was able to concentrate 100% on weighting the bike in and out of the corners rather than trying to rip down the trail. It gave me a chance to find the balance points on the bike. The remainder of the day was much better.
The slacker, taller front end requires more weight to change direction. This requires you to ride further forward on the bike to leverage weight into the front end. Or to accept that the bike isn’t going to bite quite as well and deal with it.
I tend to ride off the back wheel a bit. and over the years have become much more comfortable with a bit of drift entering or exiting a corner. This works well on mid to high speed corners particularly with increasing radius. The slightly taller bottom bracket may help in g-out corners when I’m sitting on the back wheel, although I can’t say I’ve had issues with the stock bottom bracket either.
The 150mm fork rides more planted especially in tight or “pocketed” switchbacks and corners. The increased “push” feeling of the slacker bike would feel a bit slower in series of tight corners.
A somewhat surprising upside to the taller handlebars was better performance manualing at speed or floating off hips, etc. With the longer, slacker front end I really expected to have to pull bars to get the wheel up. Well, the taller bars sit in an improved leverage / power position making it easier than expected to balance the bike off a lip or manual across features. (at least as well as I can manual that is…)

A Quick Wrap
Taller bars require more weight to keep the front wheel planted. They provide more support in the steeps and change power positions. Finding the right balance for your body requirements, terrain and preference.
10mm more fork modifies BB, Headtube Angle, and Wheelbase. You feel these changes between tight, pocketed turns and more open high speed corners through how planted your tires feel. The standard setup will be a bit more nimble with quicker handling. A taller setup provides a bit more “thump” capacity which may allow you to ride faster into and out of terrain at the potential cost of a bit of drift here and there.
I’m not precise enough to notice the 3.2mm change in bottom bracket – but if you are, or you like the idea of a bit taller BB sometimes a taller fork will be appropriate.
You don’t necessarily need a new fork for these types of mods – so you’re not stuck one way or another.
I hope some of my personal experience was insightful to you! Work with your resource to help answer questions on how personalizing a setup can change your on trail performance.
Looking for even more performance out of your bike? Let’s chat about BikeCo Pro Tune options! I can’t say enough good things about my Pro Tuned fork and rear shock. The fork has greatly improved small bump compliance and the DPX2 rear shock provides a bit more “pep” out of the corners without compromising the Switch Infinity small bump compliance.
In the market? Chat with the expert staff here at BikeCo.com about how to dial in a Yeti factory build or spec a custom for your particular needs! BikeCo offers the best in MTB at the best pricing, every day.
8/10/19: lots of questions on how a SB130 would pencil out as a Mullet – Here’s some answers
Update 12/29/18 – I spent some time really trying to figure out some more details on this. Read more about 150 vs. 160 Fork Headtube, Trail & Flop
Looking for more info on the Yeti SB130? Check out our YETI SB130 FIRST RIDE REVIEW as well as YETI SB130 EXTENDED RIDE REVIEW
See you on the trails – Nate at BikeCo.com