Posted on Leave a comment

4 Common Reasons Your MTB Shock is Losing Air

4 Common Reasons your shock is losing air

You’ll hear this a lot from MTB and eMTB riders: my shock (or fork) is losing air. Every time I check it it’s lower than I left it.

Well there are a few reasons that a functioning shock will show lower PSI.

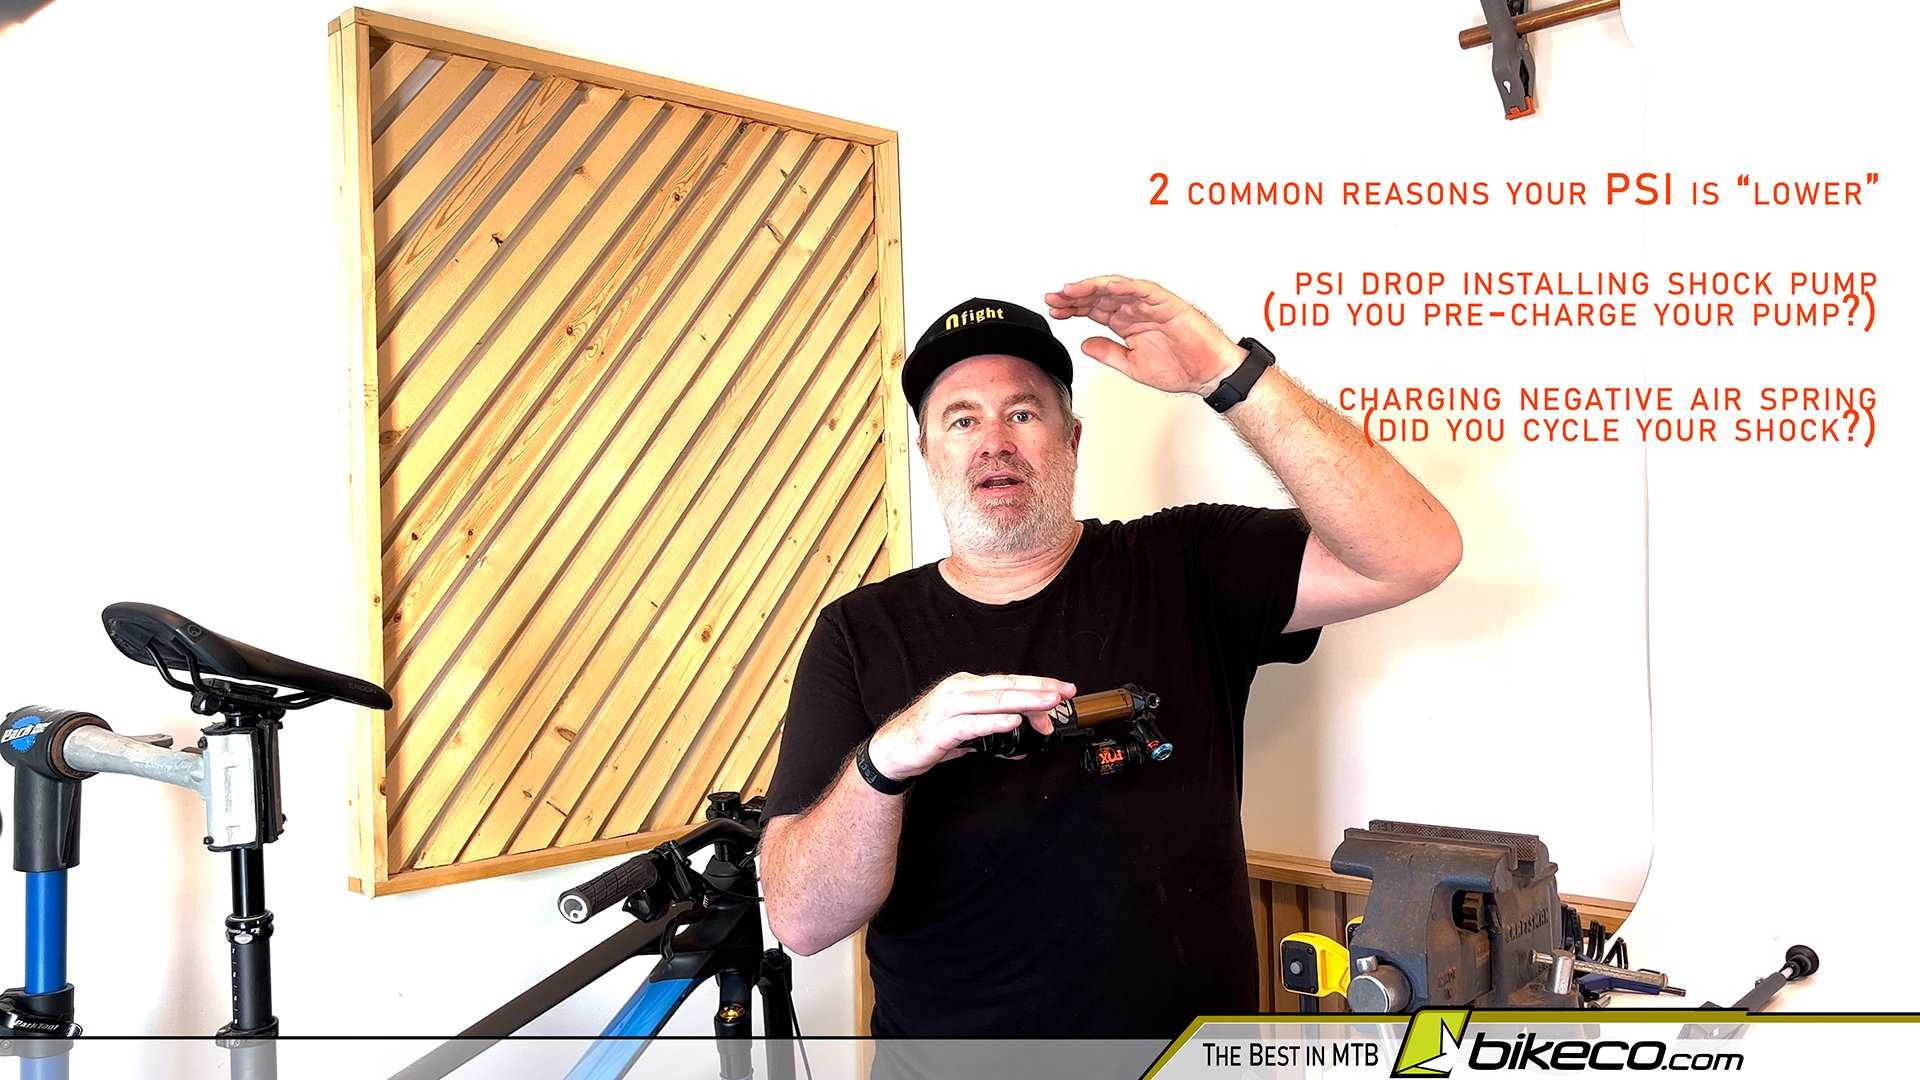
Are you Pre-Charging your Pump?

The most common is not pre-charging the pump line prior threading the pump on and opening the Schrader valve.

This one is pretty easy to explain – the gauge is located at the end of a volume of hose. If you do not pre-charge that hose to approximately what you have in the shock when you open the Schrader valve to your air spring you increase the volume of the main chamber which will lower the overall PSI.

The smaller the suspension’s main chamber the more dramatic the PSI drop will be.

That’s why it’s a good idea to pre-charge your suspension pump. Thread the pump on until it makes a seal with the shock but hasn’t yet opened the valve.

Charge the pump to approximately what is in the main chamber.

Finish threading the pump onto the fork or shock. It will show a more accurate pressure of the main air spring as it doesn’t have the volume loss as a non-charged pump.

Like I mentioned this is the most common cause for “air loss” in suspension. It is seen in both the fork and rear shock.

Did You Cycle the Shock and Charge the Negative Air Chamber?

Another common cause for lower pressure, particularly in rear shocks, is setting the pressure and not charging the negative air chamber.

This is typically seen when large PSI jumps are made in the shock such as a brand new piece of equipment.

What does it look like? You set the pressure to the suggested PSI. You jump on the bike and go ride. Bike feels soft. You check the air and it’s dropped from the beginning of your pedal.

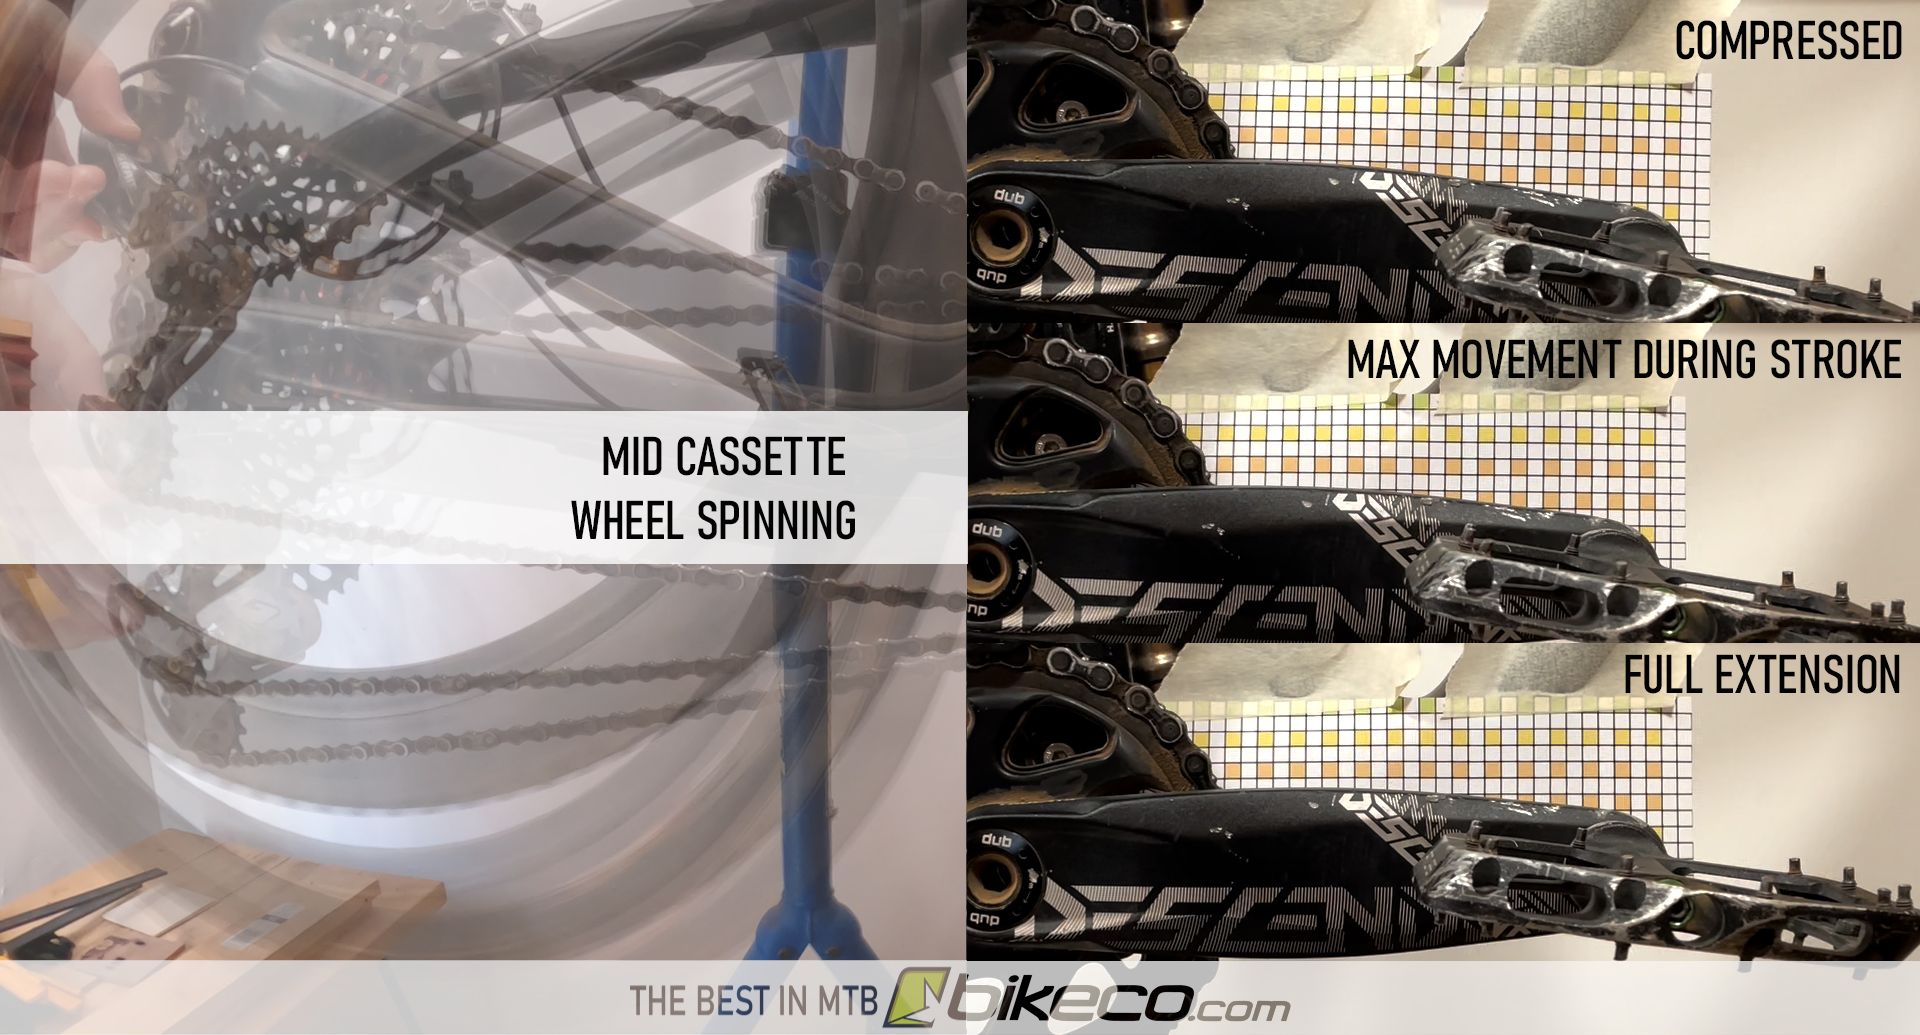
Unlike most forks, which usually charge the negative air chamber at full extension and thus see less of this, your rear shock most likely has an air divot to charge the negative chamber somewhere a bit into the stroke.

That means it takes a few compressions of the suspension to engage the negative air chamber. And once the piston allows the negative air chamber to fill it effectively drops the volume of the main chamber. Then when the shock extends and you check the PSI it will be lower.

It is a good practice to give a rear shock a few bounces during setup, especially when large PSI changes are made to ensure that the negative air chamber has charged and the shock will have the support you expect.

Does it Need Seals? Or Just Had Seals Installed?

It is actually more rare for a shock to be truly bleeding off PSI than for one of the above two to be the culprit on new suspension.

As the suspension ages seals may degrade and can be the cause of air loss. Suspension manufacturers have suggested service intervals based on hours of operation, but if your more aggressive on your equipment, such as a racer, you may find that shortening the service window keeps your bike running smoothly.

Some common causes of premature seal wear include dirt ingress, which is why it is so important to keep your stanchions as clean as you can before each ride. The less dirt the suspension pulls into the seals the less abuse on the seals, shafts, etc is incurred.

Occasionally a recently serviced fork or shock may ‘roll’ a seal or have been nicked during installation. Typically you’ll find this out when you’re setting back up for your ride or on your first ride. This is very rare on a professional level as the quality control of parts and service techniques eliminates the chance for most of this. But, there’s typically a handful of small to medium seals which make create an air-tight chamber and if one of them isn’t working you might have a slow leak.

Dirty or loose Schrader valves can cause air loss, although most shocks have a decently sealed cap these days.

Extreme temperature or altitude changes will effect your PSI and should be accommodated for. Check your sag before your chair lift day at altitude!

A less common cause, but it is out there: chemical degradation. Seal materials are susceptible to being attacked by other chemicals – so be aware of what comes in contact with your suspension.

A typical way to test for faulty seals is to set the shock at a test pressure, say 100psi, and allow it to sit overnight. Pre-charge a pump and check the pressure. A notable drop, ie more than might be expected from the pump increasing the main chamber volume, is likely worth an additional look.

Another test, although I must disclaim this one a bit, is to submerge the shock and watch for bubbles. I try to avoid this option as much as possible personally as I find it has to be a pretty decent leak for me it to be losing air visibly and can tend to be detected using the overnight pressure test. If it is leaking and pulls water in you’re going to have remove the water and any contaminated oil or grease since you don’t want water diluting or boiling in your suspension’s air chamber.

Very Rare PSI Loss Causes

The least common cause of air loss would be a crack or micro-crack in a casting. This can be a hard one to determine, particularly as it may require the shock to cycle and load up before the pressure rises enough to “open” the crack and vent air pressure.

Occasionally seals will have a similar end of service life where the air loss is occurring as the PSI increases, but, it’s fairly uncommon.


In conclusion, most of the air loss attributed to new or newly serviced product can be traced back to the pump increasing the volume, and thus lowering the pressure or in the case of rear shocks the negative air chamber charging.

If you’re using good practices with your setup and still noting air loss the next step is most likely to do a seal service, especially if the shock is near the service window or if its’ been used in extreme conditions.

If the new seals aren’t helping it’s probably worth digging a little deeper and possibly using a professional resource to help you locate the issue.

Local or ride in the South Orange County area? Come by and have our team service or tune your suspension. We are located at 21098 Bake Parkway #112 in Lake Forest near the corner of Bake and Trabuco.

Return to Top of Page

Posted on Leave a comment

Extended First Ride: Mondraker FOXY Carbon Review

Extended First Ride Mondraker FOXY Carbon Review

Well, after about 4 years I changed bikes this week. I demo-ed the aluminum Mondraker FOXY and decided the carbon version, with suspension and brakes I liked would be a good fit. So far, I’ve been blown away with how right that is. Here we go with an Extended First Ride: Mondraker FOXY Carbon Review.

To start, if you want to learn a more about the spec of my build you can link over to a post which details some of the “whys” each part ended up on my personal bike.

As a note, I purchase all my product. You can see where I see value. Great performance on budget bits (like Magura MT5 brakes – love em, they work great and they save $) means I have more budget on parts I’m willing to go all in for performance (suspension for example).

2022 Mondraker FOXY Carbon RR Review

What’s an Extended First Ride?

Sounds a corporate-ese right?

This Mondraker FOXY review isn’t a two hour spin and then onto something else. Getting miles in different terrain over a few days allows minor adjustments and a much better understanding of the bikes finite details.

Mondraker FOXY Carbon Review

I’ll go over quick pre-ride notes, thoughts on the trail performance as well as some product specific insight on bits that are new to me on a personal or extended test bike.

FOXY, Before the Ride

Mondraker Fit: Forward Geometry

I wanted to go a little longer than my previous SB130 (Large). Since the FOXY has a longer reach and slightly taller stack per size I stayed in the Large, but it hit my goal of being slightly longer.

Between the stem stack and 40mm bars I was able to get my hands up a bit more which I’m hoping will help my lower back on long or technical climbs.

I centered the saddle on the rails and haven’t changed it yet. It’s a comfortable position even with long legs for my height.

I don’t do a lot of cockpit fine tuning as I need my hands into a pretty specific area to help my lower back uphill. I’ll accommodate as needed downhill to make sure I feel as good as possible uphill… Like my grandma said, getting old isn’t for sissies.

Ohlins Suspension Setup

My  first ride was chasing the sun. Luckily, Ohlins has pretty good setup data available. I grabbed their settings and headed off.

The rear shock felt close. Maybe one click here and one click there on the first day to feel the difference.

In the front, the RXF M.2 fork is plush. It felt a bit linear as I prefer more ramp and support so I ended up cranking as much compression into it as possible on the first ride.

2022 Mondraker FOXY First Ride Review

On Trail

Riding within your limits is important. Even more on a bike that you are unfamiliar with. I kept the bike well within my ability since my first ride was at dusk and alone.

My first lap was an easy loop near work in Whiting Ranch. It’s a flowy, fun network, close enough to the shop I can ride before or after the day easily. Nothing burly. Prior to my earlier demo ride I was a little nervous that the FOXY would feel “big” or “numb” there. The aluminum demo bike felt OK there so I surmised that the carbon bike with better suspension would improve that. It did.

Since it’s a common lap it’s easy to look for a particular setup window: I want the bike to have traction into the corners and pop out. Rear suspension should be lively enough to pump the trail with notable effect, ie speed increase. Similarly, the fork should have enough support to keep the bike changing direction or floating over terrain and not “diving into” pockets on corners or when the trail comes back up from a hole.

The FOXY’s rear end felt close off the bat. It lacked a touch of support and sat a little deep into the direction changes, but, for a first ride it was well within an expected performance range. Where it gave up a little in support the traction was amazing.

The 36 RXF fork was more linear that I liked, kind of right on the edge of the range of ‘ya, I can get this fixed’. But I knew the Ohlins was going to have a more linear feel and it was a first drop. So, nothing to worry about just yet.

While the bike wasn’t quite as lively as I would consider perfect I wasn’t worried about getting it into the range. The combination of compression controls, ramp up chamber in the fork and volume spacers in the rear shock gave me options to fine tune the pop on the bike.

One thing I took clearly from the first ride on the FOXY: the extra grip was notable. This is one planted bike. More than once where the FOXY held a tighter line than I expected and I ended up handlebars, arms and one time maybe face into the bushes on the inside of a corner.

I was most pleased with how lively the 150mm travel Zero Suspension rides. I had some reservations that the RAZE was a bike I would like better with slightly less travel. Not all of my rides need the FOXY’s full travel, but it’s a lively bike and lets me keep something in the tank for bigger days.

When I demo’d the FOXY I found it climbed much better than I forecast. Even the aluminum demo felt good downhill. The carbon FOXY, with brakes that I had faith in and suspension with more compression support would take the ride to the next level. And it did.

Extending the First Ride Review

Writing on a single ride admittedly creates a situation where you have to extrapolate some data based on previous experience rather than actual product experience. To have a more substantial and credible post I wanted a few more rides on the FOXY.

My next ride was in Mission Trails in San Diego. This is a park not too far from my house. A little steeper and burlier terrain in parts than Whiting, but its still a fun ‘by yourself’ pedal. BTW, I don’t see a reason to test in conditions that push you to the point you can’t really understand what’s happening, like if my first ride was in the burliest terrain I can handle what am I going to write competently?

22 Mondraker FOXY Carbon Review

Climbing the Mondraker FOXY

As always, I have to disclaim this: I am not a good climber. Not my forte nor my priority. So, most of you can out climb me. I get uphill to ride down – and as long as I eventually get up there I’m quite pleased hahaha…

What am I looking for when climbing for a competent write-up? Traction and acceleration. Those two things I can feel and translate to other riders. As far as churning your legs faster and further? You got that I’m sure!

Mission Trails offers sections to feel how a bike tracks around switchbacks, handles loose rocks and gets over protruding rocks.

Switchbacks

The Mondraker tracked pretty well, around even tight switchbacks. I was intrigued to see how the slacker headtube angle compared to my previous SB130 TLR would behave. Pretty close, and without the four years of experience on the bike too…

On the tightest radius corners I found myself letting the front end get light and driving around off the back wheel. Concentrating and keeping the rear wheel under power when I get tired is difficult. I tend to just bash things and stay under power. A stronger rider likely would kind of half stand to pedal and push the front end down around the corner. The survival pedal-er, me, needs to keep the momentum going or the pedals stop and it’s foot down. This leads to staying in a more singular position and letting the front end go light and kind of body-englishing it around. Something I could work on for sure. Bike is more competent than me in this situation.

I’ll touch again on climbing switchbacks a bit later.

Climbing Rocks and Baby Heads

The FOXY climbed very sure footed in loose rocks. Zero Suspension didn’t suffer wheel spin even as the rocks moved under the power.

It behaved even better in the larger protruding rock sections. During a test ride I try to use a combination of lines that I know as well as off-line bizarre routes to see if the bike wants to behave or not. In both scenarios the FOXY was extremely competent and predictable.

One of the most notable things, the Mondraker, being so sure footed, keeps the rear tire in line very well. Compared to bikes that can lose the read end under power and kind of fish-tail around the Mondraker overall kept its heading well. This is beneficial as it requires less body-english to keep the bike moving forward.

My favorite aspect climbing was how the bike feels like it ‘crawls’ up rocks.

Previous bikes I’ve had seem to push ‘back’ when approaching some of the lines in Mission Trails. As an example, you’d almost have to pedal into the section, start up the rocks, the suspension would come back and as a rider you’d push the bike back forward to continue. It takes much more energy and thought (two things I might not have a lot of climbing admittedly).

The FOXY seems to ‘crawl’ up the rock rather than pushing back. Much more of the momentum is retained in a forward direction which is a confident feel. It’s notable how well a 150mm rear travel bike climbs these days – man it’s come a long way from when I started riding…

Acceleration

OK, while not a climber, I’m a strong enough to tell how a bike accelerates. I then extrapolate this into efficiency a bit.

The Mondraker accelerates really well whether pedaling seated or standing. When you increase the wattage to the cranks the bike quickly responds.

This compares favorably against bikes that feel like when you start putting a ton of power they take a second to load the suspension then start spinning the wheel a bit more. The FOXY rewards the effort quickly and crisply.

The bike accelerates quickly and it feels appropriate to the amount of increase of power to the increase of ground speed.

2022 Mondraker FOXY Carbon Review

Mondraker FOXY Downhill Performance

Well, here’s where it gets fun. Like real fun.

The FOXY is a blast downhill.

It corners well, it handles chunk, it has a personality that is snappy enough for me but isn’t so fast handling that it will give you issues if you push it a bit past your skill level.

Cornering

This is a very planted bike. As such braking performance is great.

Jump on the brakes hard and roll off them before a corner you’ll find the FOXY slows well and then resets to track excellent into the turn. It is quick to change direction and confident accepting lean angle both early and in the middle of the corner.

Four rides in and I found the limit of how much rear compression I like, where the bike starts to chatter just a bit in the mid corner at speed. Now I’m dialing back to get a bit more grip in the mid and corner exit.

I started with stock volume spacing and ran the suggested air pressure and close to the compression and rebound settings. Having found the limit with the compression and PSI my next step will be to go back with volume spacers and see if adding some support through air ramp allows me to back off the compression a bit.

Frankly, in a short time I’ve gotten very comfortable with the FOXY’s cornering.

At first the added grip even had me running too tight, into bushes on the inside of corners once or twice! After a couple instances I thought the bike might have pushed out of a corner – but going back and glancing at footage it might be that the additional grip has lead to an increase in cornering speed. (not even riding at full tilt! Impressive)

Finally on cornering: after each ride I note the bike’s condition with particular interest to travel used and whether the tires have any tell-tale markings on the sidewalls. I have yet to get any of the slashes on the sidewall, so I have a little more traction and compliance left in the tires if I want it as well.

Improving the bike in the corners

I’m still working to get a bit more support out of the front end which I believe will give the bike even a touch more speed out of corner pockets. A lot of this comes back to my riding size and ground speed combo.

While the Ohlins fork is a bit linear for me, a heavier rider on the max end of the air pressure, for the average 160-220lb rider I would say that the fork setup is much easier. The performance window allows for a more precise setup feel and wider range of options. Particularly using the ramp up chamber at a higher pressure per weight.

I’m working on some setup with it and it’s not so far out of the window that its unusable by any stretch. I suspect that I’ll find some magic in it. If I don’t I’ll go back to a FOX 36 or 38 GRIP2.

It’s the mid support that I’m working through at the minute.

The fork is plush, which I could give up some for more support, but I’m trying ride a normalized sag setting at the moment. I may increase the PSI and look for maybe 15-18% sag but I’m still playing with other options before I get too far away from the 20% sag.

The Ohlins high speed compression works well. I cranked it up a couple rides and it kept me out of the final bit of travel. I’ve backed it down a bit as it wasn’t adding as much to the mid stroke as I wanted and was costing me that last bit of travel in a couple situations that might have warranted it.

Personally I’m just looking for a little more right as the bike starts to set into the travel. I feel like its there and I feel like I’ll find it. Or I’ll keep pestering Joe until he goes into it and I get the first Ohlins Pro Tune…

Speaking of the fork let’s look at some terrain that needs more fork.

Chunky Terrain

The quick take: Mondraker’s FOXY is predictable and at home in chunky terrain.

The FOXY’s sure-footed personality glows when you point the bike downhill. Even running on the far end of ‘poppy’ compression the bike sticks to the ground. Since it’s hard to push the bike to a point of skipping across the trail both turning and braking capacity are excellent.

Looking at my notes, the only complaints have been based the feeling like I’ve run deeper into the front travel than I prefer, but the fork hits the HSC and hasn’t buried. I would just like a little less of that dive in feel.

I’ve bottomed the rear end of the bike a couple times but haven’t felt a hard bottom yet. It has a confident feel through the travel.

Downhill Riding Position

My opinion on the Mondraker’s riding position, given that my setup is a compromise for my back, should be taken with a little bit of a grain of salt.

However, my setup isn’t so far in the weeds that it needs to be disregarded (try to sneak a look at test bike setups sometimes, I don’t know how some of these reviewers even ride ‘em…)

I’ve found the FOXY feels like you’re ‘in’ not ‘on’, which is nice. Front and rear wheel are both relatively easy to control from a standard downhill position. The bike behaves as expected if you move weight fore and aft.

I find I’m riding slightly more nose heavy than my previous rig. This might be one of the reasons I keep coming back to a bit more mid support out of the fork. But there’s also a difference of 4 years versus 4 rides experience. Maybe I’m getting used to it. I’ll have to look at if I’ve raised my hands a notable amount as well.

Slacker Headtube and More Trail

Compared to the 130 LR the FOXY has a slacker headtube, and thus an increase in trail measurement. I was a little fearful that this would numb the front end of the bike on trail and light enduro terrain.

So far, I haven’t noticed that. My continued adjustments have all improved the cornering of the FOXY downhill but none of them are based on a numb feeling.

Uphill in tight switchbacks I think I feel it a little more.

I found two ways to make the FOXY get around the real tight stuff.

Steering with the bars and leaning ‘out’ of the turn to keep the bike standing as straight as possible kept the steering input from wanting to exacerbate the lean angle.

The second option is not steering much at all and really leaning into the uphill corners. This requires more power as it works better at speed.

Both of the above worked. What felt like it didn’t work as well was kind of half turn half lean options. We live in a polarized world – so what should I expect haha…

2022 Mondraker FOXY Carbon Review

Wrapping Up the Mondraker FOXY Review

I’m going to try to be concise as I’m edging into 3000 words and all the seo machines are going to hate me… Also I want to have a couple blurbs on some new parts I’m riding and what I think as well below.

The FOXY with a 160mm fork and 150mm of rear travel on paper probably doesn’t look as trail and light enduro friendly as it is. This is an efficient pedaling bike. Mondraker’s well-designed suspension, they’re not using quantity of travel to make up for poor quality of travel like some designs do, means the bike feels fun and poppy throughout the travel. I don’t notice the bike using more travel than it needs nor do I feel the bike being harsh or uncomfortable sitting in the middle of the travel. I suppose what that means, the ramp and compression pairing on the rear shock give a good feeling balance through the travel. Instead of feeling ultra linear even though maybe I’m using 135-140 of the rear travel the bike feels progressive and poppy without becoming teeth rattling harsh in the last bit of rear travel.

Downhill Mondraker’s years on the race course have produced a bike that’s competent and predictable in a wide range of terrain. I didn’t notice any harsh square edge hits and the bike ate up terrain even when I deliberately put it in abusive lines.
For the average rider the Mondraker FOXY’s handling is awesome. The bike’s braking capacity is tremendous allowing confidence at speed. The grip is top of class, again adding confidence. And the bike changes directions quickly and competently.

More to come on this I’m sure, but let me quickly touch on some opinions on new parts to my bike. Starting at the back and going to the front:

10-52t cassette. I’m not a good climber. But, if you are, that 52t is a big jump from the 42t. I think I will end up getting stronger as I find myself in the 42t more often because I’m tepid to shift hard into that big 52t. But, it is a great granny gear!

Small flange diameter DT Swiss 350 hubs. This will be interesting. I’ve run 28h DT Swiss before, but this smaller diameter hub with straight pull spokes will be intriguing. Upside potentially more damping during cornering. The DT internals are top notch – but will the longer spokes cause me any issues? (again, I’m bigger than you!)

AbsoluteBlack Oval Chainring. First thoughts, when you’re going so slow that everything hurts well it hurts the same. If you get up a bit past that pace I can see where the change in leverage does probably make it an easier pedaling system. Since this is the pace I tend to live in I think I will like it overall. If you really start cranking a huge cadence it feels a little strange – but – that’s not been my problem in years…

Ohlins Suspension. See above – more to come on that too.

Fidloc magnetic bottle cage. Interesting. Makes a different noise downhill than I’m used to, but seems to stay in place and has a low profile overall.

New FOX Transfer Seatpost. Love the saddle mounting hardware. Love it.

Tag T1 Carbon 40mm rise bars. Love them so far. I went with them for the height as well as I wanted to try their ovalized internal carbon design to see how that feels on trail.

Ergon GE1 grips. RIP to the WTB Padloc I loved for so many bikes. I picked the Ergon as they had a nice feel on the outside of the top surface where you’re looking offer a bit more squish.


Thanks for the read! Shopping for your dream Mondraker? Want to learn more about the bike or the Ohlins’ Suspension? Check out the links below

Update(s):

Extended Review of the Mondraker FOXY – More Trail Time and Spec Detail
Video/blog: Compare the Ohlins RXF and FOX 38 on Mondraker FOXY Carbon
Images/blog: Extra FOXY, 170mm fork on Mondraker FOXY Carbon with Float X2

Check out our in-stock bikes

Adding Volume Spacers to Ohlins TTX Air Shock

Learn how to change an Ohlins TTX Volume Spacer

Posted on Leave a comment

Adding Volume Spacers to Ohlins TTX Air Shock

Adding Volume Spacers to Ohlins TTX Air Shock

Enjoy a quick video, blog and some detail photos which detail adding volume spacers to Ohlins TTX Air Shocks. Now, Ohlins has some great data on their site as well, we’ll provide a couple links below, but here’s a couple real world tips and tricks for the Ohlins TTX Air Shock spec’d on the 2022 Mondraker FOXY Carbon RR.

Airing Down an Ohlins TTX: A Bit Different Than I’ve Been Used To

Let’s start with really the biggest difference I felt like I came across when changing volume spacers on the Ohlins TTX. When you release the air the shock compresses. With some force!

Ohlins TTX Air Shock Compressed with No Air in can

Aired down – and compressed! I took out the valve stem just to make sure I had all the main system open…

This created two interesting problems for me until I got it confirmed from our mechanics…

I watched the Ohlins video and saw the shock compress but didn’t think much of it (or didn’t think of what I was really seeing I guess!)

So, I went to air down the TTX like I had so many other shocks with a 3 way wrench. Except, when the TTX compressed the head of the shock grabbed the wrench and pinned it to the frame! Well, I thought, I’ll just air it up – oh wait, there’s a three way stuck in the way… It wasn’t too hard to get some leverage on the rear triangle to free the wrench but I did feel like a rookie for sure. I included the clip in the video since its kind of funny I suppose.

Now, the other issue, I immediately recalled other brands of suspension that if you aired the shock down and it went down (suck down as it’s called) it was going to be a somewhat sketchy problem to disassemble it. So I grabbed Tracy and made sure that 1 I hadn’t skipped any steps and 2 wasn’t going to have a shock detonating with a loaded negative air chamber damaging anyone in the work area…

Turns out this particular shock just needs to be unthreaded for a bit to come loose and allow for the volume spacers to be accessed.

If you watched the video the rest of this is just to help reinforce your understanding – and it’s great for SEO too right?

Loosen the Air Shaft

Loosen the air shaft which clamps down the outer sleeve. This is done with a bottom bracket tool. Be patient and get a good grip on it. After a couple turns you can easily turn it by hand and put the tool back on the table.

Once you’ve cleared the threads the shock will extend like the image below.

Ohlins TTX Air Shock Unscrewed and Extended

Ohlins TTX Volume Spacers

This TTX carries two different types of volume spacers, in two different places. When you open the shock you will see the two band volume spacers spec’d on the 2022 Mondraker Foxy’s shock.

Ohlins TTX Air Shock stock volume spacers

The other volume spacer, which gives you the most amount of ramp rate increase is located at the other end of the shock on the shaft.

It is a puck style volume spacer and 1 and only 1 spacer should be installed on the inner shaft.

First pull back the retainers.

Determine volume spacers in Ohlins TTX Air Shock

Carefully move the retainers out of the way and pull out the volume spacer.

In this case the was the Ohlins E volume spacer (the biggest available in the kit) and since I wanted to max the volume spacers I simply put it back in its place.

Determine volume spacers in Ohlins TTX Air Shocks

Maximum Volume Spacers for Ohlins TTX

At this point I needed to determine how many volume spacers I could add to the shock.

Using the Ohlins chart from the TTX owners manual, and a distributor to figure out the part number for the shock I determined I could run 20,000 cubic mm’s.

The stock puck was 12,000 and the 2 bands were 2,000 each – meaning I could add two additional band spacers.

Ohlins TTX Maximum Volume Spacers Installed

which I did.

Adding Volume Spacers to Ohlins TTX Air Shock

To finish adding volume spacers to Ohlins TTX Air Shock simply reassemble the shock in reverse order of disassembly.

One thing to make sure of – the outer air can has a locating tab, insure that it is fit into the proper slot during reassembly.

IF YOU HAVE ANY DOUBTS OF YOUR MECHANICAL ABILITY, HAVE A PROFESSIONAL SERVICE OR CHECK YOUR WORK!

Ohlins TTX air can tab

Check out more on the Ohlins’ TTX on BikeCo.com:

Extended First Ride: A Mondraker FOXY Carbon Review

Ohlins TTX Owners Manual (page 11 illustrates volume spacer options)

(note – one of the manuals indicated a higher max PSI than was shown on my shock. I deferred to the detail ON MY SHOCK. If you have issues or questions with that contact your sales team or Ohlins for confirmation)

Ohlins Volume Spacer Video

Return to Top of Page

Posted on Leave a comment

Mondraker MIND Telemetry Unavailable in the US

Mondraker MIND Telemetry Unavailable in the US
(clip from) Mondraker FOXY Carbon First Ride Review: Extended

Mondraker MIND Telemetry Unavailable in the US


I DON’T MIND

 
A question my, rather small, set in our ways, group of riding friends asked was what I thought about the Mondraker MIND Telemetry.
 
Well, for whatever reason: App licensing? Patent limitations? Something else I don’t know about? I dunno. But, however you cut it: MIND telemetry is not available on the US bikes.
And it doesn’t bother me.
 
Don’t get me wrong, I enjoy data. It’s interesting and you can look at it a lot of ways. But, like an old boss of mine was apt to say: figures don’t lie, but liars can figure…

APP DRIVEN TELEMETRY

 
So, app driven suspension suggestions (turn this dial put in this PSI) even based on a good deal of telemetry input, well it’s just not 100% credible to me. (funniest one was a GPS setting that rated like smoothness – What? How? Why?)
 
Telemetry sheets are graphs with spurts of data points. Usually spikes or arcs and all kinds of shapes. Any app that’s telling you “twist this 2 clicks and that 1 click and do this with the PSI” is using an algorithm of what it sees to make those suggestions.
 
Does data help a pro racer with a competent suspension tech? Yup. But a large part of that relationship is talking about “this is what I felt when I was riding best”, “this might have led me to be in the wrong position during ‘x’” and “ya, I just fluffed the lines there and the data is outlier.”
 
Working with a person who can chat about all the minutia has huge dividends and that’s one of the focal points of our bike suspension setup, delivery, and follow up process here at BikeCo.com
(which is SUPER important on the heavier eMTB rigs – if your eMTB isn’t setup right, well, sorry. You’re gonna chase that for a while and it’s going to compromise your ride quality)

CAN YOU SEE THE INPUT?

 
Riding footage adds an interesting dynamic to fine tune setup (notice the racers tend to practice with them?).
 
Being able to watch and see: “ya, that’s a proper line within my skill set and I think the fork should have rode taller” versus, “whoops, ya, I smashed through the travel because of rider error there – glad the bike was there at all!”

MY EXAMPLE: DEMO RIDE QUESTION

 
On my Mondraker FOXY demo I came across an example I think would have confused an app and led down the wrong rabbit hole.
The demo (which lacked the low and high speed compression controls on the FOXY Carbon RR Ohlins or the RAZE Fox Factory suspension) was quick to turn down, or dive into corner entry.
 
However, it felt like it would “stall” for lack of a better term when I tried to drive it to full lean angle around the apex.
 
So what was going on? What were my options? And, getting to the point of this blurb – does an app have any chance at this or did I need a certain amount of data and review with a competent person? (bet you know which way I’m going)
 
Joe and I chatted about it over lunch after the ride. (I have access to Joe Binatena one of the most sought after suspension people in MTB – and you know, if you buy a bike, suspension or a Pro Tune from The Bike Company so do you through our team…)
 
Mid to fast Bermed corners. Suspension PSI setup properly. Tire pressure OK, possibly a little high (I hate flats, and I hate flats more on test rides…)
 
I generally don’t trail brake through corners (in fact the demo bike had brakes I hated so I was braking super early to insure it would slow down…) so the bike was sitting at a proper attitude going into the turns.
 
If you brake too late or into a corner it creates a “nose down” attitude. This creates issues as the bike runs deeper into travel giving up some traction and having a more “harsh” feel – maybe harsh isn’t the right word, but a faster or more aggressive push back since it’s running at a deeper PSI?
 
Not to toot my own horn, but it might take a bit of experience to feel the bike “hang” during the lean. Of course, now that you know it can be a thing you’re ahead of where I was then right??
It might be more likely that a rider would note the bike felt slow rotating around the corner and wanted to push (understeer) to the outside of the corner.
 
Those complaints are probably going to lead to softer tires and possibly a softer suspension right? Help keep more grip to get around the corner?
 
Except, in my case that’s not what was happening. Those changes would just make the bike squirmy (too low of tire pressure) and slow out of pocketed corners as the suspension would use too much travel compromising momentum and steer input.
 
Would it have killed me to go the wrong direction with those setup mods? Probably not.
 
BUT! If I came back after the ride with lower pressures and still had the complaint and went well, if SOME was a good idea MORE must be better… I’m quickly off into the weeds of suspension setup and probably frustrated with my purchase.
 
Here’s where a live, thinking person with access to a team (am I describing BikeCo? Of course I am) has a huge advantage. If I had lowered the pressure and spoke with my contact and was like “WHOA, didn’t help” we’re probably looking at other setup options.
Because what was the fix? More ramp, more compression. The bike wasn’t exactly “pushing” or over-steering as much as it was unable to maintain the tighter early apex cornering line which then set me wider at exit.
 
Going frame by frame with the riding footage it seemed like the fork was setting in a touch deep into the travel into the corner apex / pocket, but then kind of slowly settling down a touch deeper as well. Probably the split second of the bike compressing (and slowing) drove my body slightly ahead in the bike which then added to more of front end settling in.
 
Watching the video the trail showed the bike SHOULD have load through the suspension at that point, but it was setting in (as you would expect) then kind of slowly continuing to load.
 
It made sense to have the suspension loaded into the corners, so I wouldn’t want to increase rebound as that would decrease overall grip and ride quality bouncing me around.
 
Air pressure was an option – however the bike wasn’t sitting super deep on the first section of the lean or cornering. So again, increasing air pressure would decrease grip and could induce skip.
 
So where were the answers?
 
Increasing Ramp Rate: make each MM of the suspension past sag take a little bit more load to compress it.
 
Increasing Low Speed Compression: similar to the ramp rate adjustment increasing compression slows the forks progression through the travel giving it more support.
 
Perhaps a small increase to High Speed Compression: Adding high speed compression in small increments can be helpful too.
 
Back to my point on having my phone send me a post ride SMS (not sure if that’s a function any have but it seems funny to say) to make all those ideal changes?
 
Yaaaa, I don’t think that’s gonna happen? So, no telemetry? I don’t MIND.
 
 
Posted on Leave a comment

Increase Support & Improve MTB Small Bump Compliance

Products and Tips to Improve MTB Small Bump Compliance

As your riding progresses your settings and preferences are going to change. Faster, more aggressive riding puts different demands on your equipment and balancing your setup with these changes will help you improve your riding experience. You’re likely to find you need additional support from the suspension. This is typically done with increased compression or ramp rate which can compromise some of your small bump compliance. Let’s take a quick look at other components and techniques that can add some of your small bump compliance back as you ride faster.


Faster tends to be smoother

Imagine a boat going slowly riding up a series of waves. Up each face and down the back. Then the next. It has a certain “rock” to it right? Well if that boat is able to increase the speed it can decrease the vertical motion of “rock” by not dipping all the way down into each trough. Like “whoops” in moto – skipping across the top decreases the vertical motion. Same with your mountain bike.

Now, should you just skip out of control across everything? Nope. But momentum is often your friend.

Increase Support and Improve MTB Small Bump Compliance Cornering

Why You Need More Support

How does your setup need to change with that speed?

Well you’re going to need more support. If you’re running soft suspension it’s going to do a couple negative things.

First, it’s going to tend to “pack” and stay deeper in the travel then it needs to be. This will actually create a harsher ride as the PSI has increased while still being too soft for the next concern.

Burying the bike… Really a bummer and frankly can be kinda dangerous especially if the fork is too soft and buries itself into a hole or the front side of a rock you’re trying to roll past. Front end stuffs, bike slows way down or stops, your momentum keeps going and you’re a lawn dart. No fun.

So as your ground speed increases its important to give yourself that additional suspension support. While you might adjust sag a few percent most of this support is going to be through low and high speed compression as well as volume spacing to increase the air ramp rate and support.

Increase Support and Improve MTB Small Bump Compliance Support Image with proper compression

But, I Don’t Want A Bike That Chatters All The Time

No, you don’t want a bike that loses all of it’s small bump compliance.

And, sorry, but for just a second I’m getting on my soapbox: a lot of suspension talks about “small bump compliance” as the travel between full extension (you’re bike’s in the garage) and sag (with you sitting on it). This isn’t small bump compliance to me. This is droop. Sorry I’m a car guy and when the suspension goes away from me, or droops down – well that’s not what I consider absorbing a small bump. It’s falling away until the weight catches up. So, for this, Small Bump is referring to bumps that engage the suspension travel past the sag point in compression, ie you’re riding and hit a small bump and the suspension absorbs it…

OK, back to my point.

So you’ve had to make your suspension stiffer, or less compliant, in order to have it be able to “punch back” at the terrain without diving in and out of the travel. How do you keep your teeth from rattling out?

There’s a handful of places to look at that you can find small bump compliance outside of the suspension.

Rubber is a Damper

Many of the more “grippy” compounds actually are designed to incorporate additional damping. A lot of our racers will run the MaxxGrip front tire to get just even that bit more compliance since their suspension is so aggressive.

Tire sidewalls are playing a bigger and bigger role in fine tuning MTB riding compliance. Heavier sidewalls provide additional protection as well as damping through mass and material properties.

More aggressive sidewall technology provides additional mechanical support assisting the tire’s “air spring” to support your weight. This tends to allow riders to run a lower overall tire pressure providing better tire compliance and grip.

And yes, the air in your tire is a spring. And like your suspension it as it is compressed the pressures rise. The tire’s mass and sidewall properties effectively are the damper on this spring force. A heavier, stiffer sidewall is going to help slow the tire’s air spring better. This will help minimize harsh “run through” or even prevent or minimize rim strikes (which man, you can feel those in the hands!).

Another product that can help with compliance are CushCore tire inserts.

CushCore provide three unique modifications to a tires performance.

First, it’s a mechanical damper for the last bit of tire compression prior to the rim. Think of a jounce bumper in a shock: it’s a compressible item designed to absorb impact prior to it hitting a less compressible, and certainly less ideally compressible rim…

Second it works as a volume spacer in your tire. Similar to suspension adding volume spacers allows a lower starting PSI to more quickly ramp up to the proper supporting PSI.

Third and perhaps most notable and at the same time kind of the hardest to describe is how the CushCore’s contact point lowers the sidewalls leverage ratio in many conditions. That’s to say that by putting pressure on the sidewall, or maybe support is the better term, it shortens the available length of the sidewall which allows takes away some of the mechanical advantage the ground can apply to it. Think of waving a ruler holding onto the far edge, then holding in the middle. Lowering the leverage makes a big difference right?

Learn more about Maxxis tire compounds, sidewalls and tread patterns here

Magura MT7 HC MT7 and MT5 Levers Compared

Top to Bottom: Magura MT7 HC, Magura MT7 and Magura MT5 brake levers. Shop the Magura and Shimano brake lineup here.

Brakes, Braking and Slow is Fast

Stay with me on this one, it’ll make sense. Bigger brakes will help your small bump compliance. Well, bigger, more powerful brakes and a bit of technique.

You’ve probably seen it on trail – the rider heading into a chunky section who gets timid, grabs a handful of brakes, stuffs the suspension 1/3 down into the travel and then is, at best, jostled horribly across the terrain trying to regain control? So two things wrong there.

One, momentum is your friend like we mentioned earlier.

Two, especially with your fork, grabbing a bunch of brake OR staying on the brakes too late just stuffs the bike into it’s suspension. Instead of hitting the chunk at sag with say 80% of the travel left (and at the sag PSI) you’ve gone in at like half travel, cutting down both the amount of travel you have left as well as making the bike way more harsh as it enters chunk. No good!

Sort of like how when you corner there’s a point you need to be off the brakes and let the bike roll in (ya, you can trail brake to a point – but you’re not like smashing brakes while trail braking or braking through the corner) anyhow, so you ideally have a point that you need to get off the brakes and let the bike reset its rake and sag before you go blasting through chunk.

This allows you to take advantage of the more plush suspension further in the fork’s extension, have more travel left to absorb the terrain as well as resetting the headtube angle, and therefor trail measurements as well. All good stuff.

Handlebars, Grips, Gloves and Hands

So frankly, the two tips above are going to provide you the biggest jumps in small bump compliance as you up your compression settings. There are a few places that you can get a bit more feel, and every little bit does help.

Handlebars

Carbon fiber has a unique balance of stiffness while being able to slightly damp vibration input. Really that’s the beauty of carbon bars. Being a bit lighter is great too, particularly high up on a bike where center of gravity makes a big difference, but the real draw is the feel.

OneUp Components Carbon Handlebar Shape

Carbon also can be manufactured in a variety of shapes that would be really difficult in other materials. This allows two advantages. Weight saving and performance tuning. Removing material where it’s not needed such as the Tag T1 Carbon Bar with ovalized bar ends is an example of both.

The bar that probably takes the most advantage of this is the OneUp Components Carbon Handlebar. With it’s unique shape the OneUp bar is designed to improve small bump compliance by eliminating off-axis material in the rise transition.

Handlebar Width = Leverage Rate

Handlebar width is important to how your bike rides.

Obviously you need your hands in a comfortable position that allows you a power position to push the bar into corners and pull the bars over terrain. We’ve touched on that in other blogs over the years.

In regards of small bump compliance you’re looking at the leverage ratio of your bar’s design as well as your final bar width. As you narrow your bar you decrease the leverage ration which increases the bar’s stiffness.

We’ve actually seen handlebar manufacturers try to push a “one size fits all” on some stiffer bars because if you lower the leverage ratio they become like teeth rattling stiff. We don’t all need to run 800mm bars. (at 6’1” I run 785 as a point of reference)

If you’re trimming bars it’s worth a look how stiff the bars start out. If you’re trimming towards the minimum cut widths it might be worth looking at a less stiff bar to start.

Shop our favorite handlebars here!

Grips

Some riders are big fans of the grips with a slight rotation designed into them. We setup some clients on those if they want them – but – we don’t really ride those in the shop.

Personally, I don’t like the idea of the grip rotating and taking away some of the feel when I really clamp down on the handlebars. There’s also a part of me that doesn’t particularly like having more moving bits than needed on my setup.

Gripping

Now I’m not saying you death grip the bar. Far from it. Letting the bar slightly rattle in your hands helps minimize trail feedback. In fact one of the tips from my younger brother years ago on really long descents like San Juan Trail he would pick his spots and push his thumb into his middle finger and literally let the bar bounce in those circles. I never wrapped my head around that really – but he was doing 50 and 100 mile races and keeping your body feeling good was critical.

While we’re on how you grip the bar, it won’t change small bump compliance, but if your brakes or controls are out of position and require you to rock your hands “up” or “down” the trail feedback is much more likely to cause pain when you ride.

Similarly if you ride in gloves that are too big and “bunch” up in your grip position you can expect discomfort in your hands.

Gloves with large contact pads tend to create hand discomfort. Rather than minimizing trail feedback the extra movement thick contact pads either creates hot spots or perhaps has riders gripping a bit too much.

Wrapping It Up

Ok. Eighteen hundred words. That’s a bunch right? So to wrap it up in a quick paragraph:

Increase your compression and ramp as you ride faster to aid support at speed. Remember momentum is often your friend. Don’t slam on a handful of brakes into the terrain features and pack the suspension up. Run tires with appropriate support. Hold on right, not necessarily always tight. Should I have started with all of that and saved you the read? Hahaha… See you on the trails – Nate@BikeCo.com


Return to Top of Page

Posted on Leave a comment

Getting a Grip: Ahead of Time is the New Just in Time

Getting A Grip Ahead of Time is the new Just In Time

I need new grips. The grips I love are allegedly not available for a year.

But the economy is dead, never to work again, in anyway shape or form? If you read the headlines it’s shocking we’ve made it this far. Don’t worry, they’ll tell you where the cliff is. Right, right, right past that next automated ad they’ve put in front of you (ironically, selling you something right?)

Pandemic changed things. True.

So did the blue trucks blocking the streets in every neighborhood. (I don’t have an account and I don’t use it but that’s something for another channel.

So did some family in middle America that was busy pricing out the little guys so cliché Americans could go use free scooters to navigate a megastore with a jumbo ultra super barrel of sugar. Oh, and you can get greeted by someone who has a lifetime of stories and probably did some important stuff but needs whatever micro amount of money is available to say hi to some snot nosed gamer walking straight past them. But, at least we learned you can copyright bizarre taglines about mountain sports in areas notably devoid of mountains.

Point is: the economy is dynamic, constantly changing and involves navigation. It is affecting us that’s for sure. But is it destroying a way of life? That’s a stretch. If the previously mentioned general pains in the ass to commerce didn’t break it not being able to access every whim JIT probably isn’t gonna break the economy.

So Get A Grip?

Ya. I want to get some grips. Mine are worn out. I thought I had another set in my toolbox somewhere, but guess not after search.

I’m particular and I really do love the WTB Padloc grips, I’ve pushed them a bunch over the years and I might be one of the few who do love em (people are intimidated of chamfering their bars or whatever).

Well guess what: not the most popular item? Read another way, not the most profitable item? Production got backburned it looks like. Can’t blame WTB – consolidate SKUs and get the most sought after product in front of your users. Makes total sense. Good on them frankly.

But I’m glancing at my distributors and I’m seeing April 2023. And I would guess that’s a pretty soft date and could be pushed back, if they’re made again.

Options and Choices

Well, I’m not going to be able to nurse these grips for a year. So, guess I’m looking at other solutions eh?

I could go deep on the web search and locate them somewhere else. And I might. If I do I’ll be shopping product name and manufacturer part number.

The part number probably isn’t super super critical with these grips as they didn’t have multiple compounds or whatever – but on something like a specific tire you’re looking for? MAN, I would be damn sure it hit all the boxes. Cause ya, I love the Minion DHF 2.5 front tire. But I want it in the specific sidewall and TPI that I want. And some strange mega-store’s spec of it with the cheap sidewall or whatever is beyond unusable and a huge waste of my time and expectation.

I’m also going to be judging the credibility of the resource that lists product as “available” for the same reasons. I don’t feel like dealing with the wrong product, or a week later being told it’s not available (sometimes things aren’t available, but credible sites can tell you really quick, before you’re waiting thinking its’ on the way to then being told nope, no dice)

So, picking your retailer is getting to be as important as picking your product. Well that’s good for quality retailers! We’re stoked to work with you.

Other Options instead of a Rabbit Hole?

What if I don’t want to play chase the part number around? Well looks like I’m comparing other grips right?

Personally I’m looking at the larger diameter Ergon grips as well as a couple other options our guys have brought into the shop.

Ahead of Time is the new JIT

So what extras do I keep around the toolbox? Here’s a current look, fresh from looking for my grips I thought I had!

Extra derailleur cable. I keep these around more to save the drive if I need one (I don’t work on-site every day so if I need a cable I’m going to a local cruiser shop or whatever)

Few feet of derailleur housing. See above

Derailleur Hanger.

Brake Pads. 2 sets, so front and back if needed.

Brake Fluid. Not sure if this counts as an “extra” so much as a quick maintenance thing from lever bleeds.

Front tire (Minion DHF 2.5). I keep 1 tire around just in case too. If I lose a rear tire I tend to put my existing front tire to the rear and the fresh tire in the front.

Chain. I’m leaning into the idea of putting together a full drivetrain but have found other places to spend money lately and haven’t done it just yet. Reading that I know I’m going to regret it if I don’t put a cassette and ring in my toolbox. Wednesday I’m picking those up hahaha…

Learning the new Economy

You know, I try really hard not to be a typical consumer about everything – I work hard not to get into the “need it today” mode unless I really do (or I want to go on an errand or whatever and whoa, I’m at my favorite haunt and just happen to end up with some toy for myself hahaha).

But some bits, like parts to keep my bike on trail, that’s super important to me and that’s where Ahead of Time is the new plan – and you’ll find them in my toolbox. I’m not hording tons of em – just the one I need.

So I guess I’m getting a grip on the new economy. In fact, I’ll be getting a new grip on the modern times – gonna go with the Ergons this time.

See you on the trails – Nate@BikeCo.com

Posted on Leave a comment

Gimble on Chesty?

Disclaimer(?) – not sure that’s the “best” word but in the modern social world I guess you have to announce all this right??

We do not sell GoPro bits or accessories. None of the pictured or utilized bits were provided in exchange for content or whatever. I bought them. Cause, it’s easier to buy stuff than to try to “bro” things all the time or EVER schmooze to a social media product manager, aka “influencer wrangler”. OK, off my soap box and onto something we think is fun.

Also – we make no claims that any of these bits are used as described and in fact some of our usages may void warranties with usage outside design expectations.

BikeCo is working to create a variety of additional video content this year. From mechanical advice to riding tips and tricks we’re gathering and editing a variety of media and as always working to produce it in new and interesting ways to our clients.

We don’t sell action cameras or accessories, but a TON of our clients use them and we thought we’d occasionally post ideas we’re working with to get something different in pixel form.

GoPro Bits - Hero 10 with Max Lens Gimble Roll Bar Mount Chesty

The footage and stills in the post, with the exception of the image OF the bits, was shot with the above bits. Chesty mount, modified mount attached to Roll Cage clamp, Roll Cage clamp was mounted around the gimble handle using a Hero 10 with the Max lens.

I wanted to try to find a way to better show how steep some of the trails we ride are. You know what I mean, like when you watch POV of UCI DH tracks and it looks like a park path until you see the trees or people at these extreme angles on the side and think, hmmm, they’re standing straight up and down!

Anyhow – this is kind of a BikeCo “UnBoxing” video, except I think its idiotic to show you a video of me opening a box…

But I bought a gimble to test, put it on the charger and then went straight to the trails. Didn’t sync it to the app. Didn’t sync it to the GoPro either. Figured I could do that later and I would lose light otherwise.

Here’s a quick edit we posted to social, a Tips in 60 look at it:

Like I mentioned in the teaser above I’m not shooting video to really impress anyone with my riding skills. It’s super hard when there’s so much content out there of people absolutely shredding right? Also, you tend to get the two factions when you send it to friends and family who don’t ride: those who are impressed you can even balance a bike and are amazed and those who kind of “hmm, oh kay” the stuff right?

I had the gimble in a “vertical” position, camera on top for this video. I tried it this way as I wasn’t 100% comfortable that the roll cage mount would hold it and figured if it was in the vertical position the camera and gimble head would hit the mount if it came loose giving me a second to deal with it.

I think I’ll try it with the gimble “inverted” with the camera lower to see if I can get a better balance point. I’ll probably use the 1/4×20 threaded bung at the bottom to mount a retention strap in case the thing slips out. If I get a dialed in rig setup I’ll post some pics down the line.

We capture video for a range of content we use to highlight product or tips and tricks. For my personal use I like to pull stills from the footage, which the new GoPro is amazing for btw.

Below are a couple images pulled from the ride with the gimble as well as a shot from the standard Chesty setup.

Chesty with Gimble Mount Riding Shot 1

The gimble kind of holds a position, and then sort of swung back into the expected axis. This provided some fun shots that highlighted the front wheel and suspension.

Chesty with Gimble Mount Riding Shot 2

So your chesty mount typically won’t have such an exaggerated angle, btw you should be turning your bike more than your body but trust me, I wasn’t leaning the bike THAT much more than my body here!

Chesty Riding Shot with GoPro Hero 10

Screen grab from a ride prior to the gimble. Also, this image has the standard GoPro Hero 10 lens, the video and images above are using the Max lens which has some interesting advantages. More on that some other time perhaps.

So – overall what are my thoughts?

Well initially while riding I was a bit concerned with how the results would come out. The rig was bouncing around a decent amount (oh man, some footage of my climbing while the gimble is bouncing off my gut will make you seasick in about two seconds) but at least in the downhill the software was able to stabilize the footage pretty well.

A couple times the gimble seemed confused and rolled around, you can see it at the end of the video teaser. It was kind of a bummer / frustrating on trail. But, the reality is this setup was in its first test configuration and I had made ZERO attempt to fully setup the gimble interface as instructed.

Reviewing the footage and pulling some images I was overall pretty happy. I plan to invest some time and get the setup more dialed in: both the digital app setup as well as how I mount the gimble in the first place.

Hope you enjoyed this quick look at a gimble on a chesty mount and maybe it motivated you to try some different ideas to generate content.

Posted on Leave a comment

When You Slip Down the Rabbit Hole Writing a Social Post

3-22-22 Five-Ten Freerider PRO Canvas Parley Plastic
OK, nothing’s simple. Welcome to the 2020’s right?
What started as a “rah-rah” post quickly turned into questions, a bunch of searching around on the web, ordering a wack of washing bags, learning about external washing machine filters I need to research more tonight – buuuuut, we’re trying really hard not to green-wash posts right? That counts for something!
 
Back to our post shown in bold:
 
Five-Ten Freerider PRO Canvas feature uppers made from 50% recycled ocean bound plastic and 50% recycled polyester.
 
The Freerider PRO Canvas contains plastic that would have been destined for the oceans through a partnership with Parley Ocean.
 
Will this pair of shoes save your planet? Well, nah, but supporting products like these announce a clear intent and manufacturers listen to your dollars…
 
You know, even a small angle of change now will make a huge difference down the line (think of a triangle as the legs start to stretch from each other, or you’re walking through the woods and start off 5 degrees off target – doesn’t seem like much at first but by the end the distance can be quite big right?)
 
I support everyone who’s making a commitment to a little less plastic or finding uses to repurpose existing plastic!
Shop the Five-Ten Freerider Pro at BikeCo.com
 
 
now, down the rabbit hole… right click to open in a new tab (or hold your finger down on your iphone I think that opens a new tab option too)
 
learn more about Parley Ocean & Adidas here:
 
or learn about how Adidas is working to help close the loop (important when you think how many synthetic materials are in our current kits right?) including a program to easily donate out of use shoes and clothes to be re-purposed minimizing virgin material production as well as helping keep plastic out of the trash / ocean in the first place: https://www.adidas.com/us/sustainability
 
or read about some options available to minimize both virgin and “up-cycled” clothing from depositing microplastics into the water systems: https://www.nytimes.com/wirecutter/blog/reduce-laundry-microfiber-pollution/
All and all – we should keep educating ourselves and working to make the planet a little better than it was the day before.
Posted on Leave a comment

Clipless or Flats for MTB?

clipless or flats for mtb? Pedal Comparison

Wondering if clipless or flats are right for you? Let’s take a minute and go through some of the differences and preferences that will help you define Clipless or Flats for MTB.

First let’s look at some pedaling basics that will help you whether you choose to ride clipped in or on platform pedals.

Good Pedaling Practices

Spinning Circles

Spin circles. Seems simple right? Ironically after all the years of riding this probably one of my least applied practices… I’m going to reference a clock face with 12 being straight up, 3 being forward and we’re talking about the drive side crank, clock reference is flipped for non-drive.

Ideally you’re using a combination of muscles and movements when you pedal your bike, not just smashing down in the say 1 to 4 o’clock positions. (I’m so guilty of that).

Now, whether you’re running clipless or flat pedals you can take advantage of spinning better circles. It’s more efficient, it’s easier on your body, it probably looks better (according to my riding buddies who give me a hard time). How does the concept work?

Even though there is clearly a position of the most power you can still “drive” the pedals throughout most of the pedal stroke whether you’re riding flats or clipless. On the bottom of the pedal stroke, like say 4 to 8 o’clock you “drag” your foot back. Think of it like a moonwalk move or scuffing your foot almost. On the top of the circle you’re pushing that “scuffing” until the pedal drops back into the optimum power position.

Does this add a ton to your speed? Nah. But it is more efficient (when I remember to do it) and it fires different muscles that in turn helps ease the load across the rest of your legs.

One of the things new riders imagine is that with clipless pedals you can “pull” up on the opposite of the power down stroke. And, sort of you can, but again, it’s not nearly as efficient as the down stroke but every bit does help.

Footwork Matters

Getting the right foot “down” at the right time makes  a big difference. Learn to corner with your outside foot down. It greatly improves your ability to weight the bike and “drive” it through the corner with your feet. It also improves your ground clearance as you lean the bike over.

Heels Down

Again, this is for either pedal type. Get your heels down when you’re descending. It improves how the bike is weighted and gives you much more control, particularly in steep chutes.

Downsides?

Let’s get these out of the way right off the bat and move on with the day right? Here are the most common fears for each type of pedal.

Clipless: “What if I don’t get out of them?”

Yup. It’ll happen, but, from my experience it is absolutely not in the situation you’d think. I’ve run full speed out of crashes and then thought about, man, I never even mentally made the choice to clip out. It becomes automatic really quickly.

When I found it “more” likely to happen frankly is tired, at the top of a climb, when I would think I clipped one foot out and lean over only to find that I had in fact, clipped the other foot out. Almost always happens when there’s people watching. It’s like Murphy’s law.

Flats: “What if they hit me in the shins?”

Ya. That happens too. The last real good one I had was at the top of a trail bouncing off like a 6″ tall by 2′ long “table” messing around while chatting with friends. I wasn’t paying real attention and just kinda tried to save a foot coming off and then yup, snakebite.

The few times I’ve had bigger get offs with flat pedals I’ve been well clear of the bike pretty fast.

So there are the typical worries. Let’s compare some other aspects.

Comparing Cliplesss & Flats

Where are the real differences in your day to day riding? Let’s take a look.

Efficiency(?)

I started out riding clipless and went to flats the last few years. Honestly I haven’t noticed any efficiency differences – but – I’ve never been renowned for my pedaling prowess.

I’d imagine that clipless pedals are slightly more efficient for the average rider. I haven’t really looked into the weight differences between flats and clipless plus cleats either. If you’re riding XC / Trail and long adventure days that weight will mean more than an hour and a half rip after work.

Technique

Clipless pedals tend to hide technique issues. You can cheat on your bunny hops, you can pull the bike up or yank it around side to side in the air a bit easier if you’re offline, etc.

Here’s the scoop on that though: probably no one is grading your technique at the end of the ride except you right? So if you’re more confident clipped in then go for it.

When I rode clipless I kept a pair of flats around for the occasional rip to work on technique. It’s interesting as I found that where I thought “flats will be great in the gnarly stuff” once I got bouncing around in it I realized “hmm, I miss being attached to the bike a bit more!”. The bottom of our local Car Wreck trail was my big eye opener on that.

Once I moved permanently to flats I found that I had to corner slightly different or my “upper” or inside foot tended to bounce off the pedals. Clipless had kept me hooked in for all those years and it was an eye opener that I had been just floating that foot essentially.

If you ride flats you’re going to need to concentrate more on keeping your feet “planted” on the bike consistently. Whether bunny hopping the obstacles, or ripping through the chatter.

Using your knees as “suspension” to absorb the bike up and drive it down is a great technique to practice whether you’re running flats or not.

Confidence

You know, your riding is really about you. What are you confident on? What causes you concern? Sounds over simplified, but really if you’re thinking about “extra” things when you really should be concentrating on other things that’s no good right?

I’m going to use a recent experience as an example, although not MTB related. I was on the freeway the not too long ago on my motorcycle. Now, I’ve got a lot of years and a ton of miles on motorcycles so admittedly it can seem a bit “autopilot” at times. It was a high speed day but with traffic – nothing too out of the ordinary heading up to the shop from San Diego. Anyhow, when the hills dropped away into Del Mar and I got a cross wind there was a repetitive thumping on the side of my head… Turns out I hadn’t fastened the helmet! Instantly that was all I could think about. I didn’t want to pull over in the construction area and get creamed by a car so I rode on a bit looking for an offramp. I’m big on helmet safety and this was really not a good feeling and I got hyper focused on it. To the point that when I got off the freeway to correct it I ended up pulling over onto a steep grade and nearly dumping the adventure bike on my legs! I had been so mis-focused that I made a mistake I probably never had made in 20+ years of riding moto… Point is, if you’re having to really put tremendous thought into something it will have other consequences.

Are you worried about that technical single track and whether you could get a foot out before you tumbled off the edge? Well, being aware of that is one thing. Hyper focusing on it to the point you are scared isn’t fun or effective.

If you’re confident or even cautiously confident or aware you’re much better off.

Clipless Pedals Explained

Clipless pedals use a cleat to engage with spring loaded “clamps”.

As you saw in the video most clipless pedals are engaged by stepping “in and down”. The forward tab of the cleat fits under the forward bar and then you step down with your heel. As you step down the rear of the cleat’s radius will put pressure on the spring loaded bar (shown as rear in the video, but could be either front or rear depending on design) opening the bars allowing the cleat to pass before the spring clamps the bars in place.

To exit clipless pedals you pivot your heel outboard. This rotates the cleat in the clamps allowing the cleat to disengage. The geometry of the design means that it generally takes less pressure to clip out than to clip in as the spring loaded bar doesn’t need to move the same amount.

It’s pretty simple and your muscle memory will pick up on it quickly.

Differences in Clipless Feel

The main difference in clipless pedals is the amount of “float” they have in the design.

Float can be two different motions: lateral or rotational.

Lateral float is how much extra area there is for the cleat to move inboard or outboard while staying engaged. For instance Time pedals tend to have more lateral float than Shimano pedals.

Rotational float is dependent on cleat design. Most pedals have a similar range of rotational float before the pedal disengages, although some manufacturers may offer cleats that have different shapes providing quicker or later disengagement.

Many pedals offer adjustable spring rates. This adjusts to rider preference for clip in pressure, hold while clipped in, and to a lesser extent the clip out pressure. When I rode Time pedals I like a mid pressure setup. If I ride HT clipless pedals I tended to tighten the spring more to provide a more confident clip out feel (seems sort of counterintuitive I know, but it works).

Shopping Clipless Pedals

As mentioned previously there is a feel difference between clipless pedals.

Riders looking for a very “set in” almost like a ski boot feel gravitate to the Shimano lineup.

Those who prefer a bit more movement in their pedals tend to shop the Time lineup. The lateral float is felt most during climbing if you are a rider who likes to wiggle around.

Shopping Flat Pedals

Flat pedals come in a variety of sizes and shapes.

Pedals generally are somewhat “sized” depending on your shoe size. If you’ve got big feet you should shop bigger pedals – makes sense right? (Luckily we list the platform dimensions to help riders compare our selection of platform pedals).

clipless or flats for mtb PNW Loam Pedal Dimensions

Thinner pedals will slightly improve ground clearance. Thicker pedals may tend to have better bearings for heavier riders.

Some riders prefer more mechanical concave to help sit “into” the pedal.

Hell, some riders love the look and color of a model and that’s enough! We only carry proper pedals so you don’t have to worry about falling in love with a garbage brand or model here at BikeCo.com

The Worst of Both Worlds

OK, this is a bit of a soapbox rant based mostly on my opinion. Grain of salt if you want – or agree with me and be right! (hahaha, just kidding)

What about pedals that have clips on one side and flats on the other? Well, they’re the worst of both worlds.

Reasons to commit to one or the other:

Clipless side – if you’re trying to clip in and only one side of the pedal has the assembly what are the mathematical odds that it’s facing the correct way? You might think 50% – but you’re wrong. Murphy’s law comes into play and its almost ALWAYS on the bottom and you have to flip the pedal around with your foot till you get it to step into it.

Flat pedal side – ever seen the road biker clippty clomping around the coffee shop and then WHAM!! slipped on the cleat? Ya. Cleats are metal. Metal on hard surfaces tends to be slippery as hell. Clipless shoes have a large area removed to accommodate mounting cleats and allowing them to move forward to back and side to side. So, your clipless shoe with a cleat in it essentially has a big void of traction right near the contact point of your shoe. That means your choices on the platform pedal side are total shit traction, or you can move way forward on the pedal to get to the shoe’s sole around your midfoot or further back. Which isn’t great for control.

Hopefully you’ve learned about the differences between clipless and flats for MTB – we invite you to shop both types of pedals as well as The Best in MTB here on BikeCo.com!

Return to Top of Page